# Overview

## What is MetaID

MetaID is a unified identity and data format protocol built on Bitcoin and its homogeneous blockchains. Based on the MetaID protocol, developers can build various Web3 applications on Bitcoin that enable data interconnectivity and ensure user data sovereignty.

### In simple terms, MetaID can be used to:

* Build all types of Web3 applications on Bitcoin, including social applications, games, e-commerce applications, etc.
* Issue various FT and NFT assets on Bitcoin that are closely integrated with data value.

## **MetaID Features**

* **Abstraction of discrete blockchain data**: MetaID abstracts discrete blockchain data into ordered tree-structured data, preparing for the construction of  Web3 applications on Bitcoin.
* **On-chain user and application data**: All user information and application data are stored on-chain, associated with addresses controlled by the user's private keys. This ensures that data ownership belongs entirely to the data producer and is independent of other parties.
* **Native NFT data**: Each piece of on-chain data in MetaID is naturally a non-fungible token (NFT) that users can freely transfer and trade, giving them complete control over their data.
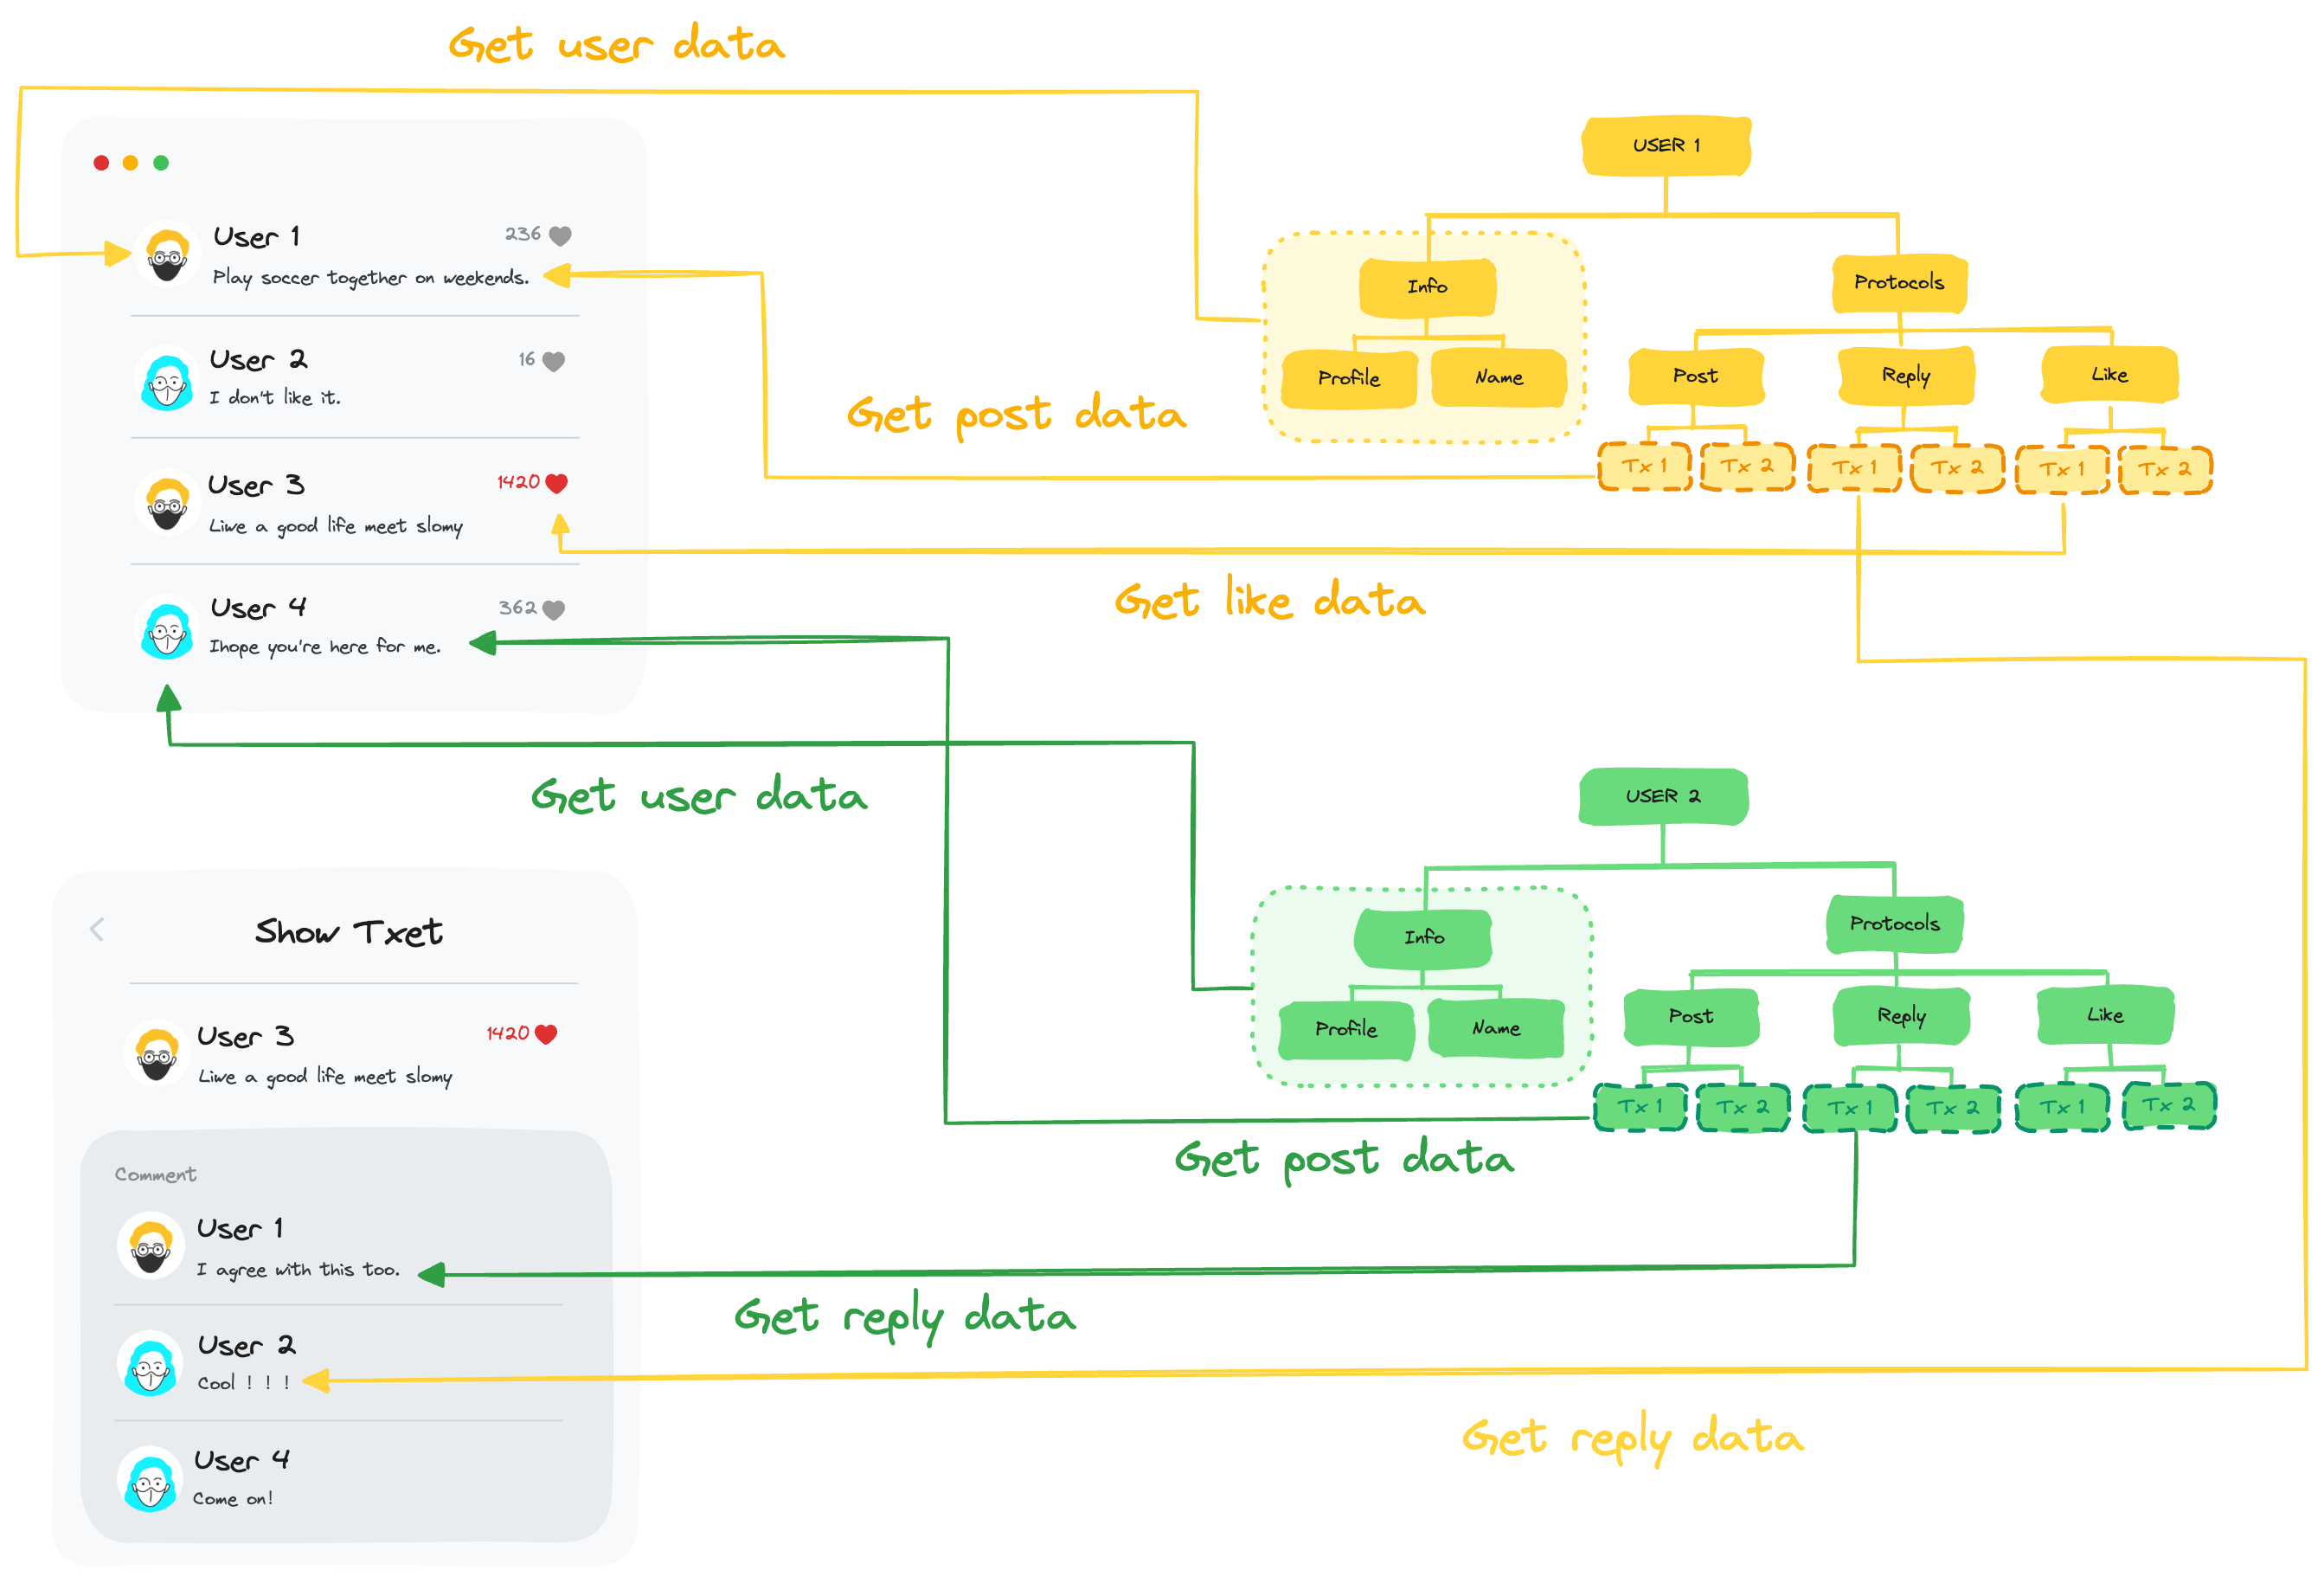
* **Cross-application data connectivity**: Data can be interconnected between different applications, eliminating data silos. Different protocol data can be combined under Users' MetaID, greatly reducing the workload for Web3 application development.

## **MetaID Vision**

* **Best cornerstone for Web3 applications**: Bitcoin is the best carrier for Web3 applications due to its high consensus, high concurrency, and support for on-chain data storage. MetaID aims to become the best DID and data unification protocol in the Bitcoin ecosystem.
* **New Web3 development paradigm**: MetaID will create a new Web3 development paradigm where data is interconnected, user-owned, and naturally combined with user assets. We believe that **Bitcoin = Money + Data**.

## **MetaID Basic Principles**

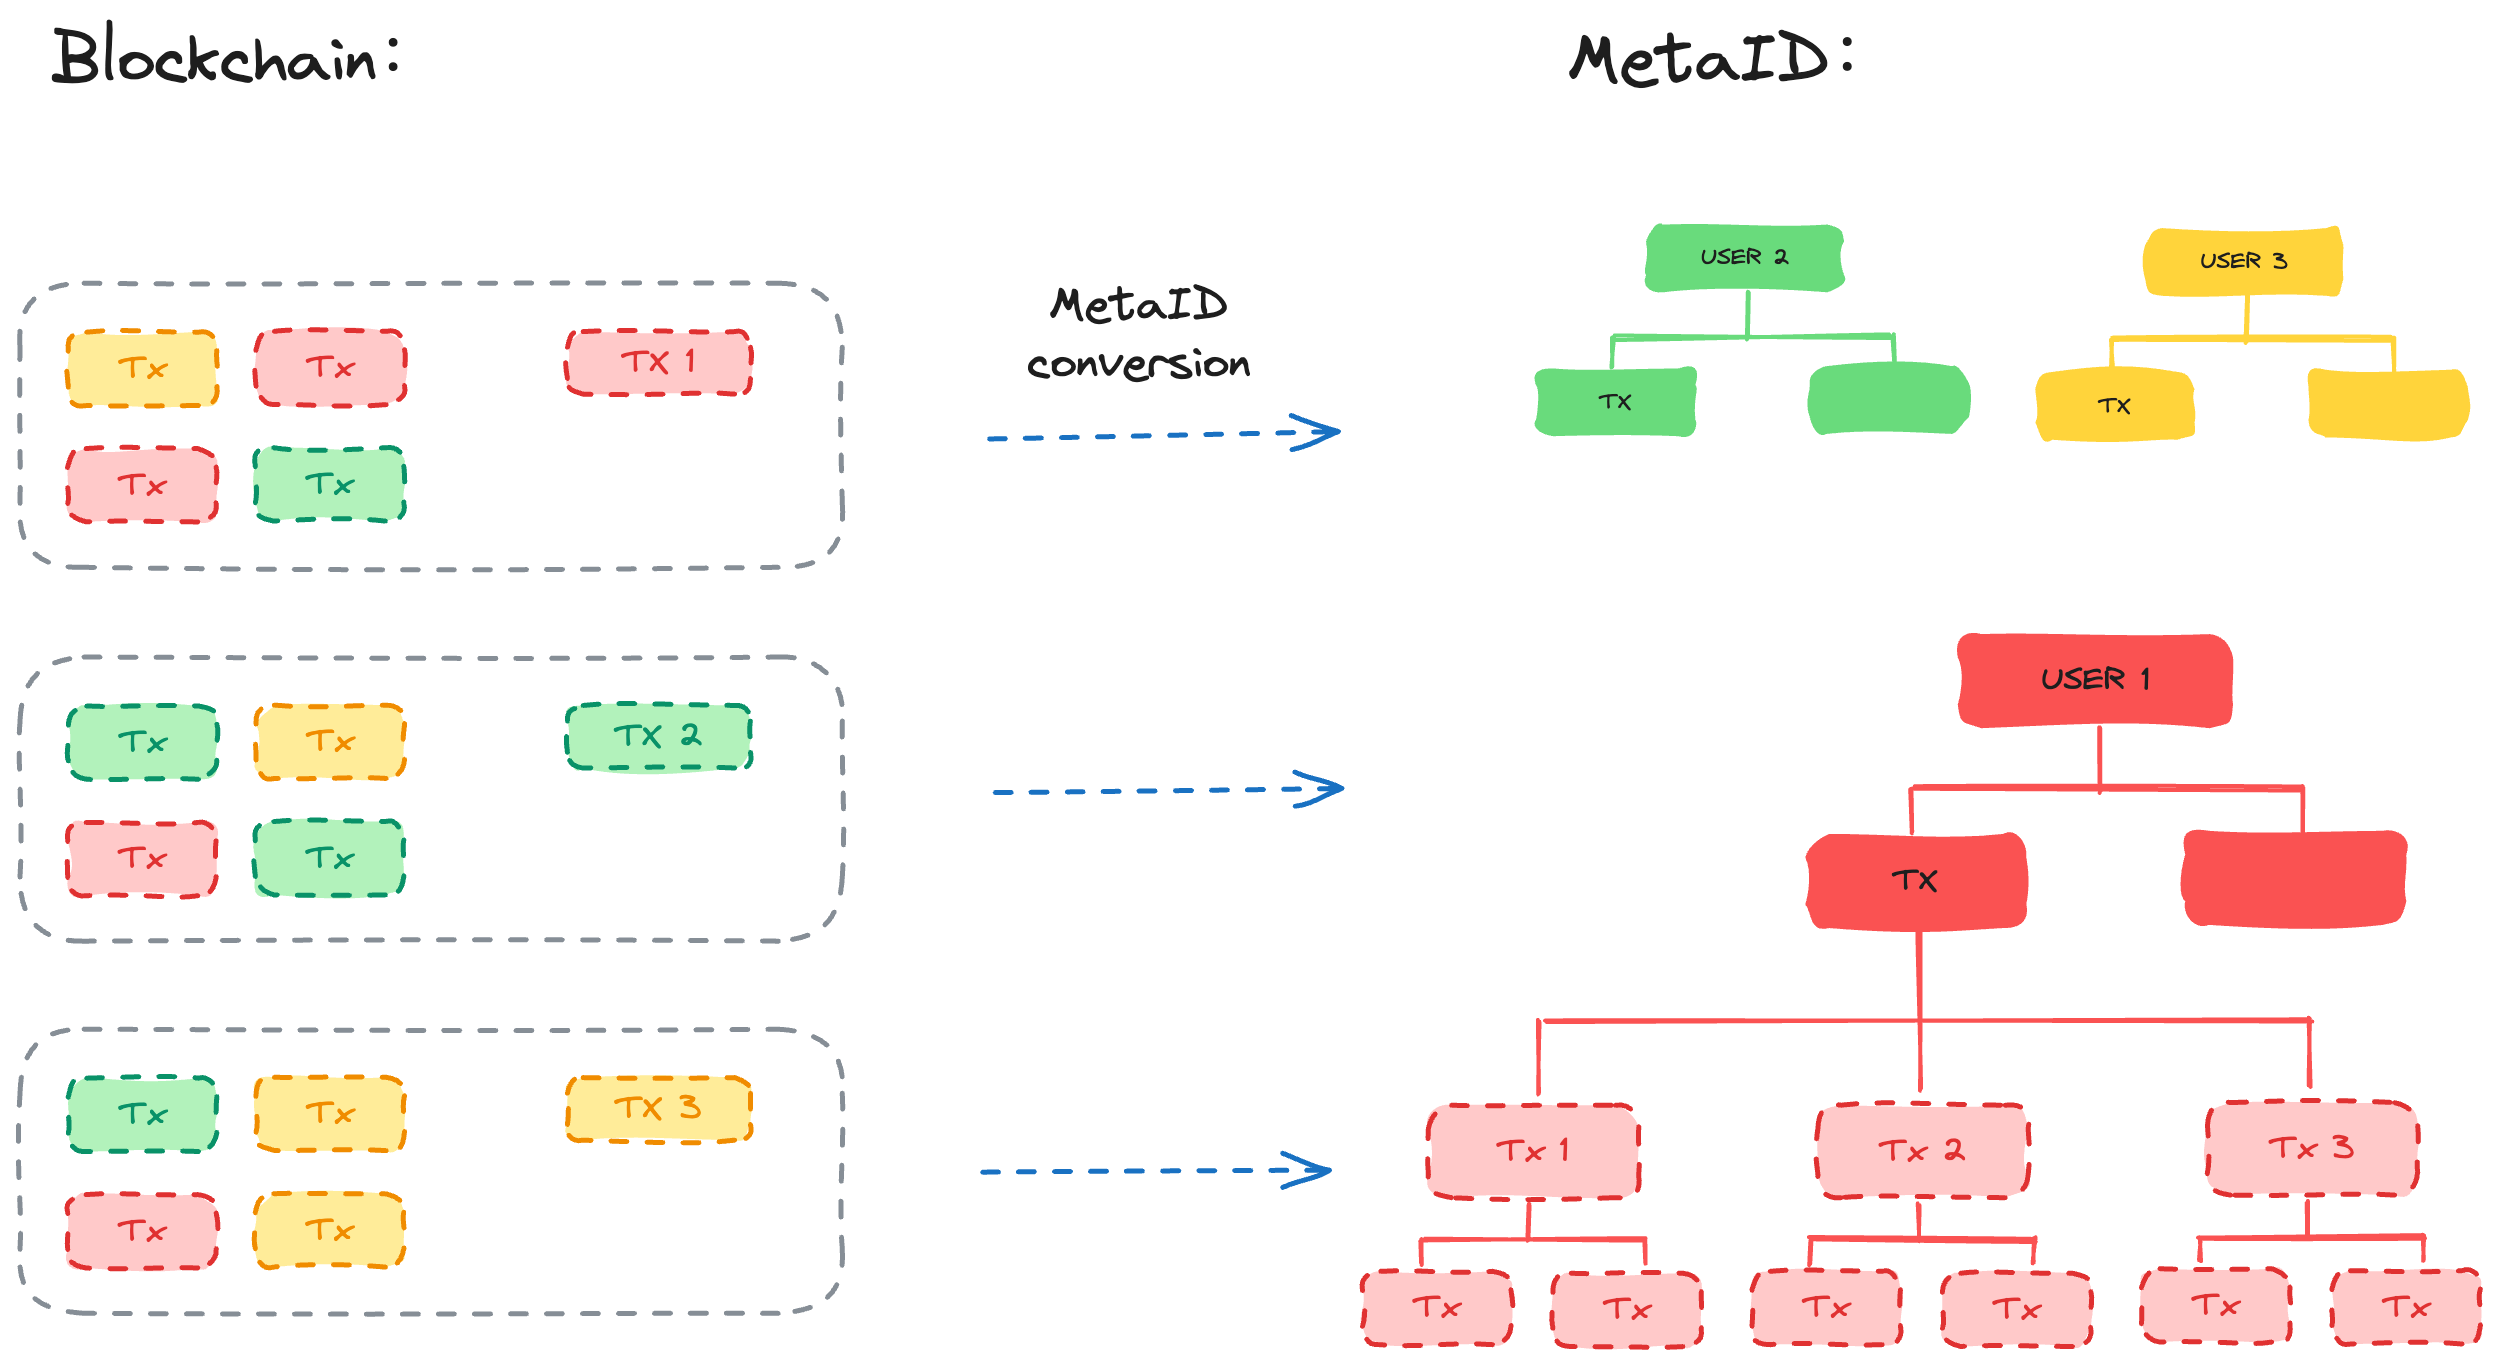
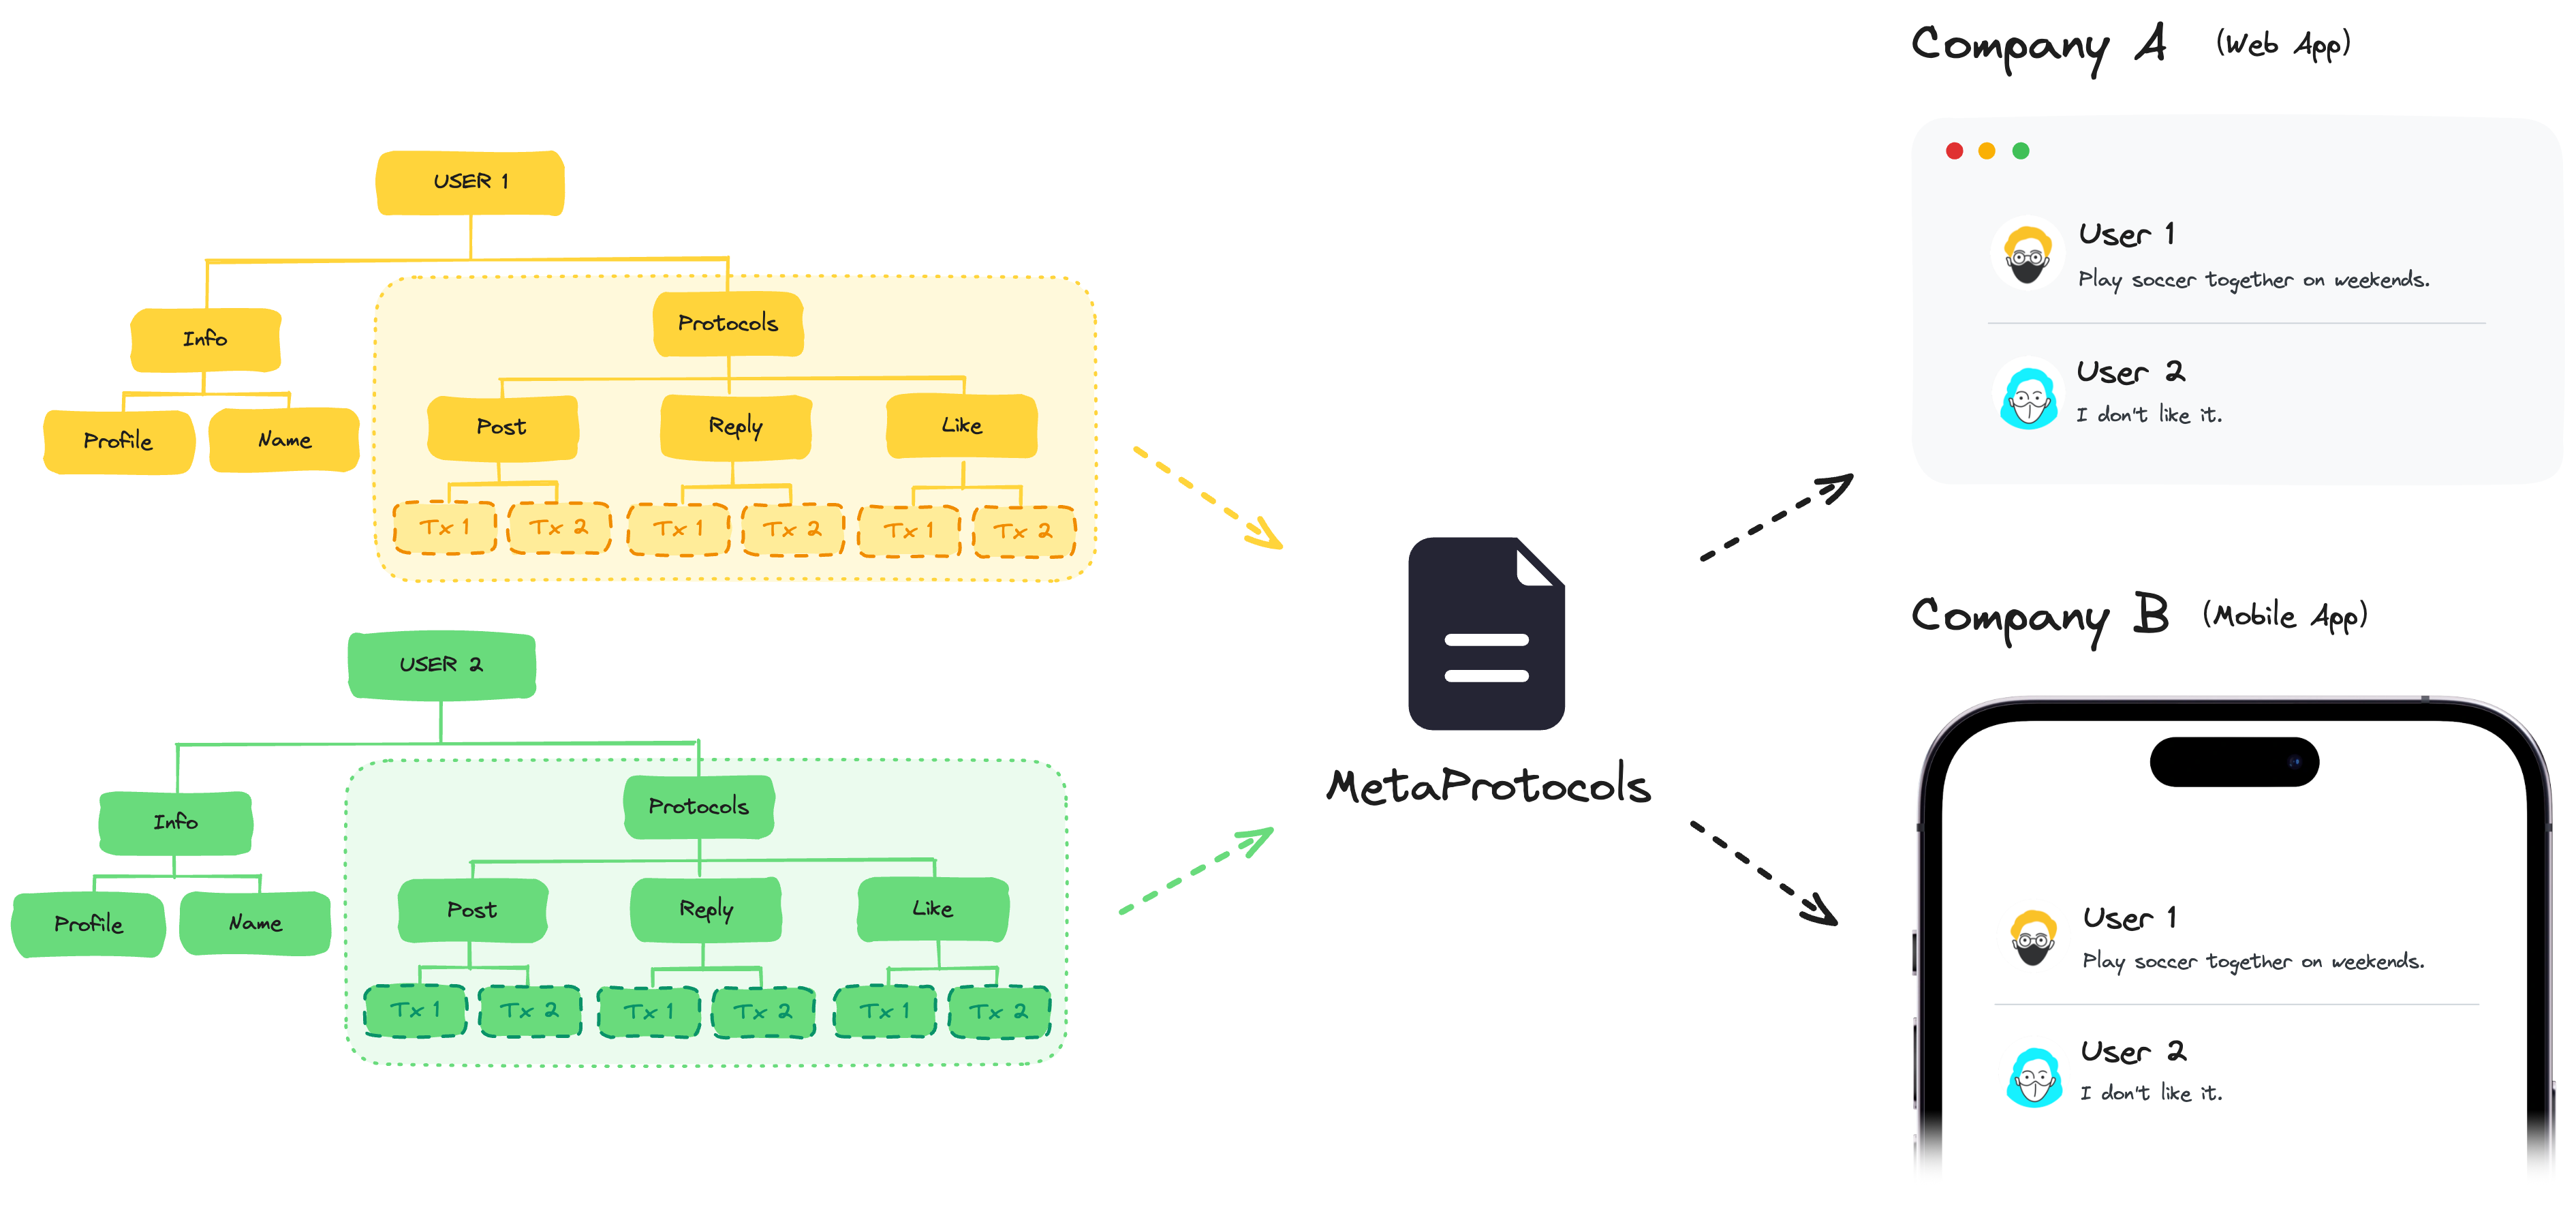
Through the MetaID protocol, transactions based on MetaID scattered across the blockchain are classified by "individual" and organized into a complete tree structure. From the perspective of the MetaID protocol, all on-chain data is abstracted and stored on-chain in the format of a "MetaID tree." As a result, on-chain data consists only of "MetaID trees," making the data independent of the chain and even the storage format. As long as the final implemented "MetaID tree" conforms to the MetaID format, it can achieve data ownership by users, orderly data storage, and data interconnectivity. Therefore, all forms of Web3 applications can be built on this foundation.

#### Classifying discrete blockchain data into ordered structured data by "individual"

<figure><img src="https://1852888944-files.gitbook.io/~/files/v0/b/gitbook-x-prod.appspot.com/o/spaces%2FQqzh03Cj3B0aOuGYLJKs%2Fuploads%2Fi2vd9ILrugA6d5qE5gMh%2FWechatIMG24.jpg?alt=media&amp;token=09f72f27-0c5b-4b1a-b673-4a6420af3ee1" alt=""><figcaption></figcaption></figure>

#### Reusing on-chain data through the protocols

<figure><img src="https://1852888944-files.gitbook.io/~/files/v0/b/gitbook-x-prod.appspot.com/o/spaces%2FQqzh03Cj3B0aOuGYLJKs%2Fuploads%2Fwz8u1KPYJ2wK55tfiArd%2FWechatIMG25.jpg?alt=media&amp;token=91a9a0fb-2cd7-47bb-b557-588b005e2a02" alt=""><figcaption></figcaption></figure>

#### Combining different protocols through MetaID in a single application

<figure><img src="https://1852888944-files.gitbook.io/~/files/v0/b/gitbook-x-prod.appspot.com/o/spaces%2FQqzh03Cj3B0aOuGYLJKs%2Fuploads%2FFuHieUsgcOaxVvy4WRP3%2FWechatIMG31.jpg?alt=media&amp;token=32423d07-348d-47dd-969e-8075ff6293a5" alt=""><figcaption></figcaption></figure>

## Latest MetaID Status

**May 2024:**\
The MetaID protocol has released its latest V2.0 version. With the efforts of the developer community, the first versions of essential infrastructure such as MAN, MetaID Browser, and MetaID SDK are now available. Additionally, the first MetaID application on BTC, named "bitbuzz" (<https://bitbuzz.io>), has been launched.


# Terms

In this documentation, we introduce some new terms:

### MetaID

MetaID is defined as the root index value of the user data tree. This value is globally unique. The MetaID protocol is essentially a set of conventions for generating this user data tree. In this document, MetaID sometimes refers to this index value, and sometimes the MetaID protocol and related methods are simply referred to as MetaID.

#### Generation Rules

The generation rule of MetaID is based on processing the user's Address through SHA256 hash, so the Address itself has a unique MetaID.

```
MetaID = SHA256(Address)
```

#### MetaID Tree

The tree-structured data generated according to MetaID rules is called a "MetaID Tree". The MetaID Tree is constructed through the path in the user's own PIN, forming an interconnected, DAG-structured data. See the "[MetaID Tree Introduction](/metaid-specification/metaid-tree/metaid-tree)" entry for details.

### PIN

PIN stands for Personal Information Node. Each node and leaf on the MetaID Tree is a PIN. In simple terms, every piece of MetaID data inscribed on the chain is called a PIN. See the "[About PIN"](/metaid-specification/about-pin) entry for details.

### PoP

PoP stands for Proof of PIN. It is related to randomness and the hashrate difficulty of the block where the PIN is located. PoP is used to reflect the value of the user's MetaID data and the user's "workload" in the MetaID world. See the "[About PoP](/metaid-specification/about-pop)" entry for details.

### MAN

MAN stands for MetaID App Node. It is the first backend indexer that follows the MetaID V2 protocol, aiming to create a distributed storage node based on MetaID and facilitate developers to develop decentralized MetaID applications without relying on third-party service providers. See the relevant documents in the "[MAN introduction](/metaid-app-node/introduction)" section for details.

<br>


# Protocol Spec

#### MetaID Protocol Specification

The MetaID protocol is structured as follows:

```jsx
<metaid_flag> 
<operation> 
<path> 
<encryption> 
<version>  
<content-type> 
<payload> 
```

The MetaID protocol consists of seven parts:

#### **\<metaid\_flag>**

A fixed value "metaid" used as the protocol identifier.

This is a required field.

#### **\<operation>**

Operation commands, supporting four types of commands:

* **`create`**: Creates content, creating a PIN at the specified path.
* **`modify`**: Modifies content, modifying the PIN at the specified path.
* **`revoke`**: Revokes content, declaring the PIN at the specified path as void.
* **`hide`**: Creates and hides a PIN. After using this command, no PINNumber will be assigned.

This is a required field.

#### **\<path>**

The path where the PIN is located. There are three modes for indicating the path:

* Starting with “/”, the path locates the PIN to be created, such as /protocols/simplebuzz.
* Starting with “#”, the path locates the PIN by PINNumber.
* Starting with “@”, the path locates the PIN by PINID.

This is a required field.

#### **\<encryption>**

The encryption method for the PIN content. 0 means no encryption; 1 means ECIES encryption; 2 means ECDH encryption.

This is an optional field. If not provided, it must use `OP_0` as a placeholder, with a default value of `0`.

#### **\<version>**

The version number of the PIN. Different version numbers may imply different formats for the payload content.

This is an optional field. If not provided, it must use `OP_0` as a placeholder, with a default value of `0`.

#### **\<content-type>**

Specifies the file format of the `payload`, including the encoding method of the `payload`.

All media types can be referenced from: <https://www.iana.org/assignments/media-types/media-types.xhtml>

This is an optional field. If not provided, it must use `OP_0` as a placeholder, with a default value of `application/json`.

#### **\<payload>**

The `payload` is arbitrary data content, with its format specified by \<content-type>. The MetaID protocol does not limit the length of the `payload`. It is only constrained by the size of a single transaction data on the blockchain where the PIN is located.

This is an optional field. If not provided, it must use `OP_0` as a placeholder.


# MetaID Tree


# MetaID Tree

#### Overview

User data and operations are stored on the blockchain in the form of PINs. The MetaID tree of each user can be constructed through the `path` in the PINs, forming an interconnected, directed acyclic data structure used for organizing and managing user data and operations on the blockchain.

<figure><img src="https://1852888944-files.gitbook.io/~/files/v0/b/gitbook-x-prod.appspot.com/o/spaces%2FQqzh03Cj3B0aOuGYLJKs%2Fuploads%2FVOs1KGkc5u2WDZPLJIbs%2Fimage.png?alt=media&amp;token=720aa6b8-bb23-4bfb-850d-89cd6e92e3b1" alt=""><figcaption></figcaption></figure>

#### Default Reserved Nodes in the MetaID Tree

The MetaID tree retains default paths for `info`, `protocols`, `file`, `nft`, `ft`, and `follow`.&#x20;

<figure><img src="https://1852888944-files.gitbook.io/~/files/v0/b/gitbook-x-prod.appspot.com/o/spaces%2FQqzh03Cj3B0aOuGYLJKs%2Fuploads%2F3yTxagSl6G5EUfJlJIZv%2Fimage.png?alt=media&amp;token=0c39e83c-e364-41b2-bcf7-391f17694503" alt=""><figcaption></figcaption></figure>

* `/info`: Path for storing user personal information.
* `/protocols`: Path for storing user application protocol information.
* `/file`: Path for storing user files.
* `/ft`: Path for storing user fungible token (FT) asset behaviors.
* `/nft`: Path for storing user non-fungible token (NFT) asset behaviors.
* `/follow`: Path for storing user follow behaviors.


# Info Node

### **Info Node Overview**

The Info node is specifically designed to store users' personal information. Through the Info node, users can securely store and manage their personal information on the blockchain.

### **Basic Information about the Info Node**

The protocol stipulates that the Info node must include the following five sub-nodes:

* **name**: User name, recommended not to be encrypted. The format is fixed as text/plain.
* **avatar**: User image, recommended not to be encrypted. The format is binary, with the payload part storing the image's binary stream.
* **bio**: User personal bio, recommended not to be encrypted. The format is fixed as text/plain.

### **Data Format**

The personal information of users is stored in the following format:

```c
OP_FALSE
OP_IF
   metaid                
   create                
   /info/name            
   0                    
   OP_0                
   text/plain           
   Alice                 // Example user name
OP_ENDIF
```

### **Info Node Path**

The path for the Info node uses **`/info`** as the base path and distinguishes different types of personal information through subsequent paths. For example, **`/info/name`** can be used to store the user's name, while **`/info/avatar`** can be used to store the user's avatar information. By storing personal information under different type paths, users can clearly organize and manage their personal profiles.

If the application needs to add user information, it can add child nodes after the **`/info`** node. For example, **`/info/email`** represents the user's email information.

<br>


# File Node

### **File Node Overview**

The File node is a PIN path specifically designed for storing files. Through the File node, users can securely store files on the blockchain in the form of PINs, achieving decentralized file storage and management.

### **Data Format**

The PIN content for storing files follows this format:

```go
OP_FALSE
OP_IF
	metaid            
	create             
	/file/file-name-1.jpg     
	0                  
	OP_0               
	image/jpg;binary   
	<file data>        // Payload - Binary content of the file
OP_ENDIF
```

Here, **`<file data>`** contains the binary content of the file, and **`content-type`** specifies the file's data type (for example, image/jpg;binary indicates a JPEG image file).

### **File Node Path**

The path for the File node uses **`/file`** as the base path and can further distinguish different files through file names or sub-paths. Through the File node path, users can easily locate and retrieve specific file PINs in the MetaID tree structure, thereby achieving effective organization and management of files.

### **File Referencing**

In MetaID, file referencing is a fundamental business operation with critical importance. This feature allows users to reference existing on-chain **`file`** data in application protocols, enhancing data connectivity and user experience. To achieve this, we define a special file referencing rule.

#### **File Referencing Format**

When referencing a **`file`** in a sub-protocol, such as in the **`payload`**, we use the following format:

```arduino
metafile://{pinid}
```

Here, `PINID` is the unique identifier of the file to be referenced. This format allows us to establish a reference link from the current protocol to a specific **`file`**.

<figure><img src="https://1852888944-files.gitbook.io/~/files/v0/b/gitbook-x-prod.appspot.com/o/spaces%2FQqzh03Cj3B0aOuGYLJKs%2Fuploads%2FAxTDYpf4WQMaVWCRHtP8%2Fimage.png?alt=media&amp;token=ce9c2ee8-71f7-454d-aee3-c61d55354347" alt=""><figcaption></figcaption></figure>

#### Example

For example, posting with an attached file:

```json
//Payload
{
	"content":"Hello bitcoin world!",
	"contentType":"text/plain",
	"createTime":1710741614716,
	"quoteTx":"",
	"attachment":[
		"metafile://{pinId}"
	]
}
```

The final on-chain content will be:

```json
OP_FALSE
OP_IF
	metaid                           // Protocol identifier
	create                          // Operation type
	/protocols/simplebuzz         // Path
	0                                // Encryption type (0 means no encryption)
	0                                // Version
	application/json;utf-8              // Content-type
	{"content":"Hello bitcoin world!","contentType":"text/plain","createTime":1710741614716,"quoteTx":"","attachment":["metafile://{pinId}"]}       // Payload
OP_ENDIF
```

<br>


# FT Node

The FT node is used to store transaction information related to various asset protocols, including deployment, minting, and other PIN information.


# NFT Node

The NFT node is used to store transaction information related to various NFT protocols


# Protocols Node

The Protocols node records the transactions of users using various third-party protocols. The sub-paths under the Protocols node represent the paths of third-party protocols, named after the protocols. Under these protocol paths are the specific transactions generated by users using those protocols. The structure is as follows:

<figure><img src="https://1852888944-files.gitbook.io/~/files/v0/b/gitbook-x-prod.appspot.com/o/spaces%2FQqzh03Cj3B0aOuGYLJKs%2Fuploads%2FV0R4iujUcNAvqZIhYkIn%2Fimage.png?alt=media&amp;token=1788b4e9-9f5f-41da-b7e1-fab63c8bff50" alt=""><figcaption></figcaption></figure>

Since the protocols for Protocols are open, all application developers can construct their own protocols. The structure under each protocol is determined by the protocol creators or application developers but must ensure the uniqueness of the protocol node identifier.

#### **Protocol Naming Conventions**

When constructing a new protocol node, the sub-path after `/protocols` is the protocol name, `/protocols/{sub-protocol}`. There are no restrictions on protocol names, and application developers can create protocol names that are easy to read and understand according to their needs. Protocol names can be duplicated, and application developers can use their format to obtain the corresponding content.

#### **Structure and Conventions of Protocols**

The structure of each protocol is determined by the protocol creators or application developers. Each protocol can have a flat single-layer structure or a complex multi-layer structure. If the business allows, the structure and detailed description of the protocol should be made public by the protocol creators to facilitate calls and parsing by other application developers or data service providers.

It should be noted that although the structure of these nodes is decided by the protocol creators or application developers, the creation of the related nodes is done by the users and controlled by the users, who only record protocol data related to themselves.

#### **Protocol Transaction Nodes**

Each PIN under a sub-protocol represents a specific transaction generated by users using that protocol, referred to as protocol transaction nodes.

* `payload`: Storage for protocol data. The protocol data is parsed by the application developers according to the agreed protocol.
* `content-type`: Data type and encoding method. The application developers need to read the `payload` data according to the `content-type`.

The sub-path name of the protocol transaction nodes must be unique at the same hierarchical level in the domain tree to facilitate future URI-based searches. For example, the public key can be used as the sub-path name, or it can be set independently, provided it ensures a mapping relationship with the public key.

Assuming a MetaID transaction belongs to the SampleBuzz protocol, with the data format in JSON and the data content as follows:

```json
{"content": "This is a test","title": "Test-Title"}
```

The construction of this MetaID transaction can be referenced as follows:

```c
OP_FALSE
OP_IF
	metaid                         
	create                         
	/protocols/simplebuzz        
	0                              
	0                               
	application/json;utf-8         
	{"content":"This is a test","title":"Test-Title"} 
OP_ENDIF
```

or

```c
OP_0
OP_RETURN
	metaid                          
	create                        
	/protocols/simplebuzz       
	0                               
	0                            
	application/json;utf-8        
	{"content":"This is a test","title":"Test-Title"} 
```

It should be noted that the `version` value in the protocol transaction node represents the protocol version it follows. Different version numbers may indicate different `payload` contents. During data parsing, different `version` values require different parsing methods. The generated MetaID tree structure for the above example is as follows:

<figure><img src="https://1852888944-files.gitbook.io/~/files/v0/b/gitbook-x-prod.appspot.com/o/spaces%2FQqzh03Cj3B0aOuGYLJKs%2Fuploads%2Ff9eIWgEjc4yYcU0Naj0i%2Fimage.png?alt=media&amp;token=d55e99e9-dc5c-4402-9b23-c19580174246" alt=""><figcaption></figcaption></figure>


# Follow Node

### Introduction

The **`follow`** node is an integral part of the MetaID specification, allowing users to create and maintain their social relationships within the blockchain network. By utilizing **`follow`**, we can significantly enhance the social capabilities of MetaID, providing users with a richer and more in-depth interaction experience.

<figure><img src="https://1852888944-files.gitbook.io/~/files/v0/b/gitbook-x-prod.appspot.com/o/spaces%2FQqzh03Cj3B0aOuGYLJKs%2Fuploads%2FT5TLZmq09QumO5ieXFt9%2Fimage.png?alt=media&amp;token=d20981c2-14ea-4c90-9675-bcd452551b61" alt=""><figcaption></figcaption></figure>

### Spec

The script format for the **`follow`** protocol is as follows:

```jsx
OP_FALSE
OP_IF
	metaid                           
	create                          
	/follow                         
	0                               
	0                                
	application/json;utf-8         
	{metaid}                        
OP_ENDIF
```

#### Conventions for **`follow`**

1. In the **`follow`** format, **`create`** represents a follow action, while **`revoke`** represents an unfollow action.
2. In the **`revoke`** operation, the **`path`** must locate a valid `PIN`, and this `PIN` must be a valid **`follow`** `PIN`.

### Example

Taking user A following user B as an example:

* User A's MetaID: **`c08c4e96514ee5c4f91b6df3de7a42f797a36af7265918a6b74d5198f87682ad`**
* User B's MetaID: **`2464ad8d35e601f8b73c80976104ff00e878f58dc2f2936ec3a269fe34d962c2`**

The script operation for user A to follow user B is as follows:

```jsx
OP_FALSE
OP_IF
	metaid                         
	create                         
	/follow                        
	0                              
	0                              
	application/json;utf-8         
	2464ad8d35e601f8b73c80976104ff00e878f58dc2f2936ec3a269fe34d962c2 
OP_ENDIF
```

After the **`follow`** `PIN` is committed to the blockchain, the generated **`pinId`** is: **`dcvv5d4377f36c7c2466259593d0d4a0c1e5d7ec19500e082ce1eea3993f22b1aac1i0`**

Then, the script operation for user A to unfollow user B is as follows:

```jsx
OP_FALSE
OP_IF
	metaid                         
	revoke                         
	@dcvv5d4377f36c7c2466259593d0d4a0c1e5d7ec19500e082ce1eea3993f22b1aac1
	OP_0                           
	OP_0                           
	OP_0                           
	OP_0                            
OP_ENDIF
```

Both follow and unfollow operations take effect immediately and generate corresponding records on the blockchain.


# MetaID Envelope

### Envelope

The MetaID content is entirely on-chain, and the MetaID envelope format currently supports two schemes:

#### 1. Taproot-Script:

By utilizing the Taproot-Script "commit/reveal" scheme, the MetaID envelope is placed in the Taproot script of the input, containing various operations that can be legally executed on MetaID. The convention is to use `OP_FALSE OP_IF ... OP_ENDIF` to place any non-executable content in the Taproot spending script. The byte " `metaid` " (`6D6574616964` in hexadecimal) is used to identify the envelope as a MetaID protocol.

Taproot-Script Envelope format:

```jsx
OP_FALSE
OP_IF
	<metaid_flag>
	<operation>
	<path>
	<encryption>
	<version>
	<content-type>
	<payload>
OP_ENDIF
```

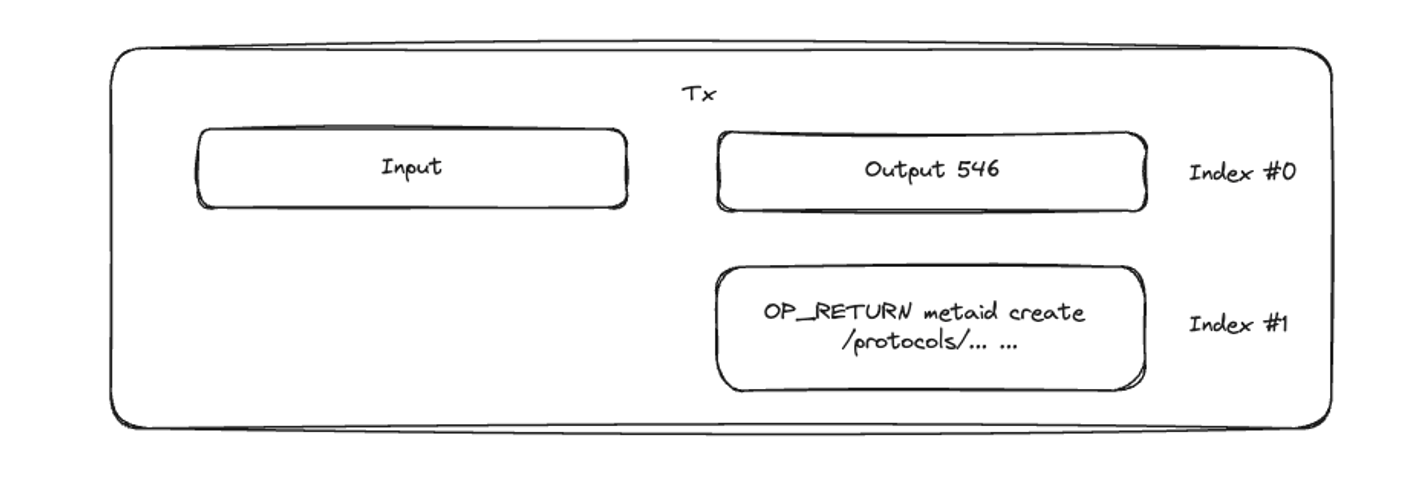
#### 2. Locking-Script:

By utilizing the OpReturn opcode, data is placed after it. The MetaID envelope is placed in the Locking-Script of the transaction output, containing various operations that can be legally executed on MetaID. The convention is to use `OP_RETURN` to place any non-executable content in the locking output script. The byte " `metaid` " (`6D6574616964` in hexadecimal) is used to indicate that the envelope belongs to the MetaID protocol.

Locking-Script Envelope format:

```jsx
OP_0
OP_RETURN
	<metaid_flag> 
	<operation>
	<path>
	<encryption>
	<version>
	<content-type>
	<payload>
```

The envelope must appear after `OP_RETURN` in the output script and at index 1 of the output. The first satoshi of the UTXO at index 0 is used to carry the envelope content.

<figure><img src="https://1852888944-files.gitbook.io/~/files/v0/b/gitbook-x-prod.appspot.com/o/spaces%2FQqzh03Cj3B0aOuGYLJKs%2Fuploads%2FkprdpfDzZ8RVvKeLkQvi%2Fimage.png?alt=media&amp;token=7d69c385-89be-433a-97a7-c7f3cd552a6e" alt=""><figcaption></figcaption></figure>

**Note: If both Taproot-Script and Data-script envelopes exist in the same transaction, the Taproot-Script format takes precedence.**


# Privacy Model

The privacy model of the MetaID protocol is designed by the application developers. If application developers do not want their users' data to be public, the following methods are recommended:

### On-chain Data Encryption

* **Set the node's `encryption` to `1`**: Use ECIES encryption. This ensures that only the user can view the data. For detailed information on ECIES encryption and decryption, please refer to the [Integrated Encryption Scheme](https://en.wikipedia.org/wiki/Integrated_Encryption_Scheme).
* **Set the node's `encryption` to `2`**: Use the ECDH key agreement method. This ensures that only the user and the application can view the data. Users can also authorize or delegate the application to grant access to third parties. For detailed information on ECDH encryption and decryption, please refer to [Elliptic-curve Diffie–Hellman](https://en.wikipedia.org/wiki/Elliptic-curve_Diffie%E2%80%93Hellman).

### Link Mode

The data structure relationship of the MetaID tree is transparent. Some users do not want their MetaID tree data structure relationship information to be exposed. In this scenario, the link mode can be used. By setting the **`operation`** to **`link`**, the node is set as a link node, pointing to another dataset, which can be another MetaID or another anonymous dataset. This way, users can selectively use anonymous nodes and MetaID protocol nodes.

### Hide Mode

It is also worth mentioning that when the **`operation`** in the PIN transaction is **`hide`**, it is also a way of privacy model. At this time, the PIN will declare not to be indexed and referenced by applications, which can be used in scenarios where local applications are used and do not want to be referenced by indexers and third-party applications.


# About PIN

PIN stands for Personal Information Node. Each piece of on-chain data that conforms to the MetaID format is called a PIN. These are issued by users through private key signatures, representing individual on-chain actions. Actions such as creating a MetaID, posting comments, liking, deploying, and minting assets are all represented by a PIN.

PINs use ordinal theory, with the PIN content loaded in the transaction output, typically at the first satoshi of its output. When a PIN is created, the first satoshi of the transaction output represents the PIN.

#### **PIN Owners and Creators**

Each **`PIN`** has two main attributes: owner and creator.

* **Creator**: The creator is the original address that generated the **`PIN`**. This attribute is determined by the transaction that creates the **`PIN`** and, once set, cannot be changed regardless of subsequent transactions.
* **Owner**: The owner is the current user address that holds the satoshi representing the **`PIN`**. This attribute can be changed by transferring the satoshi.

For example, if user address A creates a **`PIN`**, and the satoshi representing this

**`PIN`** is currently held by user address B, then A is the creator and B is the owner.

#### **PINID**

A **`PINID`** is composed of its transaction ID (**`TxId`**) and the output position (**`output index`**) within the transaction. The format is as follows:

```css
PINID = {TxId}i{index}
```

The **`PINID`** is a globally unique identifier, marking a specific position within a specific transaction on the blockchain.

#### **PIN Number**

The **`PIN Number`** is a sequence number assigned to a **`PIN`**. It is ordered based on the sequence in which the **`PIN`** is packaged in the blockchain, following the first-seen principle.

#### Transfer

The PINs in MetaID exist in the form of satoshis, allowing the tracking and transfer of individual satoshis. The transfer follows a first-in-first-out method from the transaction input to the transaction output, depending on the order of transaction inputs and outputs.

As shown in the diagram, if the PIN is in position #1001 in all transaction inputs, it remains in position #1001 in all transaction outputs after the transfer.

<figure><img src="https://1852888944-files.gitbook.io/~/files/v0/b/gitbook-x-prod.appspot.com/o/spaces%2FQqzh03Cj3B0aOuGYLJKs%2Fuploads%2FuZFuKdtUILmV42elrsHD%2Fimage.png?alt=media&amp;token=cf17f05f-e8ce-49c1-860e-75353fcc5155" alt=""><figcaption></figcaption></figure>


# About PoP

### Overview

Proof of PIN (PoP) is an interesting concept in MetaID. We have developed the PoP mechanism with reference to the mining principle of Bitcoin. The PoP value reflects the user's "proof of work" in the MetaID world. In the MetaID world, the minimum "work" of a user is to send a PIN, so each PIN has a hash value that combines the user's PIN with the difficulty of the block it is in. The PoP value reflects the following two dimensions:

1. Overview of the amount of MetaID data created by the user: The more MetaID PINs created, the higher the probability of obtaining a high-difficulty PoP value.
2. Hashrate consumption of the user's MetaID data creation: The PoP value is linked to the hashrate of the blockchain where the MetaID data is located. The higher the hashrate, the easier it is to obtain a high-difficulty PoP value.

PIN is similar to SHA256 hashrate, while PoP is similar to difficulty hash. The higher the hashrate, the greater the probability of obtaining a high-difficulty hash value.

By verifying the user's related PoP value, we can quickly evaluate a user's contribution in the MetaID world and give the concept of level and rarity to PINs.

### Calculation Method

PoP is calculated by performing a SHA256 joint hash on the **`MerkleRoot`** and **`PINID`**, and then multiplying it by the **`BlockHash`** to generate a new value. The specific formula is:

```scss
PoP = hash(PIN_ID + Merkle_Root) * Block_Hash
```

The resulting original hash value is then converted to octal, and the converted result is the PoP.

Here is the code:

```go
package pop

import (
	"crypto/sha256"
	"encoding/hex"
	"fmt"
	"math/big"
	"strconv"
)

func CalculateHash(pinid string, merkleRoot string) string {
	h := sha256.New()
	h.Write([]byte(pinid + merkleRoot))
	return hex.EncodeToString(h.Sum(nil))
}

func CalculateProductToHexStr(blockhash string, pinHash string) string {
	blockhashByte, _ := hex.DecodeString(blockhash)
	blockhashInt, _ := new(big.Int).SetString(blockhash, 16)
	pinHashByte, _ := hex.DecodeString(pinHash)
	pinHashInt, _ := new(big.Int).SetString(pinHash, 16)
	popByte := new(big.Int).Mul(blockhashInt, pinHashInt).Bytes()
	// Calculate total length: 32+32=64
	totalLen := len(blockhashByte) + len(pinHashByte)
	// Number of leading zeros needed
	remainingLen := totalLen - len(popByte)
	for i := 0; i < remainingLen; i++ {
		popByte = append([]byte{0}, popByte...)
	}
	return hex.EncodeToString(popByte)
}

func ConvertToOctalHex(productHex string) (string, int64) {
	productByte, _ := hex.DecodeString(productHex)
	
	// Convert to binary
	bList := make([]string, 0)
	for _, b := range productByte {
		binaryB := fmt.Sprintf("%b", b)
		bList = append(bList, fmt.Sprintf("%08s", binaryB))
	}
	productBinaryStr := ""
	for _, b := range bList {
		productBinaryStr += b
	}
	productBinaryStr = productBinaryStr[:510]

	bCount := int64(0)
	for _, b := range productBinaryStr {
		if b == '0' {
			bCount++
		} else {
			break
		}
	}

	// Convert binary string to octal string
	octal := ""
	for i := 0; i < len(productBinaryStr); i += 3 {
		binaryStr := productBinaryStr[i : i+3]
		num, err := strconv.ParseInt(binaryStr, 2, 64)
		if err != nil {
			fmt.Println("ParseInt error:", err)
			return "", 0
		}
		octal += strconv.FormatInt(num, 8)
	}
	return octal, bCount
}

func GenPop(pinid, merkleRoot, blockHash string) (string, int64) {
	// Calculate pinHash
	pinHash := CalculateHash(pinid, merkleRoot)
	// Multiply blockhash by pinHash
	productHexStr := CalculateProductToHexStr(blockHash, pinHash)
	// Convert to octal
	octal, bCount := ConvertToOctalHex(productHexStr)
	
	return octal, bCount
}
```

PoP calculation test case:

```go
func Test_pop(t *testing.T) {
	pinid := "77aac2ae323748dee3b8b1ae6b7c33c1c4466f568c572ea488f584f041f0de4ei0"    // 64 char hash
	merkleRoot := "e56011a241cb196fc4efbeafef051ca901761ffb569a43146582f9133bfd41d2" // 64 char hash
	blockhash := "000000000000000004c2db0441a47fd3574992d508b8d9d866a789d371aa5060"  // real block hash
	pop, bCountZero := GenPop(mockPinId, merkleRoot, blockHash)

	fmt.Println("POP:", pop)
	fmt.Println("POP-0:", bCountZero)
}
```

### **PoP Level (Difficulty Classification)**

In the MetaID system, the difficulty level of a PoP value is defined similarly to the prefix-zero count in block hash calculations. Specifically, the greater the number of leading "0"s in the prefix of a PoP value, the higher its corresponding difficulty level (PoP Level). The system mandates that any valid PoP value must contain at least 21 leading "0"s as a baseline standard.

To efficiently evaluate and quantify the rarity and difficulty of a PoP, MetaID introduces the concept of the PoP Level. PoP Level is an integer metric, currently ranging from Level 1 to Level 13, and is primarily used for quick rarity assessment of PINs, asset minting in MRC20 scenarios, and similar applications. The initial threshold for PoP Level varies across different mainchain environments; for instance, MVC commonly adopts Level 1 as the entry standard, whereas BTC typically begins at Level 6.

The specific difficulty demarcation is as follows: for PoP Level 1, a PoP value must have 22 leading "0"s; for PoP Level 2, 23 leading "0"s are required; and for each subsequent level, the number of mandatory leading "0"s increases by one. The greater the number of prefix "0"s, the rarer the PoP value and the higher the algorithmic challenge involved in its generation.

Moreover, the difficulty between adjacent PoP Levels follows an exponential progression; each incremental level results in an eightfold (8x) increase in mining difficulty compared to the previous level. This mechanism significantly enhances both the security and scarcity of higher-level PoP values.

### PoP Score (PoP分数)

#### **Definition and Application Scenarios of PoP Score**

PoP Score is a numerical metric designed for a more granular assessment of PIN rarity compared to PoP Level. It is particularly useful in scenarios requiring fine-grained differentiation of PoP difficulty, such as PEV values in the MetaSo system or MDV values, enabling precise scoring and ranking of each PIN. Every PIN is assigned a unique PoP Score, which is recorded within the MetaID system.

#### **Calculation Methodology of PoP Score**

**a. Determining the Integer Part (PoP Level)**

Take the PoP value associated with a certain PIN as an example:

```
0000000000000000000000215206653161113226643512614250403542335511435340330664252463510373257440244542222437344512355773452022004517474440724217350505346711227665150775715
```

First, count the number of consecutive leading "0"s in the prefix. Suppose there are 22 "0"s, then the corresponding PoP Level is 1, which becomes the integer part.

**b. Calculating the PoP Sub Octal**

Remove all the leading "0"s from the prefix, then take the first four non-zero digits as the fractional part after the decimal point. For example, in the sequence above, these four digits are "2152". Record this as the PoP Sub Octal, so PoPSubOctal = 0.2152.

Note: **The PoP Sub Octal is a special octal (base-8) fraction.**

**c. Octal Fraction Normalization**

To ensure even value distribution, the octal fraction PoPSubOctal is converted to a uniformly distributed decimal in the range \[0,1]. This uses the "Octal Fraction To Uniform Decimal" conversion method.

**d. Calculating the PoP Sub Decimal**

The final normalized decimal is denoted as PoP Sub Decimal, with the following correction applied:

```
PoP Sub Decimal = 1 - octalFractionToUniformDecimal(PoPSubOctal)
```

**This ensures that the closer the decimal value is to 0, the higher the resulting PoP Level Decimal, aligning with the intended difficulty design.**

**e. Calculating the PoP Level Decimal**

Add the integer level and the sub-decimal component:

```
PoP Level Decimal = PoP Level + PoP Sub Decimal
```

For this example, PoP Level Decimal is approximately 1.72.

**f. Calculating PoP Score**

Take the base 8 to the power of PoP Level Decimal to determine the final PoP Score:

```
PoP Score = 8 ^ PoP Level Decimal
```

For example, 8 to the power of 1.72 yields approximately 35.7531 (rounded to four decimal places).

#### **Calculation Summary**

For the given example:

```
0000000000000000000000215206653161113226643512614250403542335511435340330664252463510373257440244542222437344512355773452022004517474440724217350505346711227665150775715
```

* **PoP Level:** Lv.1
* **PoP Score:** 35.7531


# Host

## \<path>

The path where the PIN is located. There are three modes to represent `path` as follows:

* Starts with "/": Locates the PIN to be created through the path, e.g., `/protocols/simplebuzz`.
* Starts with "#": Locates the PIN through the PINNumber.
* Starts with "@": Locates the PIN through the PINID.

This is a required option.

## host

```json
**<**path> {host}:{path}
```

In `<path>`, `host` can be an address or a MetaName, for example:

Address: `1PKZnf7DxP69TFTHyzPc5KBidph6yuPKyG`,

```json
1PKZnf7DxP69TFTHyzPc5KBidph6yuPKyG:/protocols/simplebuzz
```

When `host` is included in `<path>`, it declares the source of the data, understood as the host header. This is optional.

If `host` is a MetaName, it must not exceed 32 characters, e.g., MetaName: `alice.metaid`

```json
alice.metaid:/protocols/simplebuzz
```


# MetaAccess

### **Introduction**

MetaAccess provides a decentralized authorization mechanism to grant access to encrypted on-chain data based on specific rules.

### Spec

Two protocols are required: AccessControl and AccessPass.

* AccessControl is responsible for setting permissions and control rules. It is published on-chain along with the encrypted content.
* AccessPass facilitates payment and authorization transactions, enabling access to decrypted content.

#### AccessControl

**Path:** `/metaaccess/accesscontrol`

```json
{
    "publicContent": "public part of content", // Public portion of the content
    "publicPins": ["PINID-1", "PINID-2"], // Public files
    "publicPath": "/protocols/simplepublicbuzz",
    "controlPins": ["PINID1", "PINID2"], // Array of PINs that require access control
    "controlPath": "/protocols/simpleasseccbuzz", // Path controlling access to the specified PINs
    "manDomain": "", // To be defined
    "manPubkey": "THE-PUBKEY-OF-MAN", // Public key of the MAN node providing decryption services
    "creatorPubkey": "THE-PUBKEY-OF-CREATOR", // Creator's public key
    "encryptedKey": "Use the ECDH Key to Decrypt it and use that decrypted key to decrypt the content",
    "holdCheck": { // Hold check
        "type": "mrc20", // "chainCoin" or "mrc20"
        "ticker": "mc", // Ticker for mrc20; ignored if type is "chainCoin"
        "amount": "1000"
    },
    "payCheck": { // Pay check
        "type": "chainCoin", // "chainCoin" or "mrc20"
        "ticker": "",
        "amount": "0.00001",
        "payTo": "address",
        "validPeriod": "4320" // Blocks; 4320 represents 1 month
    }
}
```

#### AccessPass

**Path:** `/metaaccess/accesspass`

```json
{
    "accessControlID": "the-pinid-of-accesscontrol-file"
}
```

### Workflow

**Creator:**

1. The application requests MAN to generate a public key. MAN generates and stores a key pair, returning the public key (man-publicKey).
2. The application requests the wallet to perform an ECDH operation using the wallet path and man-publicKey to derive a shared secret (SP).
3. The application generates a random AES key (P1).
4. The application edits the text or image, selects the public and paid sections, and sets the payment mode.
5. Using key P1, the application encrypts the paid content via AES, producing `txRaw`.
6. Using the shared secret SP, the application encrypts key P1 to generate `encrypted-key` and constructs the `accesscontrol` PIN.
7. Both the content PIN and `accesscontrol` PIN are broadcast on-chain.

**Buyer:**

1. The application constructs an `accesspass` with an output containing the payment required by the `accesscontrol`.
2. MAN provides an interface to retrieve encrypted content, requiring a wallet-signed header. MAN verifies the signature and retrieves the signed address from the `accesspass`.
3. MAN queries the `accesscontrol` file corresponding to the `accessControlID` and derives the shared secret (SP) using its private key and the creator's public key.
4. MAN validates the `accesspass` against the `accesscontrol` rules. If valid, it proceeds; otherwise, it returns nothing.
5. MAN decrypts the `encrypted-key` using SP to obtain key P1.
6. MAN uses key P1 to decrypt the corresponding `controlPins` and returns the decrypted content.

### ECDH Configuration

To ensure proper collaboration between client and server during key exchange, both parties must standardize the following parameters in the **ECDH (Elliptic Curve Diffie-Hellman)** protocol:

* **Elliptic Curve Type**
  * Curve: `NIST P-256` (aka `secp256r1` or `prime256v1`).
  * `P-256` provides a balance of security and efficiency.
* **Public and Private Key Format**
  * Keys are transmitted as **Hex-encoded** strings.
  * Public keys are converted to byte arrays using `PublicKey().Bytes()` before Hex encoding; the same applies to private keys.
* **Key Derivation**
  * Each party generates a public-private key pair, then calculates a shared secret using their private key and the other party's public key.
  * The derived shared secret is directly usable as the symmetric encryption key.

#### Symmetric Encryption Configuration (AES)

* **Algorithm**
  * `AES-256-CFB` is used for symmetric encryption.
  * The `CFB (Cipher Feedback)` mode supports streaming encryption and decryption, ideal for shared key environments.
* **Key Generation**
  * A 256-bit (32-byte) random key is generated using `rand.Read`.
  * Keys are stored and transmitted in Hex-encoded form.
* **Initialization Vector (IV)**
  * A new 16-byte random IV (AES block size) is generated for each encryption.
  * The IV is prepended to the ciphertext during transmission for decryption purposes.

#### Go Code Example

```go
// Generate ECDH Key Pair
func GenKeyPair() (privateKey string, publicKey string, e error) {
    curve := ecdh.P256()
    privKeyA, err := curve.GenerateKey(rand.Reader)
    if err != nil {
        return
    }
    privateKey = hex.EncodeToString(privKeyA.Bytes())
    publicKey = hex.EncodeToString(privKeyA.PublicKey().Bytes())
    return
}

// Key Exchange
func PerformECDH(privKeyA *ecdh.PrivateKey, pubKeyB *ecdh.PublicKey) ([]byte, error) {
    return privKeyA.ECDH(pubKeyB) // Generate shared secret
}

// Generate AES Key
func GenerateAESKey() (string, error) {
    key := make([]byte, 32) // AES-256 key
    _, err := rand.Read(key)
    if err != nil {
        return "", err
    }
    return hex.EncodeToString(key), nil
}

// AES Encryption
func EncryptPayloadAES(key, payload []byte) ([]byte, error) {
    block, err := aes.NewCipher(key)
    if err != nil {
        return nil, err
    }
    ciphertext := make([]byte, aes.BlockSize+len(payload))
    iv := ciphertext[:aes.BlockSize]
    if _, err := io.ReadFull(rand.Reader, iv); err != nil {
        return nil, err
    }
    stream := cipher.NewCFBEncrypter(block, iv)
    stream.XORKeyStream(ciphertext[aes.BlockSize:], payload)
    return ciphertext, nil
}
```


# MetaName

## About

### **Introduction**

To build a more comprehensive ecosystem, the MetaID-v2 protocol utilizes MetaName as its domain name system. Anyone can register their own domain name and namespace and use its features.

## Spec

MetaName defines the domain name specification for MetaID-v2, with the agreed `path` being `/metaname/{namespace}`.

#### Register Name

Registering a new domain name follows the principle of **First is first** and is temporarily indexed on BTC. Anyone can easily register a MetaName on the MetaID-v2 protocol. According to the MetaID-v2 protocol, use `operation` as `create` and `path` as `/metaname/{namespace}` to declare any namespace, such as `metaid/ord/sats/btc`. For example, registering `alice.metaid` would look like this:

```json
OP_FALSE
OP_IF
   metaid                
   create                
   /metaname/metaid  //namespace: metaid/ord/sats/btc          
   0                     
   OP_0                  
   Application/json            
   {
      "name": "alice",
      "rev": "",
      "relay": "",
      "metadata": ""
   }                // MetaName payload (example)
OP_ENDIF
```

MetaName allows users to set `rev`, `relay`, and `metadata` parameters during registration:

```json
{
  "name": "alice",
  "rev": "",
  "relay": "",
  "metadata": ""
}
```

| **Key**  | **Required?** | **Type** | **Expected**   | **Description**                                                                                                                                                                    |
| -------- | ------------- | -------- | -------------- | ---------------------------------------------------------------------------------------------------------------------------------------------------------------------------------- |
| name     | Y             | String   | MNS name       | The domain name set during registration. Namespace does not need to be added. See specific [restrictions](https://www.notion.so/MetaName-12ee16594dde806caecfef37a31c2df7?pvs=21). |
| rev      | N             | String   | address format | The address corresponding to domain resolution.                                                                                                                                    |
| relay    | N             | String   |                | The pointer corresponding to domain resolution.                                                                                                                                    |
| metadata | N             | String   |                | Custom content, suggested to be within 200 characters.                                                                                                                             |

#### **⚠️ Domain Name Restrictions**

* Domain names cannot be duplicated and follow the principle of **First is first**.
* The `operation` must be `create` when registering a domain name.
* Any UTF-8 character is valid.
* All domain names are automatically converted to lowercase.
* Spaces, periods, and line breaks are not allowed in domain names.

#### Update Name

To update or modify a domain name, use `operation` as `modify` under the rules of MetaID-v2. The `path` must point to the corresponding MetaName's `pinid`, and only the `rev`, `relay`, and `metadata` parameters can be updated.

* Note that `modify` does not affect the `name`.
* The `name` in the payload can be left blank when modifying.

```json
OP_FALSE
OP_IF
   metaid                
   modify                
   @{pinid}         
   0                     
   OP_0                  
   Application/json            
   {
          "rev": "xxx",
          "relay": "xxxxx",
          "metadata": "xxxxxxxx"
   }
OP_ENDIF
```

### Example

#### Registration

MetaName: alice.metaid

```json
OP_FALSE
OP_IF
   metaid                
   create                
   /metaname/metaid  //metaid/ord/sats/btc          
   0                     
   OP_0                  
   Application/json            
   {
          "name": "alice",
          "rev" : "bc1puyjhe7h2crd86qnerjqwmhc55t9zzhacnj4h9ypmclwkgsd4h8eq6xk2ys",
          "relay": "xxx",
          "metadata": ""
   }
OP_ENDIF
```

#### Update

MetaName: alice.metaid

```json
OP_FALSE
OP_IF
   metaid                
   modify                
   @2e9b714d338c47cb4144d9f6986f510f83504ad4158297158b490406e825ff0c         
   0                     
   OP_0                  
   Application/json            
   {
           "rev" : "bc1ppkvfwnw67q4w8pt86l7wr3jkngsyymqucrn6vxak7zpntawm6n6qe2n9ls",
           "relay": "xxx",
           "metadata": ""
   }
OP_ENDIF
```


# Examples

Assuming the address: 19Up4xZ4Y6CBhUcXSQZdo7tHaGNYFn7EUj, according to the protocol, its inherent MetaID is: 8a15022dd74648c5158d237f41e544e6097b3f27dcc85788a4b7470c063ed33c

<figure><img src="https://1852888944-files.gitbook.io/~/files/v0/b/gitbook-x-prod.appspot.com/o/spaces%2FQqzh03Cj3B0aOuGYLJKs%2Fuploads%2FJrolQCW0YR3R17msVVvV%2Fimage.png?alt=media&amp;token=3dc87829-77fc-421e-8426-6780e6da4c28" alt=""><figcaption></figcaption></figure>

According to the agreement, the following paths are reserved

* **`/info`**: Stores user's basic information such as username and avatar.
* **`/protocols`**: Used for application protocol operations.
* **`/file`**: For file data storage.
* **`/ft`**: For storing user's fungible token (FT) asset actions.
* **`/nft`**: For storing user's non-fungible token (NFT) asset actions.
* **`/follow`**: Stores user's follow list data.

#### 2. Create Username and Avatar

Users can set their username and avatar by constructing **`PIN`** transactions:

1. **Set Username**: User sets their **`name`** to **`Alice`** with the **`path`** as **`/info/name`**.
2. **Set Avatar**: User sets a specific avatar with the **`path`** as **`/info/avatar`**.

Both paths are under the **`/info`** directory, indicating they are part of the user's personal information.

**Set Username**:

```jsx
OP_FALSE
OP_IF
	metaid  
	create     
	/info/name 
	0          
	OP_0       
	OP_0      
	Alice      
OP_ENDIF
```

**Set Avatar**:

```jsx
OP_FALSE
OP_IF
	metaid            
	create           
	/info/avatar      
	0                 
	OP_0             
	image/jpg;binary  
	<pfp data>        
OP_ENDIF
```

<figure><img src="https://1852888944-files.gitbook.io/~/files/v0/b/gitbook-x-prod.appspot.com/o/spaces%2FQqzh03Cj3B0aOuGYLJKs%2Fuploads%2FtYRdSZ3ym9Y4OQGtA179%2Fimage.png?alt=media&amp;token=5b16f25f-49f8-4823-be86-90a45ed62def" alt=""><figcaption></figcaption></figure>

### Submitting SimpleBuzz Protocol

Assume a user wants to post a **`buzz`**, they need to create and submit a new **`PIN`** in the **`/protocols/simplebuzz`** section.

This adds the **`buzz`** data to the **`/protocols/simplebuzz`** path, indicating it is a record under the user's SimpleBuzz protocol.

```jsx
OP_FALSE
OP_IF
	metaid                           
	create                           
	/protocols/simplebuzz            
	0                                
	0                               
	application/json;utf-8                
	{"content":"Hello bitcoin world!","contentType":"text/plain","createTime":1710741614716,"quoteTx":""}     
OP_ENDIF
```

<figure><img src="https://1852888944-files.gitbook.io/~/files/v0/b/gitbook-x-prod.appspot.com/o/spaces%2FQqzh03Cj3B0aOuGYLJKs%2Fuploads%2FrH6WVPD67VrZ4CIcedkx%2Fimage.png?alt=media&amp;token=f20c31ee-12eb-49ea-a7d5-9ba7f6cd8d64" alt=""><figcaption></figcaption></figure>

### Modification

When performing a **`modify`** operation, use the **`@`** symbol to point to the **`PIN`** to be modified. For example, to modify a specific **`PIN`**, use **`@{PINID}`**.

```jsx
OP_FALSE
OP_IF
	metaid                           
	modify                          
	@{pinid}                       
	0                               
	0                             
	application/json;utf-8               
	{"content":"Hello bitcoin world!!!!!!!","contentType":"text/plain","createTime":1710741614716,"quoteTx":""}     
OP_ENDIF
```

### Revocation

When performing a **`revoke`** operation, use the **`@`** symbol to point to the **`PIN`** to be revoked. For example, to revoke a specific **`PIN`**, use **`@{PINID}`**.

```jsx
OP_FALSE
OP_IF
	metaid                        
	revoke                           
	@{pinid}                           
	OP_0                                
	OP_0                             
	OP_0             
	OP_0
OP_ENDIF
```


# Introduction

MetaID App Node (hereinafter referred to as MAN) is the first open-source backend indexer adapted to the MetaID V2 protocol and also serves as a distributed storage database for MetaID data. Developers do not need to rely on third-party service providers or run heavy Bitcoin nodes. They only need to deploy and install MAN locally to develop and run all types of MetaID applications, achieving true Web3 application decentralization.

**Main Features of MAN**

1. Fully compatible with the MetaID V2 protocol.
2. Indexes MetaID protocol data according to block order and transaction order, and also supports data indexing in the memory pool.
3. Ready to use out-of-the-box, with support for various databases such as MongoDB and Pebble, allowing developers to choose based on their application needs.
4. Developer-friendly, providing a general data query API for common data applications, and planning to implement Graph Query Language for complex data.
5. Controllable index data volume, supporting full data synchronization, single application data synchronization, and multi-application combined synchronization. Developers can configure MAN easily to obtain the data they need.

**Application Development Process Based on MAN**

1. Download the MAN program source code and compile it, or directly download the latest MAN-Release program.
2. Modify the relevant configuration files.
3. Run MAN.
4. Use the MAN API and MetaID SDK for development.
5. Develop and debug on the test network of the relevant UTXO chain.
6. Release on the mainnet.


# Compile and Run

{% hint style="info" %}
The first version of MAN has been launched and open-sourced. For subsequent deployment and API documentation, please refer to the documents on Github
{% endhint %}

{% embed url="<https://github.com/metaid-developers/man-indexer>" %}


# JSON API

{% hint style="info" %}
The first version of MAN has been launched and open-sourced. For subsequent deployment and API documentation, please refer to the documents on Github
{% endhint %}

## Basic API

<table><thead><tr><th>address</th><th>method</th><th width="165">parameter</th><th> describe</th></tr></thead><tbody><tr><td>/api/pin/{numberOrId}</td><td>GET</td><td>PIN number or PIN id</td><td>Get PIN Details by PIN Number or PIN ID</td></tr><tr><td>/api/address/pin/list/{addressType/{address}</td><td>GET</td><td>address<br>addressType ：creator，owner</td><td>Retrieve the list of PINs created or owned by the specified address.</td></tr><tr><td>/api/address/pin/root/{address}</td><td>GET</td><td>address</td><td>Get PIN Root by Address</td></tr><tr><td>/api/node/child/{pinId}</td><td>GET</td><td>pinId</td><td>Get Child Node by PIN ID</td></tr><tr><td>/api/node/parent/{pinId}</td><td>GET</td><td>pinId</td><td>Get Parent Node by PIN ID</td></tr><tr><td>/api/info/address/{address}</td><td>GET</td><td>address</td><td>Get MetaID Info by Address</td></tr><tr><td>/api/info/rootId/{rootId}</td><td>GET</td><td>rootId</td><td>Get MetaID Info by Root ID</td></tr><tr><td>/api/pin/content/{numberOrId}</td><td>GET</td><td>PIN number or PIN id</td><td>Get PIN Content by PIN Number or PIN ID</td></tr><tr><td>/api/getAllPinByParentPath</td><td>GET</td><td>page,limit,parentPath</td><td>Get All Pins by Parent Path</td></tr></tbody></table>

## generalQuery

General query for protocols data, supporting data retrieval in get, count, and sum methods.&#x20;

Endpoint: /api/generalQuery

**method:** POST

```jsx
{
    "collection": "pins", // Name of the collection to query, required
    "action": "sum", // Query operation, supports get, count, sum
    "filterRelation": "or", // Query condition relationship, supports or, and. Currently does not support mixing.
    "field": [
        "number" // Field(s) to return in the query, required for sum operation
    ],
    // Query conditions
    "filter": [
        {
            "operator": "=", // Condition operator, supports =, >, >=, <, <=
            "key": "number", // Field to apply the condition
            "value": 1 // Value to query
        },
        {
            "operator": "=",
            "key": "number",
            "value": 2
        }
    ],
    "cursor": 0, // Starting point for returning data
    "limit": 1, // Number of data records to return
    "sort": [
        "number", // Field to sort by
        "desc" // Order, supports asc, desc
    ]
}
```

#### Successful Response Example

```jsx
{
    "code": 1, // Success code 1
    "message": "ok", // Response message
    "data": [ // Data content
        {
            "_id": "65e96a276bff93b007c02b16",
            "isLike": "1",
            "likeTo": "32c6d91b6fb3f6746258d83f1fe8fb32f19c2a3e0071847b6046f01c938ca20bi0",
            "pinAddress": "tb1pss8ce6tgupnhmfj8u9h4saue48upucu04c7549tzal6n67v8njyst7e0fx",
            "pinId": "3943f7fa4c8496ced9ff722ae5bbdd57ad7b84a383304890b41f21e12f11086bi0",
            "pinNumber": 69
        }
    ]
}
```

#### Failed Response Example

```jsx
{
    "code": -1, // Failure code
    "message": "Data not found", // Reason for failure
    "data": null
}
```


# Browser

{% hint style="info" %}
We have deployed the MAN browser, and the source code has also been open-sourced on Github:\
<https://man.metaid.io/>
{% endhint %}

The MAN indexer includes a built-in MetaID browser that supports querying MetaID-related data.

### Running the Browser

To start the HTTP web service, set the `server` parameter to 1 when running the program:

```bash
./manindexer -server=1
```

The default ports for the service are 80/443. If you need to specify a different port, you can do so in the configuration file under the `web` section.

Once the service is started, access it via `http://127.0.0.1:{port}`.

### Browser Features

#### Search

The search function accepts keywords such as MetaID, PIN Number, and PIN ID. Note that fuzzy search is not supported.

#### PIN

A list of all PINs, displayed in reverse chronological order with pagination. Clicking on a specific PIN provides more details, such as:

[9bc429654d35a11e5dde0136e3466faa03507d7377769743fafa069e38580243i0](https://man.metaid.io/pin/9bc429654d35a11e5dde0136e3466faa03507d7377769743fafa069e38580243i0)

#### MetaID

A list of all MetaIDs, sorted by creation time in descending order. Clicking on a specific MetaID shows the PIN used to create that MetaID.

#### Block

A list of all blocks containing MetaID protocol data, sorted by block height in descending order. Clicking on a block card displays the details of the transactions within that block, such as:

<https://man.metaid.io/block/844453>

#### Mempool

Lists MetaID data in the memory pool, which is automatically deleted after being included in a block.


# MetaID PIN Conventions

#### About `modify`/`revoke`

1. The address initiating the `modify` or `revoke` must match the address of the creator of the old version of the PIN, and the PIN must not have been transferred. If the PIN has been transferred, any subsequent `modify`/`revoke` operations will be invalid. For PINs under the `/info` path, only the initiator's address and the address of the creator of the old version of the PIN need to match for modification.
2. The PIN being modified must be the current latest version of the PIN for the modification to be valid. If the PIN being modified is not the current latest version, all `modify`/`revoke` operations will be invalid.
3. The modified PIN and the newly modified PIN need to be packaged in different block heights to be valid. If the modified PIN and the newly modified PIN are packaged in the same block, the new modification will be invalid.
4. When the `operation` is `modify`/`revoke`, the `path` needs to point to the corresponding PIN, for example: `@{pinid}`. The pointed PIN must be a PIN that exists on the chain and has been packaged into a block for the `modify`/`revoke` to be valid. The targeted PIN must be in different block heights.

<figure><img src="https://1852888944-files.gitbook.io/~/files/v0/b/gitbook-x-prod.appspot.com/o/spaces%2FQqzh03Cj3B0aOuGYLJKs%2Fuploads%2Fll69aa6m1gK3pS6ryPVI%2Fimage.png?alt=media&amp;token=258b4c82-3eb8-44cc-8e32-e04e514dc51c" alt=""><figcaption></figcaption></figure>


# PIN Data Structure

The MAN indexer extracts MetaID protocol data from the reveal scripts of Taproot transactions. For detailed protocol information, please refer to the MetaID Specification section.

### PIN Data Structure

```go
type PinInscription struct {
	Id                 string `json:"id"`
	Number             int64  `json:"number"`
	RootTxId           string `json:"rootTxId"`
	MetaId             string `json:"metaid"`
	Address            string `json:"address"`
	CreateAddress      string `json:"createAddress"`
	Output             string `json:"output"`
	OutputValue        int64  `json:"outputValue"`
	Timestamp          int64  `json:"timestamp"`
	GenesisFee         int64  `json:"genesisFee"`
	GenesisHeight      int64  `json:"genesisHeight"`
	GenesisTransaction string `json:"genesisTransaction"`
	TxIndex            int    `json:"txIndex"`
	TxInIndex          uint32 `json:"txInIndex"`
	TxInOffset         uint64 `json:"txInOffset"`
	Operation          string `json:"operation"`
	Path               string `json:"path"`
	ParentPath         string `json:"parentPath"`
	OriginalPath       string `json:"originalPath"`
	Encryption         string `json:"encryption"`
	Version            string `json:"version"`
	ContentType        string `json:"contentType"`
	ContentTypeDetect  string `json:"contentTypeDetect"`
	ContentBody        []byte `json:"contentBody"`
	ContentLength      uint64 `json:"contentLength"`
	ContentSummary     string `json:"contentSummary"`
	Status             int    `json:"status"`
	OriginalId         string `json:"originalId"`
	IsTransfered       bool   `json:"isTransfered"`
	Preview            string `json:"preview"`
	Content            string `json:"content"`
	Pop                string `json:"pop"`
}
```

### PIN Indexing Rules

#### General

1. **Flag Recognition:** The flag is `metaid`.
2. **Case Sensitivity:** Case insensitive. The indexer can store all data in lowercase.

#### Operation

1. The `pinid` of an `init` type PIN is a user's `MetaID`.
2. `init` and `create` operations follow the first-come, first-served principle.
3. Within the same block, the order of `init` and `create` operations is not distinguished. The indexer should process `init` type PINs first to establish the `metaid`.

#### Path

1. For the same path, `init` and `create` PINs are indexed by the oldest entry, while `modify` and `revoke` operations consider the most recent entry.
2. `modify` and `revoke` operations must act on already included PINs. These operations are valid only for already included PINs, even within the same block.
3. Non-`init` PIN paths must fall within the following default paths for a MetaID:

   (1) /info

   (2) /protocols

   (3) /file

   (4) /ft

   (5) /nft

   (6) /follow
4. Paths for `modify` and `revoke` operations should specify the target PIN using `@pinId`.

### PIN Status Codes

| Status Codes | Describe                                                                                                                                         |
| ------------ | ------------------------------------------------------------------------------------------------------------------------------------------------ |
| 0            | Normal PIN                                                                                                                                       |
| -1           | PIN being revoked                                                                                                                                |
| 1            | PIN being modified                                                                                                                               |
| -101         | Target PIN's block height ≤ Current PIN's block height                                                                                           |
| -102         | Target PIN has already been transferred                                                                                                          |
| -201         | PIN being modified, correct format, but the PINId in @+PINID does not exist (confirmed PIN)                                                      |
| -202         | PIN being modified, correct format, but the address initiating the modify does not exist                                                         |
| -203         | PIN being modified, correct format, address initiating the modify exists, but the target PIN's address is not equal to the current PIN's address |
| -204         | Target PIN already has a modify (status code 1)                                                                                                  |
| -205         | Target PIN's Operation is init                                                                                                                   |
| -301         | PIN being revoked, correct format, but the PINId in @+PINID does not exist                                                                       |
| -302         | PIN being revoked, correct format, but the address initiating the revoke does not exist                                                          |
| -303         | PIN being revoked, correct format, address initiating the revoke exists, but the target PIN's address is not equal to the current PIN's address  |
| -304         | Target PIN has already been revoked (status code -1)                                                                                             |
| -305         | PIN being revoked, correct format, but the target PIN's Operation is init or the target PIN's Path is **/info/**                                 |

For more information, please refer to the MAN source code:

{% embed url="<https://github.com/metaid-developers/man-indexer>" %}


# Get Started

{% hint style="info" %}
The MetaID-TS-SDK source code has been released on GitHub. For the latest API and example code, please refer to the most recent GitHub page.

<https://github.com/metaid-developers/metaid>
{% endhint %}

#### Introduction

MetaID SDK provides a set of standard specifications and tools for generating and processing underlying blockchain data that conforms to the MetaID protocol (specifically for UTXO-standard chains, currently supporting the BTC chain).

The design goal of MetaID SDK is to offer a relatively unified and efficient method, greatly simplifying the integration of web3 services. It eliminates the need for developers to handle multiple protocols and construct complex UTXO transactions for on-chain data, saving time and reducing the risk of compatibility issues.

With the simplicity, compatibility, extensibility, and efficiency of MetaID SDK, traditional application developers can quickly develop and deploy a Dapp application running on a UTXO chain.

#### Core Concepts

MetaID SDK has two core concepts: Connector and Entity.

* **Connector**: Used for authentication and management of identity information, serving as the foundation for users to publish data on the blockchain.
* **Entity**: A term used in the application layer for managing resources of a specific data type. From a programming perspective, when you create a new entity instance, you can access its properties and utilize a series of methods it provides for executing on-chain data storage and modifications. Each type of Entity corresponds to the PATH part of the MetaID Specification.

#### Installation

**Method 1: Use Yarn or NPM**

```bash
// Use Yarn
yarn add @metaid/metaid 
// Use NPM
npm install --save @metaid/metaid
```

**Method 2: Include as src in Your Native JS Project**

This method converts the npm package into a browser-compatible package without requiring a bundling tool like webpack.

1. Initialize a local project:

```bash
mkdir generate-metaid-bundle && cd generate-metaid-bundle/ 
yarn init 
// or
npm init
```

2. Install the SDK:

```bash
npm install --save @metaid/metaid
// or
yarn add @metaid/metaid
```

3. Create a `main.js` file with just two lines of code:

```js
var metaidSDK = require('@metaid/metaid')
window.metaidSDK = metaidSDK
```

4. Globally install browserify:

```bash
npm install -g browserify
// or 
yarn global add browserify
```

5. After installation, run the command:

```bash
browserify main.js -o bundle.js
```

6. Once the command is executed, a `bundle.js` file will be generated. Now you can include this file along with your HTML code using the `<script>` tag:

```html
<!DOCTYPE html>
<html>
    <head>
        <meta charset="utf-8">
        <script src="bundle.js"></script>
    </head>
    <body>
        <div class="app">
             <!-- HTML tag of your page -->
        </div>
    <script>
        // JS code
    </script>
    </body>
</html>
```


# Core API

{% hint style="info" %}
The MetaID-TS-SDK source code has been released on GitHub. For the latest API and example code, please refer to the most recent GitHub page.

<https://github.com/metaid-developers/metaid>
{% endhint %}

#### Overview

The MetaID SDK currently targets the BTC chain, providing corresponding API methods from three dimensions: Wallet Layer, Connector Layer, and Entity Layer. Below is a detailed introduction to the relevant API methods.

Each layer's responsibilities and relationships are outlined.

#### Wallet Layer API

<pre class="language-jsx"><code class="lang-jsx">import { MetaletWalletForBtc } from '@metaid/metaid';
<strong>// Create a wallet object based on the currently logged-in wallet account
</strong>const _wallet = await MetaletWalletForBtc.create();

// Access the wallet object's public properties
const address = _wallet.address // Get address
const pubicKey = _wallet.pub // Get public key

// Access a series of methods provided by the wallet object (provided the wallet is connected, otherwise returns {status: 'not-connected' })
await _wallet.getAddress() // Get wallet address

await _wallet.getAddressType() // Get wallet address type

await _wallet.getPublicKey(path) // Get public key based on path

await _wallet.getBalance() // Get balance

await _wallet.signMessage(message) // Send signed message

await _wallet.signPsbt({
  psbtHex,
  options,
}: {
  psbtHex: string
  options?: { toSignInputs?: ToSignInput[]; autoFinalized: boolean }
}) // Sign the input psbtHex

// This is a low-level inscription API method; unless you have very customized inscription needs, it is not recommended to call it directly. 
// The connector layer has abstracted and encapsulated this method, along with related parameter descriptions.
await _wallet.inscribe({data, options} : \
  { data: InscriptionRequest, options: {noBroadcast : boolean }) 
</code></pre>

#### Notes on Wallet Method Parameters and Return Types:

1. Example return value for `getBalance`:

```jsx
{total: 97901828, confirmed: 97901828, unconfirmed: 0}
```

where `confirmed` and `unconfirmed` represent the confirmed and unconfirmed balances respectively (unit: satoshi).

2. Example return value for `getAddressType`:

```jsx
{name: 'Taproot', addressType: 'P2TR', path: "m/86'/0'/0'/0/0"}
```

BTC address types mainly include four types: Legacy (P2PKH), Nested SegWit (P2SH), Native SegWit (Bech32), and Taproot addresses.

3. Explanation of `inscribe` method parameters:

```jsx
export type Operation = 'init' | 'create' | 'modify' | 'revoke'
export type Encryption = '0' | '1' | '2'

export type MetaidData = {
  operation: Operation
  body?: string | Buffer
  path?: string
  contentType?: string
  encryption?: '0' | '1' | '2'
  version?: string
  encoding?: BufferEncoding
  revealAddr: string
}

export type InscriptionRequest = {
  feeRate: number;
  metaidDataList: MetaidData[];
  revealOutValue: number;
  changeAddress: string;
  minChangeValue?: number;
}
```

4. The `inscribe` method returns different transaction data formats depending on whether broadcasting is performed:

* If `noBroadcast` is set to `yes`, meaning no broadcasting, the return format is:

```jsx
{
  commitTxHex: string;
  revealTxsHex: string[];
  commitCost: string;
  revealCost: string;
}
```

* If `noBroadcast` is set to `no`, meaning broadcasting is performed, the return format is:

```jsx
{
  commitTxId: string;
  revealTxIds: string[];
  commitCost: string;
  revealCost: string;
}
```

Where, if not broadcasting, the transaction result is returned in `txHex` format; otherwise, the transaction result is returned as `txid`. The sum of `commitCost` and `revealCost` represents the estimated fee required for the current inscription transaction.

#### Connector Layer API

```jsx
import { btcConnect } from '@metaid/metaid';

// Create a new connector based on the wallet object
const _btcConnector: BtcConnector = await btcConnect({ wallet, network }: { wallet?: MetaIDWalletForBtc; network: BtcNetwork });

// If the wallet object is not empty, you can use the following method to check if the wallet has created a MetaID
_btcConnector.hasMetaid()

// The connector provides a series of methods for operating MetaID related data

type BtcNetwork = "testnet" | "regtest" | "livenet"

// Inscription method
type Operation = 'init' | 'create' | 'modify'
type InscribeOptions= {
  operation: Operation
  body?: string | Buffer
  path?: string
  contentType?: string
  encryption?: '0' | '1' | '2'
  version?: string
  encoding?: BufferEncoding
}
await _btcConnector.inscribe(inscribeOptions: InscribeOptions[], noBroadcast: 'yes' | 'no')
// The return type of this method is the same as the wallet inscribe method.

// Create MetaID, the parameter avatar is processed into Buffer in chunks from the native File type in JS, and then converted to a base64 string
const metaIdRes = await _btcConnector.createMetaid(body?: { network?: BtcNetwork, name?: string; avatar?: string })
// Return type: metaIdRes: { metaid:string }

// Get user information associated with MetaID
const user = await _btcConnector.getUser({ network, currentAddress }: { network: BtcNetwork; currentAddress?: string })

// Update user information associated with MetaID
const isUpdateSuccess = await _btcConnector.updateUserInfo(body: { name?: string; bio?: string; avatar?: string })

// Get MetaID
const currentMetaId = await _btcConnector.getMetaid()

// Check the current connector status (whether the wallet is connected)
const isConnected = await _btcConnector.isConnected()

// Disconnect the current wallet
await _btcConnector.disconnect()

// Create an Entity object, this method bridges the Connector layer and the Entity layer
await _btcConnector.use(entitySymbol: string)
```

#### Notes on Connector Layer API:

1. From the perspective of the MetaID Specification, issuing or modifying on-chain data involves sending a PIN, and the inscription interface handles this task. Whether it's creating a MetaID, updating user information, or calling the create method after generating an Entity object, it essentially sends a PIN to put the data on-chain.
2. For the `createMetaid` method of the connector object, if you pass in a complete `body` parameter including name, bio, and avatar, the SDK will sequentially perform the following actions: first initialize at the root path `/` (operation=init), then create corresponding information under the paths `/info/name`, `/info/bio`, and `/info/avatar` (operation=create).
3. Regarding data timeliness, when modifying on-chain data (operation=modify/revoke), there are relevant matters to note. Please refer to the second convention in the MetaID Specification regarding `modify`/`revoke` operations.

#### Entity Layer API

Once you create an entity through the connector, you can access a series of properties and methods provided by that entity.

> Currently, the MetaID SDK provides basic entity calls based on the on-chain microblog example application, including buzzEntity, fileEntity, and likeEntity. If developers have their own customization needs, they can create their data protocol on the MetaProtocols website, and the MetaID SDK will automatically create the corresponding entity for that protocol.

```jsx
// Example of creating a buzzEntity

type BtcNetwork = "testnet" | "regtest" | "livenet"

// Create a buzzEntity entity through the connector
const buzzEntity = await _btcConnector.use('buzz')

// Get all buzzes sent by the currently connected account in a paginated manner
const allBuzz = await buzzEntity.list({ page, limit, network }: { page: number; limit: number; network?: BtcNetwork })

// Get the details of a specific Pin by its pinId
const pid = 'XXXXXXXXX' 
const pinDetail = await buzzEntity.one({ pid, network }: { pid: string; network: BtcNetwork })

// Count the total number of Pins sent under the current entity (buzzEntity)
const pinTotal = await buzzEntity.total({ network }: { network?: BtcNetwork })

// Create a buzz
type CreateOptions = {
  body?: string | Buffer;
  contentType?: string;
  encryption?: "0" | "1" | "2";
  version?: string;
  encoding?: BufferEncoding;
}

// The return type of this method is the same as the wallet inscribe method.
const createRes = await buzzEntity.create({
  options,
  noBroadcast,
}: {
  options: CreateOptions[]
  noBroadcast: 'yes' | 'no'
})
```

#### Notes on the Entity's `create` Method:

1. According to the MetaID Specification, you can think of the create method as creating new files under a certain folder (file path), essentially calling the connector's inscribe method. The results vary depending on the broadcast parameter, and the specific data format can be found in the connector's inscribe method description.
2. Explanation of the `option` parameter corresponding to the MetaProtocols protocol:
   * The `body` parameter's specific fields should refer to the corresponding MetaProtocol protocol description for that entity (e.g., buzzEntity corresponds to the SimpleBuzz protocol).
   * The `contentType` field represents the data format, e.g., `text/plain`, `image/png`.
   * The `encryption` field indicates the encryption type of the content: `0` for no encryption, `1` for ECIES encryption, and `2` for ECDH negotiated key encryption.
   * The `version` field specifies the protocol version number of MetaProtocols.
   * The `encoding` field refers to the encoding format, which aligns with the global `BufferEncoding` parameter in TypeScript:

     ```typescript
     type BufferEncoding = 
         | "ascii"
         | "utf8"
         | "utf-8"
         | "utf16le"
         | "utf-16le"
         | "ucs2"
         | "ucs-2"
         | "base64"
         | "base64url"
         | "latin1"
         | "binary"
         | "hex";
     ```

     **Examples** for the `Option` Parameter

     (1) For the `buzz` entity, the `option` parameter should be:

     ```typescript
     {
         body: "buzz content"
     }
     ```

     (2) For the `file` entity, assuming you are passing an image file, the `option` parameter should be:

     ```typescript
     {
         body: Buffer.from('image raw hex string', "hex").toString("base64"),
         contentType: "image/jpeg",
         encoding: "base64"
     }
     ```

3\. Instructions for Batch Creation (Inscription): You may have noticed that the `CreateOptions` parameter is passed in as an array. This means you can create multiple pieces of data for a particular type of entity simultaneously. Here's a specific example: when you post a `buzz` with multiple image attachments, you only need to call the inscription interface twice. First, batch inscribe multiple images using the `fileEntity`. The generated transaction hash array is then passed into the `attachments` field of the `buzzEntity` create method for the second inscription.


# Quick Example

{% hint style="info" %}
The MetaID-TS-SDK source code has been released on GitHub. For the latest API and example code, please refer to the most recent GitHub page.

<https://github.com/metaid-developers/metaid>
{% endhint %}

### Intro

Bitbuzz is a front-end social application based on the MetaID protocol and running on the testnet of BTC blockchain. It has the following basic functions: new user registration, setting user basic information, publishing buzz (with attached pictures), liking buzz. In this article, I will show you how to build this project with MetaID SDK step by step. I will presume you have a basic understanding of [MetaID Specification](/metaid-specification/protocol-spec).

### Creating a MetaID Account With SDK

Creating a MetaID Account is very easy, the following code will use a connector which is connected to a [Metalet wallet](https://metalet.space). Then it will check whether the Metalet account has built a MetaID account, if not , it will accept the `body parameter`(optional parameter, including name、bio、avatar) provided by the user to create a new MetaID account.

```jsx
import { MetaletWalletForBtc, btcConnect } from '@metaid/metaid';

 
const _btcConnector: BtcConnector = await btcConnect(_wallet);

const handleCreateMetaid = async (userInfo) => {
  const userInfo = {name:'Bob', bio:'Success needs time.', avatar:'imageUrl'}
	if (!_btcConnector.hasMetaid()) {
      const createRes = await btcConnector.createMetaid({ ...userInfo, network });
    } else {
      const resUser = await _btcConnector.getUser();
    }
};
```

#### Connecting to BTC Blockchain

Like most blockchains, we need a wallet account to connect to the blockchain. Here we use Metalet wallet as an example. Assume you have created a MetaID account based on last step and have a `handleLogin` method for your application triggered when user clicks the login button. We need to apply MetaID SDK to establish a connection between the application and the wallet. This is the foundation for users to send data to the blockchain.

```jsx
import {  MetaletWallet, connect } from "@metaid/metaid";

 
const handleLogin = async () => {
    const _wallet = await MetaletWallet.create();
    const baseConnector = await connect(_wallet);
 
}                                                                                                                                                                                                                                                                                                                                                                                                                                                                                                                                                                                                                           |. |
```

#### Define the required entities

On top of the foundation established in the previous step, it's time for `Entity` to come into play. We utilize the`use` keyword to create an entity. For the buzzhub application, we need a “Buzz” entity. With this entity, we can get the existing buzz data and send a new buzz to the BTC blockchain. The following code block implements the 'getBuzzList' function. The 'page' parameter is used to query paginated data. It's worth noting that 'connect' can be passed an empty object, and based on this, the created entity can only retrieve data from the blockchain but cannot send data to the blockchain (used for displaying data in an unauthenticated state. (Remember every buzz is just a Pin result)

```jsx
 
const getBuzzList = async ({ page, limit } ) => {
    const	buzzEntity = await baseConnector.use("buzz");
    const buzzList = await buzzEntity.list({ page, limit });;
 
};
```

#### Send **data to the blockchain with Entity**

When you get the buzzEntity variable, you can use its `create` method to publish a new buzz and store it on the blockchain. For each type of Entity, you need to set a Schema file which is used to define the format for on-chain data. For example, according to the definition of simplebuzz which comes from metaprotocols, we have our `buzz.entity.ts` schema file for the Buzz entity.

```jsx
type EntitySchema = {
  name: string
  path:string
  versions: {
    version: number
    body: any[]
  }[]
}

const buzzSchema: EntitySchema = {
  name: 'buzz',
  path: '/protocols/simplebuzz',
  versions: [
    {
      version: 1,
      body: [
        {
          name: 'content',
          type: 'string',
        },
        {
          name: 'attachments',
          type: 'array',
        },
      ],
    },
  ],
}
```

Sending a buzz with only text information is simple; it only requires a few lines of code. The first argument passed to the 'create' method comes from the 'body' field defined in the 'buzzSchema'.

```jsx
const	buzzEntity = await baseConnector.use("buzz");
const finalBodybody = { content: "Hello World", attachments: [] }
const createRes = await buzzEntity.create({
				options: [{ body: JSON.stringify(finalBody) }],
				noBroadcast: "no",
			});
```

#### Send multiple entities’ data to the blockchain

Assuming you need to post a buzz with some image attachments. That is, we need to populate the attachments field of the body parameter. A unique pinID(transaction id of this file create pin) is generated for each image file uploaded to the blockchain. Each string element in the attachments array relies on this txid, and the exact string prefix will vary depending on the type of file protocol (metacontract, sensible, etc.).We need to define a new File entity to implement the logic described above, according to the MetaFile protocol, we have the following code definition for the File entity schema.

```jsx
const fileSchema = {
  name: 'file',
  nodeName: 'MetaFile',
  encoding: 'binary',
  versions: [
    {
      version: '1.0.1',
      body: '',
    },
  ],
}
```

then we can generate txid based on this schema. It is worth noting that you need to transform binary image data to hex format with `Buffer.from` method.

```jsx
const finalBody: any = { content: buzz.content };
if (!isEmpty(buzz.images)) {
	const fileOptions = [];

	const fileEntity = await btcConnector!.use("file");

	for (const image of buzz.images) {
			fileOptions.push({
			body: Buffer.from(image.data, "hex").toString("base64"),
			contentType: "image/jpeg",
			encoding: "base64", // this encoding field is for wallet inscription API,
			toEncoding: fileSchema.encoding
		});
	}
	const imageRes = await fileEntity.create({
		options: fileOptions,
		noBroadcast: "no",
	});

		finalBody.attachments = imageRes.revealTxIds.map(
		(rid) => "metafile://" + rid + "i0"
	);
}
```

As you can see, The `create` method accepts `options` parameter.

```jsx
type CreateOptions = {
    body?: string | Buffer;
    contentType?: string;   
    encryption?: "0" | "1" | "2"; 
    version?: string;  
    encoding?: BufferEncoding;  
}
const createRes = await buzzEntity.create({
    options,
    noBroadcast,
  }: {
    options: CreateOptions[]
    noBroadcast: 'yes' | 'no'
  })
```

When you need to send multiple entities data to the blockchain. Until the last `create` method, you need to set the value of the `options.serialAction` parameter to `combo` in the previous `create` method.The purpose of this action is to bundle multiple transactions, thus avoiding multiple pop-ups when signing the transaction with the Metalet wallet and achieving a better user experience.

Finally, we can create a buzz with three image attachments:

```jsx
const createRes = await buzzEntity!.create({
				options: [{ body: JSON.stringify(finalBody) }],
				noBroadcast: "no",
			});
```

#### Build relationships between different user’s data

Imagine a scenario where as a BuzzHub user, you come across a buzz posted by someone else and you want to like it. Essentially, this scenario involves establishing an association between the data of two end-user accounts.

First we need a new `Like` entity, base on its metaprocols definition, we have the following like entity schema definition.

```jsx
const likeSchema = {
  name: 'like',
  path: '/protocols/payLike',
  versions: [
    {
      version: 1,
      body: [
        {
          name: 'likeTo',
          type: 'string',
        },
        {
          name: 'isLike',
          type: 'string',
        },
      ],
    },
  ],
}
const likeEntity = btcConnector.use('like')
```

And then, based on a logged-in MetaID account, you can like any buzz by calling this `likeEntity.create` method.The corresponding code is quite simple.

```jsx

const res = await likeEntity.create({ likeTo: pinId, isLike: '1' }, 
                                     { signMessage: 'like buzz' })
 //  pinId is from the buzz bin you want to like,
 //  it is caculated by the buzz's txid + 'io'                    
```

### Live Example

[Code Link](https://github.com/metaid-developers/metaid)

[Website Link](https://www.bitbuzz.io)


# Cross-chain

MetaID V2 is designed to operate on Bitcoin and Bitcoin-structured blockchains. As long as the indexer supports it, PINs can theoretically be built on any Bitcoin-structured blockchain. All transactions that comply with the MetaID protocol format, even if dispersed across different blockchains, can be aggregated under a single MetaID node.

Support for cross-chain compatibility is theoretically feasible with any Bitcoin-structured blockchain that meets the following criteria:

* Uses a UTXO architecture.
* Locking scripts support the `op_return` operator.
* Supports the classic Bitcoin address format (i.e., Bitcoin addresses prefixed with “1”).

At present, in addition to Bitcoin, the following major public chains meet the conditions supported by MetaID. With future support from relevant indexers and wallets, these chains are expected to be supported:

* MVC
* BCH
* eCash
* Dogecoin
* Litecoin
* Bitcoin SV

When implementing cross-chain support in wallets and applications, the following concepts should be noted:

### Unified Address

**\[TBD]**

### Unified UTXO Chain

**\[TBD]**


# Unified UTXO Chain

TBD


# History About MetaID

MetaID is not a new protocol created in 2024. The first version of the MetaID protocol was released in April 2020, based on the MetaNet protocol. Over nearly four years of development, multiple developers have jointly built a substantial infrastructure and applications. By the time V2.0 was released, MetaID had accumulated over 170,000 users and more than 21 million transactions, with more than a dozen MetaID applications being launched.

Here is a brief history of MetaID:

* April 2020: Release of V1.0 MetaID protocol, the first version supporting only the Bitcoin SV.
* April 2021: Upgrade to MetaID protocol V1.1.
* 2022: Multiple applications adopted the MetaID solution, covering Web3 social applications, cloud storage, NFT markets, games, and more, with a total user base exceeding 100,000.
* January 2023: Upgrade to MetaID protocol V1.2, adding support for multiple chains, including Bitcoin sidechain MicrovisionChain.
* May 2024: Release of MetaID V2.0, which fully supports Bitcoin and further enhances cross-chain support for UTXO-based blockchains.

## Comparison between MetaID V2.0 and previous versions

|                 Feature                 |                       V1.2                       |                         V2.0                         |
| :-------------------------------------: | :----------------------------------------------: | :--------------------------------------------------: |
|                  Vision                 | To become the best cornerstone protocol for Web3 | **To become the best cornerstone protocol for Web3** |
|          Unified tree structure         |                        Yes                       |                        **Yes**                       |
|             Based on MetaNet            |                        Yes                       |                        **No**                        |
| Adoption of Ordinals-like theory scheme |                        No                        |                        **Yes**                       |
|         Asset protocol included         |                        No                        |                        **Yes**                       |
|           Cross-chain support           |                       Weak                       |                      **Better**                      |


# FAQ

## Can you explain what MetaID is?

Over the past year, many protocols have emerged in the Bitcoin ecosystem, but MetaID is the first designed specifically for building Web3 apps on Bitcoin. So, what exactly is MetaID? Here's a simple example to help explain it: Imagine a decentralized version of [X.com](http://x.com/) and Telegram built on Bitcoin using MetaID. With MetaID, these apps could interact seamlessly, allowing you to send a DM from your X account directly to a Telegram user. The best part? Your data is secured by Bitcoin's network, meaning no central authority can ban your account or delete your info. While many people see Bitcoin primarily as digital gold, we believe its potential goes way beyond that. Bitcoin's UTXO architecture and ability to store data on-chain make it the perfect foundation for Web3 apps. In short, we believe that with MetaID's help, a vast and thriving Web3 ecosystem can be built on top of Bitcoin.

So MetaID is a protocol about enabling web3 on Bitcoin

## Could you tell me other aspects that make MetaID stand out compared to the others?

MetaID is quite different from other protocols.

In Bitcoin, there are Ordinals and Atomiclas protocols,and more.Those protocols are great and have inspired MetaID in some ways. However, they often focus more on asset issuance and lack the structuring of on-chain data. So, building true Web3 apps based on these protocols isn't possible.

The biggest difference between MetaID and other protocols is that MetaID organizes scattered on-chain data into tree-like structures, using ‘people' as the classification method. Data from other protocols is like scattered stones and bricks, while MetaID data is like piles of structured building materials classified by ‘people’, making it easy for us to build skyscrapers.

This figure shows the concept:

&#x20;&#x20;

<figure><img src="https://1852888944-files.gitbook.io/~/files/v0/b/gitbook-x-prod.appspot.com/o/spaces%2FQqzh03Cj3B0aOuGYLJKs%2Fuploads%2FfWbHYCCnryjWRIEvNbN3%2Fimage.png?alt=media&amp;token=7d920166-a993-434d-9933-670e1557250c" alt=""><figcaption></figcaption></figure>

Plus, MetaID introduces models for declarative modification, deletion, hiding, and privacy handling of data. These data processing capabilities are precisely what other protocols are missing, and they're a must for building large-scale Web3 apps.

<br>

## I'm curious to know how you got to this point and how they came up with the idea.. Please explain history of MetaID

MetaID isn't a new protocol created in 2024. That idea came in mind in 2020.

The first version of MetaID was released in April 2020, based on the MetaNet protocol, and has undergone nearly 4 years of development. Before the release of v2, MetaID had already accumulated over 170,000 users and more than 21 million transactions with more than 10 MetaID apps running at its peak. Therefore, MetaID is a protocol that has been proven feasible.

<br>

## Could you give me some more detail on how the PIN data works?

PIN is the core concept of MetaID.

PIN is the smallest data unit and the most core concept in MetaID. Each PIN is like a brick of Lego, different PINs can be combined to create various Web3 applications. Eeach PIN inscribed is an NFT and introduced capabilities such as creator, holder, modification, deletion, hiding, encryption, and a POP value for value assessment. As a result, various complex Web3 applications and DataFi applications can be built using PINs.

I hope this fig can roughly explain how PIN organizes data:

&#x20;&#x20;

<figure><img src="https://1852888944-files.gitbook.io/~/files/v0/b/gitbook-x-prod.appspot.com/o/spaces%2FQqzh03Cj3B0aOuGYLJKs%2Fuploads%2FBvFIy4bNs1zt66FdygG5%2Fimage.png?alt=media&amp;token=0615d12b-ea20-43ad-b475-281c73c27c2f" alt=""><figcaption></figcaption></figure>

We color and label each satoshi on the Bitcoin network as a piece of on-chain data. Since a satoshi is the smallest unit in the Bitcoin network, it is atomic, indivisible, and can be freely circulated. Therefore, in MetaID, all data is a satoshi and also an NFT.

Therefore, PIN=Sats, it also gains security properties from Bitcoin.

## Bitcoin doesn't seem to be designed for heavy usage. How does MetaID address the congestion issue on Bitcoin?

Indeed, Bitcoin cannot solve the problem of congestion and high fees in the foreseeable future. Therefore, MetaID supports cross-chain from the design level. As long as it is a Bitcoin sidechain, Layer-2, or even BCH that is homogeneous with Bitcoin, MetaID can theoretically support it seamlessly. This is the biggest difference between MetaID and other protocols. MetaID introduces the concepts of Unified UTXO Chain and Unified Bitcoin Address, which effectively solves Bitcoin's congestion problem and fully unleashes the potential of Layer 2 networks that are homogeneous with Bitcoin. In terms of cross-chain support, MetaID can be regarded as a Layer 0 protocol for the Bitcoin architecture, enabling interoperability between different blockchains that are homogeneous with Bitcoin and allowing assets to flow between Bitcoin and its Layer 2 networks.&#x20;

<br>

## Why should people use Web3 applications built on Bitcoin instead of those built on other public chains like ETH or Solana?

Sunny: Bitcoin is the earliest public chain and pioneered the blockchain industry. Counterintuitively, although Bitcoin was designed the earliest and lacks smart contracts, from an architectural perspective, it is the best carrier for Web3 applications. Let's look at the advantages of Bitcoin as a Web3 application carrier compared to other solutions:

1. 1.It has the highest consensus, decentralization, and security.
2. 2.The UTXO architecture is globally stateless, naturally suitable for high concurrency.
3. 3.On-chain data storage is an inherent capability of Bitcoin, which is simpler and more elegant than other blockchains.
4. 4.The smallest unit of Bitcoin, satoshi, is naturally atomic and indivisible, making it the best carrier for Web3 data.

In hindsight, it seems that the underlying design philosophy of Bitcoin was intended for the future of Web3. Of course, Bitcoin has issues like congestion and previously lacked a dedicated foundational protocol for building Web3, but fortunately, MetaID has now emerged.


# MetaID Philosophy

MetaID aims to build a vast array of Web3 applications on Bitcoin and its isomorphic blockchains. We believe that the future of robust Web3 applications should have the following characteristics, which have been the design goals of MetaID from its initial version:

* **Ownership of Data:** Data should be completely owned by the data producer, who can freely trade their data.
* **Single Private Key Access:** Users should be able to access all Web3 applications with a single private key.
* **On-Chain Data:** User data should be as much on-chain as possible to ensure immutability, ease of reconstruction, and reduced global verification costs (verified once upon being put on-chain).
* **Declarative Data Deletion and Modification:** On-chain data should support declarative deletion and modification to cater to all types of applications.
* **Miners' Ability to Delete Data:** On-chain data should allow miners to delete data (as outlined in the Bitcoin whitepaper), but the data should still be preserved in a distributed manner post-deletion.
* **Interoperability of Data:** Data should be interconnected across applications, breaking down information silos and removing data barriers between applications.
* **Integration of Assets and Data:** Assets and data should be closely integrated, with the value of assets being built upon the value of user data.

## Scaling MetaID

The goal of MetaID is not just to build a small number of simple Web3 applications, but to enable the emergence of a vast array of MetaID applications that ultimately gain widespread adoption. However, it is well known that Bitcoin currently has low performance and high transaction fees, which clearly cannot support a large number of Web3 applications running on top of it. If MetaID applications only run on the Bitcoin main chain, MetaID cannot be widely adopted. For MetaID to succeed, it must address the scaling issue. Our philosophy on how MetaID should solve the scaling problem is as follows:

* To solve the scaling problem, MetaID must support multiple chains. We believe that as long as a blockchain is homogeneous with Bitcoin and has a certain level of hashrate, MetaID should support it (see the section "On Cross-Chain" for details).
* The ideal Bitcoin sidechain/layer 2 should be homogeneous with Bitcoin, and these sidechains/layer 2 should be able to form a large, unified UTXO network with Bitcoin (see the section "On Cross-Chain" for details).
* Due to the stateless and highly concurrent nature of the UTXO architecture, Bitcoin sidechains/layer 2 based on the UTXO architecture should actually be considered an extension of the Bitcoin network. When the Bitcoin main network is congested, MetaID transactions can be created on these Bitcoin sidechains; when these sidechains also become congested, more homogeneous sidechains can be added. In this way, under the unified UTXO network, there is no physical limit to the scaling capacity, only limited by the total hashrate - and the limit of hashrate is essentially the limit of human electricity. Therefore, with MetaID supporting a unified UTXO network, the scaling problem is thoroughly solved to a certain extent, providing a theoretical basis for large-scale adoption.
* Users can freely choose which UTXO public chain to store their MetaID data on, but the significance of storing data on blockchains with different hashrates is obviously different. For example, if Bitcoin's hashrate is 1000 times higher than that of sidechain A, it also means that MetaID data stored on Bitcoin is 1000 times more secure than that stored on sidechain A, and the energy required is also 1000 times higher (hashrate == energy). Therefore, we introduce the concept of PoP to reflect the hashrate value contained in different MetaID data.
* Bitcoin is currently the public chain with the highest consensus and hashrate, which also means that assets stored on Bitcoin will obtain the highest security. Although Bitcoin-related sidechains have low hashrates, they have low transaction fees and are almost never congested. Therefore, we believe that the best future practice for MetaID-based Web3 applications is to run general application data on Bitcoin sidechains, while important MetaID assets/data are stored on the Bitcoin main chain.


# MetaID Resources

### Infrastructure

#### MetaID Website:

[https://metaid.io](https://metaid.io/)

#### MetaID App Node:

You can obtain MAN here

<https://github.com/metaid-developers/man-indexer>

Online MAN browser and service\
[https://man.metaid.io](https://man.metaid.io/)

#### MetaID SDK(TS)

You can get the MetaID-TS-SDK here

<https://github.com/metaid-developers/metaid>

#### MetaIDProtocols.com

You can publish and view protocols formulated by application party here, and reuse this protocol data

[https://metaidprotocols.com](https://metaidprotocols.com/)

### MetaID-based Applications

Bitbuzz:

[https://bitbuzz.io](https://bitbuzz.io/)

### Others

If you are developing MetaID applications or need the MetaID Logo, please take it:

{% file src="/files/9UJI4McFLRLDFdV9l5Ct" %}


# MRC-20

{% hint style="warning" %}
Please note that this protocol is still under testing on the testnet, and we will activate the protocol at an appropriate block height on the Bitcoin mainnet after thorough testing.
{% endhint %}

MRC-20 is a fungible token issuance protocol based on MetaID, allowing users to issue assets and define minting methods through the MRC-20 protocol. Compared to other asset issuance protocols, the primary feature of the MRC-20 protocol is its ability to closely integrate minting methods with personal chain data and the MetaID protocol, thus accommodating various on-chain activity asset issuance methods. In simple terms, MRC-20 is a fungible token issuance protocol designed to meet the needs of future Web3 activities.

## Protocol Format

### **Deployment**&#x20;

#### **Path:** `/ft/mrc20/deploy`&#x20;

The backend indexer should only validate and index deploy data that matches the specified path.

The PIN under this path does not accept modify and revoke operations

#### **Protocol Format:**

```json
{
  "tick": "satoshi", // 2-24 characters
  "amtPerMint": "1000", // Total tokens obtained per mint [1, 1e12]
  "mintCount": "100", // Maximum allowable mint count [1, 1e12]
  "tokenName": "SatoshiTheLegend", // Optional, full name of the token, 0-48 characters
  "decimals": "8", // Optional, decimal places 0 to 12, default is 8  
  "premineCount": "60", // Optional, number of premined tokens during deployment, default is 0, [0, mintCount]
  "beginHeight": "851235", // Optional, the block height when minting event begins
  "endHeight": "851781", // Optional, the block height when minting event ends
  "metadata": "Arbitrary Data", // Optional, can contain additional information such as token description, icon, etc., no format requirements
  "payCheck": { // Optional, check payment to verify minting qualification
    "payTo": "address", // Check if output matches the specified address
    "payAmount": "" // Check if the specified amount of satoshi is paid
  },
  "pinCheck": { // Optional, check PIN to verify minting qualification
    "creator": "", // Creator of the PIN, using the complete MetaID
    "path": "/", // Path of the PIN
    "count": "1", // 0~n, required number of PINs
    "lvl": "6" // Minimum level of the PIN
  }
}
```

#### **Key Points:**

* After a legitimate genesis transaction, the tick will be assigned a unique ID used to identify the MRC-20 token. This ID is represented by pinid.
* The `tick` is globally unique and cannot be duplicated, and its validity is determined on a first-come-first-served basis.
* Total supply = `amtPerMint` \* `mintCount`.
* `metadata` is a customizable information item that can bind token-related information, such as a description or image.
* `beginHeight` and `endHeight` define the valid timeframe for minting events. If `beginHeight` is not specified, it defaults to the deployment PIN's block height; if `endHeight` is not specified, it implies no end time limit.

#### **`premineCount` Explanation:**

* The deployer can set premine parameters, representing the number of minting premined during the deployment transaction.
* The premined tokens are directly allocated to the deployer’s address upon confirmation of the deployment transaction.
* Total premine tokens = `amtPerMint` \* `premineCount`.
* PremineCount is optional, with a default value of 0, ranging from 0 to mintCount. Values outside this range are considered invalid.
* Example: In a deploy setting with `amtPerMint` = 10000, `mintCount` = 100, and `premineCount` = 60, 60 out of the total 100 minting events are premined, leaving 40 for public minting.

#### **`payCheck` Explanation:**

* If the deployer sets the `payCheck` item, each minting event will verify if the minting transaction has paid the specified amount of satoshi to the specified address. If the requirement is not met, the minting is invalid.
* The `payTo` item specifies the address to which satoshi must be transferred during minting; `payAmount` specifies the amount of satoshi to be transferred to the `payTo` address.

#### **`pinCheck` Explanation:**

* If the deployer sets the `pinCheck` item, each minting event will verify if the minting transaction includes a PIN that meets the specified conditions. If the requirement is not met, the minting is invalid.
* `creator` checks if the PIN creator is the specified MetaID user.
* `path` checks if the PIN path matches the specified path.
* `path` format should follow the MetaID protocol's path specification and supports path payload content matching.
  * `/path[‘payload’]` matches the entire content under the specified path payload.
  * `/path[‘key’=’value’]` matches the key and value under the specified path payload.
* `count` verifies the number of PINs that meet the conditions, with a default value of 1.
* `lvl` checks if the PIN level meets the requirement. `lvl` is determined by the PIN's PoP value. Refer to the PoP and Lvl value description for details.
* The four parameters in `pinCheck` can be combined to form minting requirements adaptable to multiple scenarios.

#### **`pinCheck` Examples:**

```json
// No restrictions on path, difficulty, or creator; any PIN qualifies for minting
"pinCheck": {
  "count": "1"
}

// Requires a PIN from the simplebuzz protocol
"pinCheck": {
  "path": "/protocols/simplebuzz"
}

// Requires a PIN that follows a specific MetaID
"pinCheck": {
  "path": "/follow['metaid_of_me']"
}

// Requires a PIN that has a specific 'like'
"pinCheck": {
  "path": "/protocols/paylike['liketo'='abcdef...']"
}

// Any two PINs under /protocols qualify for minting
"pinCheck": {
  "path": "/protocols/*",
  "count": 2
}

// Requires owning my PIN to qualify for minting
"pinCheck": {
  "creator": "abcdef0123457" // Requires a PIN created by MetaID "abcdef0123457"
}
```

### Minting

#### **PIN Path:** `/ft/mrc20/mint`&#x20;

The backend indexer should only validate and index mint data that matches the specified path.

The PIN under this path does not accept modify and revoke operations

#### **Protocol Format:**

```json
{
  "id": "479f8579e5dcdbef868a61541f0d55efccfee1704c8a03f07fb1d97577104d53i0" // tokenID, this tokenID is the PINID of the deploy transaction
}
```

#### Key Points:

* The protocol has only one parameter, which is `id`, representing the tokenID to be minted. The tokenID corresponds to the PINID of the Deploy transaction.
* The total amount of tokens minted is determined by the `amtPerMint` parameter in the Deploy file. If the minting is successful, the total amount of tokens minted will be transferred to the first satoshi of the first output of the Mint transaction.
* The validity of the minting is determined by the indexer service, which verifies the minting transaction according to the relevant conditions and constraints specified in the Deploy PIN. The verification rules are based entirely on on-chain data, ensuring consistent results across different indexers developed by various developers.
* If the Deploy file has `pinCheck` requirements, the Mint transaction input needs to reference one or more valid PINs to complete the PIN verification.
* A single PIN can only be used **once** in the minting event of the same token.
* If the Deploy file has `payCheck` requirements, the Mint transaction must have an output that meets the address and amount requirements specified in the `payCheck`.
* Minting does not support cross-chain minting, meaning the Mint transaction must be on the same chain as its corresponding Deploy transaction.

#### Example of Mint Transaction Construction

<figure><img src="https://1852888944-files.gitbook.io/~/files/v0/b/gitbook-x-prod.appspot.com/o/spaces%2FQqzh03Cj3B0aOuGYLJKs%2Fuploads%2FGZGl4gT2OfsL5llX2XaS%2Fimage.png?alt=media&amp;token=2bf82481-d97e-4f60-a8df-e7401d12cdcd" alt=""><figcaption><p>Using Taproot envelope minting, the minting conditions for this MRC-20 require 3 pins (<code>count: 3</code>) and a <code>payCheck</code>condition that requires paying 100,000 satoshi BTC to the address xxx.</p></figcaption></figure>

### Transfer

{% hint style="info" %}
There are two forms of transfer: native transfer and data transfer.
{% endhint %}

#### **Native Transfer (Direct Transfer)**

A native transfer is a simple, Layer 1 transfer method that does not rely on writing transfer data. It is completed purely through UTXO transfers.

Native transfers are suitable for scenarios that do not require MRC-20 change, such as:

1. Alice transfers all of a certain MRC-20 token to Bob.
2. The quantity of a certain MRC-20 token that Alice needs to transfer to Bob is exactly the sum of one or more MRC-20 UTXOs.

#### **Native Transfer Transaction Construction**

When the input includes MRC-20 UTXO and the transaction does not specify transfer data (OP\_RETURN or Taproot data), all MRC balances are transferred to the first non-OP\_RETURN output.

<figure><img src="https://1852888944-files.gitbook.io/~/files/v0/b/gitbook-x-prod.appspot.com/o/spaces%2FQqzh03Cj3B0aOuGYLJKs%2Fuploads%2FJ37VXfVoSODVJb32vmM2%2Fimage.png?alt=media&amp;token=d31d8c38-e37e-4d1a-9823-1249eec073a2" alt=""><figcaption><p>Native Transfer</p></figcaption></figure>

### Data Transfer (MRC-20 Allocation)

* Data transfer refers to the transfer method that explicitly writes transfer description data in the Taproot envelope specified by the MetaID protocol. It uses JSON format. By specifying, it defines how the MRC-20 balance in the input of the transaction is allocated to different outputs.
* Data transfer is suitable for all complex transaction types that require multiple output allocations or need to handle balance change.
* The PIN Path for data transfer is `/ft/mrc20/transfer`.
* Data transfer uses a data structure similar to PIN, where the operation type is `hide`, meaning it does not generate a corresponding UTXO and does not carry a pinId.
* If the allocation scheme exceeds the total amount of MR-C20 contained in the input, the allocation is considered invalid, and it falls back to the default direct transfer mechanism, transferring all MRC balances in the current transaction to the first non-OP\_RETURN output.
* Any unallocated balance in the input will use the default direct transfer mechanism, automatically assigning the remaining balance to the first non-OP\_RETURN output. This mechanism can be seen as automatic change, defaulting the unallocated balance to the first output.
* Other unrecognized data transfer formats are considered illegal and will fall back to the default direct transfer mechanism, transferring the MRC-20 balance in the transaction to the first output.

#### Data Transfer Format

Data transfer is written in the payload of the MetaID envelope as an array.

```typescript
type MRC20AllocationItem = {
	id: string
	amount: string
	type?: 'transfer' | 'teleport' = 'transfer'
	vout?: number
	coord?: string
}

type MRC20Allocation = MRC20AllocationItem[]
```

#### Data Transfer Field Descriptions

* **`id`:** The MRC20 tokenID of the allocated token.
* **`amount`:** The quantity of token allocated.
* **`type`:** The operation type. There are two types:
  * **`transfer`:** (default) Transfer, meaning the balance is transferred to a specific output in the current transaction. When the type is `transfer`, `vout` must be specified.
  * **`teleport`:** Transfer to a pre-existing UTXO on another chain. When the type is `teleport`, `coord` must be specified. Details of teleport are described in the next section.
* **`vout`:** The output index to which the token is allocated.
* **`coord:`** When teleporting, specifies the location of the UTXO on the other chain in the format `${txid}i${vout}`.

#### Data Transfer Example

The following JSON example is the payload item in the MetaID protocol specification, and the outer layer should follow the MetaID envelope specification.

```typescript
const allocation: MRC20Allocation = [
  {
    "amount": "100",
    "vout": 0,
    "id": "479f8579e5dcdbef868a61541f0d55efccfee1704c8a03f07fb1d97577104d53i0", // 'token1'
  },
  {
    "amount": "256",
    "vout": 3,
    "id": "bcccd98a7a1250f26b57d47cfdd36a95866d4bee59c32c9d4e71a6cc1f3429a5i0", // 'token2'
  },
  {
    "amount": "300",
    "vout": 3,
    "id": "479f8579e5dcdbef868a61541f0d55efccfee1704c8a03f07fb1d97577104d53i0", // 'token1'
  },
];

const pinData = {
	metaidFlag: 'metaid',
	operation: 'hide',
	path: '/ft/mrc20/transfer',
	contentType: 'application/json',
	payload: JSON.stringify(allocation) // Serializes the allocation data to JSON and puts it in the payload field
}
```

In the above transfer transaction, 100 of `token1` are assigned to the output at index 0; 256 of `token2` are assigned to the output at index 3; 300 of `token1` are assigned to the output at index 3.

<figure><img src="https://1852888944-files.gitbook.io/~/files/v0/b/gitbook-x-prod.appspot.com/o/spaces%2FQqzh03Cj3B0aOuGYLJKs%2Fuploads%2F9joshktC5gcUyJoc5UCv%2Fimage.png?alt=media&amp;token=8b32080b-fee8-45a9-9e11-613c7d21893c" alt=""><figcaption><p>Full Allocation</p></figcaption></figure>

<figure><img src="https://1852888944-files.gitbook.io/~/files/v0/b/gitbook-x-prod.appspot.com/o/spaces%2FQqzh03Cj3B0aOuGYLJKs%2Fuploads%2FlV78PYBSr8LJ7ovsC8TF%2Fimage.png?alt=media&amp;token=dfbf209d-4210-4bc5-af6b-832d3ee4c49d" alt=""><figcaption><p><strong>Partial Allocation:</strong> Any unallocated balance is automatically assigned to the first output.</p></figcaption></figure>

<figure><img src="https://1852888944-files.gitbook.io/~/files/v0/b/gitbook-x-prod.appspot.com/o/spaces%2FQqzh03Cj3B0aOuGYLJKs%2Fuploads%2FYpj40wvnBySA56VC0ZcQ%2Fimage.png?alt=media&amp;token=43d63666-cfa3-45e7-aaae-8aa8c5696a71" alt=""><figcaption><p><strong>Invalid Allocation:</strong> If the allocation scheme exceeds the balance in the input, the scheme is ignored, and it falls back to the default direct transfer mechanism.</p></figcaption></figure>

## Teleport (Cross-Chain)

### **Teleport Example**

```typescript
const allocation: MRC20Allocation = [
  {
    amount: '100',
    id: '479f8579e5dcdbef868a61541f0d55efccfee1704c8a03f07fb1d97577104d53i0', // 'token1'
    coord: 'bcccd98a7a1250f26b57d47cfdd36a95866d4bee59c32c9d4e71a6cc1f3429a5i2', // Teleport coordinate, using pinId structure to locate utxo
    type: 'teleport',
  },
]

const pinData = {
	metaidFlag: 'metaid',
	operation: 'hide',
	path: '/ft/mrc20/transfer',
	contentType: 'application/json',
	payload: JSON.stringify(allocation) // Serializes the allocation data to JSON and puts it in the payload field
}
```

Teleport realizes the cross-chain functionality of MRC-20 token and can be seen as an extended dimension version of transfer. Transfer allocates token balances to the outputs of the current transaction, while teleport allocates balances to outputs on other chains.

* **coord (coordinate):** Uses the format `${txid}i${vout}` to locate the target UTXO on another chain.
* The UTXO pointed to by `coord` is identified by the indexer to determine the chain it belongs to; no need to specify the chain in the data.
* If the UTXO pointed to by `coord` does not exist (i.e., the indexer cannot find it), the transaction is still considered valid, but the teleported balance is considered burned.
* Teleport can coexist with transfer in the same transaction, with teleport allocation having higher priority than transfer.

<figure><img src="https://1852888944-files.gitbook.io/~/files/v0/b/gitbook-x-prod.appspot.com/o/spaces%2FQqzh03Cj3B0aOuGYLJKs%2Fuploads%2FvZ0yBF4Sz4xke93PBCIp%2Fimage.png?alt=media&amp;token=356203c5-b1ae-4276-9da3-0c45a112bdff" alt=""><figcaption><p>Teleport Example</p></figcaption></figure>

### Teleport and transfer can coexist at the same level

<figure><img src="https://1852888944-files.gitbook.io/~/files/v0/b/gitbook-x-prod.appspot.com/o/spaces%2FQqzh03Cj3B0aOuGYLJKs%2Fuploads%2FU70r2kuaqIdddOk5GETX%2Fimage.png?alt=media&amp;token=4aa479cf-9206-4d58-89f1-d9658af049a8" alt=""><figcaption><p>Teleport and transfer coexist</p></figcaption></figure>


# MRC-721

{% hint style="warning" %}
Please note that this protocol is still under testing on the testnet, and we will activate the protocol at an appropriate block height on the Bitcoin mainnet after thorough testing.
{% endhint %}

## Introduction <a href="#jie-shao" id="jie-shao"></a>

MRC-721 is an NFT album protocol based on MetaID. Although each piece of data within the MetaID protocol is an NFT, we still need a specialized NFT album protocol to facilitate the display and sale of NFTs in album format. This protocol can be applied to various NFT albums, including music NFT albums, art creation NFT albums, book NFT albums, etc.

## Protocol Format <a href="#xie-yi-ge-shi" id="xie-yi-ge-shi"></a>

### Album <a href="#zhuan-ji" id="zhuan-ji"></a>

#### Base Path: `/nft/mrc721/{collection_name}`

Users should create NFT PINs under `/nft/mrc721/{collection_name}`, which signifies that the related NFTs belong to the album {collection\_name}. The format of the PINs is not restricted.

For instance, if a user wants to create an NFT album named “metabot,” they should create all related NFT PIN files under the path `/nft/mrc721/metabot`.

#### Key Points

* All NFT files and other files stored under the `/nft/mrc721/` path do not accept modify, revoke, and hide operations. This means that all files under the MRC-721 protocol cannot be modified, revoked, or hidden.
* `collection_name` can be any characters as long as the final path conforms to the MetaID PIN path specifications.

### Album Description Protocol <a href="#zhuan-ji-shuo-ming-xie-yi" id="zhuan-ji-shuo-ming-xie-yi"></a>

#### Path: `/nft/mrc721/{collection_name}/collection_desc`

This protocol provides an explanation and description of the album at its respective path. Only NFT albums with a collection\_desc protocol file will be indexed by the backend indexer.

#### Album Description Protocol Format:

```
{
	"name": "the full name of the collection",
	"totalSupply": 5, // Maximum supply of the album, acceptable values range from -1 to 1e12; default to -1, meaning unlimited; optional
	"royaltyRate": 5, // Sales royalty rate for the album, in percentage, 5 means 5%; acceptable range 0-20, default to 0; optional
	"desc": "description of the collection", // optional
	"website": "https://the-website-of-the-collection", // optional
	"cover": "metafile://your-nft-cover-pinid", // optional
	"metadata": "any data if needed" // optional
}
```

#### Key Points

* collectionid is the pinid of the `collection_desc` protocol; collectionid is the index value of the album.
* `totalSupply` is the maximum issuance of the album. The indexer only indexes PINs under the album path corresponding to the `totalSupply` value. PINs exceeding the `totalSupply` number are considered invalid for the album. For example, if `totalSupply` is 999, only the first 999 PINs created are considered valid for the album.
* Each album can have only one `collection_desc` protocol. If there are multiple collection\_desc protocols, only the first one is taken, and the others are ignored.

### NFT Item Description Protocol <a href="#nft-item-shuo-ming-xie-yi" id="nft-item-shuo-ming-xie-yi"></a>

#### Path: `/nft/mrc721/{collection_name}/item_desc`

This protocol is used to describe each item within the album. It is optional and serves as a supplementary description of the related NFT items. Its absence does not affect the creation and indexing of the NFT album.

#### NFT Item Description Protocol Format:

```
{
"items":
[{
		"pinid":"the-pinid-of-nft", //optional
		"name":"the-name-of-the-NFT-Item",//optional
		"desc":"the description of the specific NFT",//optional
		"cover":"metafile://your-nft-cover-pinid",//optional
		"metadata":"any arbitrary data you can place here"//optional
	},
//repeat item object if needed
]
}
```

#### Key Points

* `item_desc` is a descriptive file for each NFT within the album. It is optional, and its absence does not affect the backend indexer’s indexing of the NFT album.
* An NFT album can have multiple `item_desc` protocol files.
* If there are multiple duplicate pinids, the first one is used, and information about the existing pinid will be ignored.
* If the pinid points to a non-album pinid, it will be ignored.


# 概要

## MetaID 是什麼

MetaID 是一個構建在比特幣及其同構區塊鏈上的統一身份和數據格式協議。基於 MetaID 協議，開發者可以在比特幣上構建各種數據互聯互通，數據歸用戶所擁有的 Web3 應用。

### 簡單來說，MetaID 可以用於

* 在比特幣上構建所有類型的Web3 應用,包括社交類應用、遊戲、電商應用等。
* 在比特幣上發行和數據價值緊密結合各種FT 和 NFT資產。

## MetaID **特點**

* 將離散的區塊鏈數據抽象成有序的樹狀結構數據，為在比特幣上構建 Web3 應用而準備；
* 用戶信息和應用數據全部上鏈，保存在由用戶控制的私鑰所對應的地址上，做到用戶數據和其他方無關，數據歸屬權徹底由數據產生者所有；
* 每一條 MetaID 鏈上數據天然是一條非同質化 Token（NFT）數據，用戶可自由轉移和交易，用戶徹底掌握自己數據；
* 不同應用間的數據可以相互連通，消除應用間數據孤島；不同協議數據可以在用戶的 MetaID 關聯下相互組合，Web3 應用開發工作大為減少。

## MetaID**願景**

* 比特幣由於具有高共識、高並發以及支持數據在本鏈保存等特性，是成為 Web3 應用的最好載體，MetaID 目標是成為比特幣生態上最大的用戶身份和數據統一協議；
* MetaID 將打造一個數據互聯互通、數據歸屬用戶、用戶數據和資產天然結合的新的 Web3 開發範式，我們相信 Bitcoin = Money+Data

## MetaID基本原理

通過 MetaID 協議，將散落在區塊鏈上的基於 MetaID 的交易，以“人”為分類方式，將數據以樹狀結構進行完全分類。在 MetaID 協議的視角下，所有鏈上數據均抽象成“MetaID 樹”的格式在鏈上進行保存，鏈上數據從此只有一棵棵“MetaID 樹”，因此可以做到數據和鏈無關，甚至和保存數據的信封格式無關，只要最終實現的“MetaID 樹”符合 MetaID 格式，便可以實現數據歸屬用戶、數據有序存放和數據互聯互通等特點。故此在這基礎上可以構建一切形式的 Web3 應用。

#### 以“人”為分類方式，將離散的區塊鏈數據變成有序的結構數據

<figure><img src="https://content.gitbook.com/content/NHx0f4Bxw8OTbRs9kele/blobs/f3udB7CXHu01v5ZtCF9L/WechatIMG24.jpg" alt=""><figcaption></figcaption></figure>

**通過協議重用鏈上數據**

<figure><img src="https://content.gitbook.com/content/NHx0f4Bxw8OTbRs9kele/blobs/FRuIrLcF8InYXT7EMXxo/WechatIMG25.jpg" alt=""><figcaption></figcaption></figure>

**在一個應用中通過 MetaID 組合不同的協議**

<figure><img src="https://content.gitbook.com/content/NHx0f4Bxw8OTbRs9kele/blobs/kTQHHXERnbASrUcRtA9x/WechatIMG31.jpg" alt=""><figcaption></figcaption></figure>

## MetaID**現狀**

**2024 年 5 月：**&#x20;

MetaID 協議已發布最新的 V2.0 版本，並且在開發者社區的努力下，已上了 MAN、MetaID 瀏覽器、MetaID SDK 等基礎設施，並且第一個在 BTC 上的 MetaID 應用鏈上 X(Bitbuzz) 也已上線。


# 術語

在本MetaID 文檔裏,我們引入了一些新術語:

### MetaID

MetaID 定義為用戶數據樹的根部索引值。該值為全局唯一。MetaID 協議本質就是生成這個用戶數據樹的一套約定。本文檔中,MetaID有時既指這個索引值,有時也會將 MetaID 協議和相關方法簡稱為 MetaID。

#### 生成規則

MetaID的生成規則基於將用戶的 Address 通過SHA256哈希處理得到,因此 Address 就自帶有唯一的 MetaID。

```jsx
MetaID=SHA256(Address)
```

#### MetaID樹

符合 MetaID 規則而生成的樹狀數據結構，我們稱為"MetaID 樹"。MetaID 樹是通過用戶自己 PIN 中的path,構建出一個相互關聯、有向無環的樹狀數據結構,詳見"MetaID樹介紹"詞條。

### PIN

PIN是指Personal Information Node，在 MetaID 樹上每一個節點和葉子都是一個 PIN。簡單來說每一條在鏈上銘刻的 MetaID 數據都稱為 PIN,詳見"關於 PIN"詞條。

### PoP

PoP是指 Proof of PIN，它和隨機性以及該 PIN 所在區塊的算力難度相關，用於反映用戶 MetaID 數據的價值和用戶在MetaID 世界中的"工作量"，詳見"關於PoP"詞條。

### MAN

MAN 是指 MetaID App Node，是第一個遵循 MetaID V2 協議的後端索引器，目標是打造基於 MetaID 的分佈式存儲節點，以及方便開發者可以在不依賴第三方服務商開發去中心化的 MetaID 應用。詳見"MAN"部分相關文檔。


# 協議格式

### 協議格式

MetaID 協議的標準規範如下：

```jsx
<metaid_flag> 
<operation> 
<path> 
<encryption> 
<version>  
<content-type> 
<payload> 
```

MetaID 協議標準規範由 7 部分組成，分別是：

#### **\<metaid\_flag>**

固定為“`metaid`”，用作協議標識。

必要選項。

#### **\<operation>**

操作指令，支持 5 種操作指令：

* **`init`**，此指令為在鏈上初始化 MetaID，確定 MetaID 樹的根節點。約定 init 所在 PIN 的 ID 即為 MetaID。init 採用先見原則，後者 init 均無效。該指令將忽略後續的部分，後續的 5 個部分均可填默認值。
* **`create`** 創建內容，在 path 指定的路徑上創建 PIN。
* **`modify`** 修改內容，對 path 指定路徑的 PIN 進行修改。
* **`revoke`** 作廢內容，對 path 指定路徑的 PIN 聲明作廢。
* **`hide`** 創建並隱藏 PIN，使用該指令後，將不分配 PINNumber。

必要選項。

#### \<path>

PIN 所在的路徑。表示 path 有三種模式，如下：

* “/” 開頭，通過路徑定位需創建的 PIN，如 /protocols/simplebuzz。
* “#” 開頭，通過 PINNumber 定位 PIN。
* “@” 開頭，通過 PINID 定位的 PIN。

必要選項。

#### \<encryption>

針對 PIN 內容的加密方式。0 為不加密；1 為 ECIES 加密；2 為 ECDH 加密。

非必選項，若不傳必須默認使用`OP_0`占位，默認為`0`。

#### **\<v**ersion>

PIN 的版本號。不同版本號意味著 payload 內容的格式可能不相同。

非必選項，若不傳必須默認使用`OP_0`占位，默認為`0`。

#### \<content-type>

約定`payload`的文件格式，包含了`payload`的編碼方式。

所有的媒體類型可參考：<https://www.iana.org/assignments/media-types/media-types.xhtml>

非必選項，若不傳必須默認使用`OP_0`占位，默認值為`application/json`。

#### \<payload>

`payload`為任意數據內容，其數據格式由 `<content-type>` 規定。MetaID 協議對`payload` 長度沒限制，只應受該 PIN 所在區塊鏈的單條交易數據大小約束。

非必選項，若不傳必須默認使用`OP_0`占位。


# MetaID 樹介紹


# MetaID樹

### 概括

用戶的數據和操作以 PIN 的形式存儲在區塊鏈中，其中，用戶的 MetaID 樹都可以通過 PIN 中的 `path` 來構建出樹狀結構，形成一個相互關聯、有向無環的數據結構，用於組織和管理用戶在區塊鏈上的數據和操作。

<figure><img src="https://content.gitbook.com/content/NHx0f4Bxw8OTbRs9kele/blobs/SqjzcDUWsUBzNs8NESbR/image.png" alt=""><figcaption></figcaption></figure>

#### MetaID樹默認保留節點

MetaID 樹默認保留了 `info`，`protocols`，`file`，`nft`，`ft`，`follow` 路徑，當 A 地址生成一個 operation 為 `init` 的 PIN，則 A 地址完成 MetaID 的生成，默認給其 MetaID 樹結構分配保留的路徑：

<figure><img src="https://content.gitbook.com/content/NHx0f4Bxw8OTbRs9kele/blobs/J9JwhJR1BfSGmy0oXp9F/image.png" alt=""><figcaption></figcaption></figure>

默認給 MetaID 樹保留路徑 `/info`、`/protocols`、`/file`、`/ft`、`/nft`、`/follow`。並且分配了 MetaID，其 MetaID 為用戶 A 生成 `init` 的 PINID

* `/info` ：用戶個人信息的存放路徑
* `/protocols` ：用戶應用協議信息的存放路徑
* `/file` ：用戶文件的存放路徑
* `/ft` ：用戶 ft 資產行為的存放路徑
* `/nft` ：用戶 nft 資產行為的存放路徑
* `/follow` ：用戶關注行為的存放路徑


# Info 節點

### Info 節點概述

Info 節點專門用於存儲用戶的個人信息。通過 Info 節點，用戶可以在區塊鏈上安全地存儲和管理個人信息。

### 關於 Info 基本信息

協議規定 Info 節點固定包含以下 3 個子節點：

* `name`：用戶名，建議不加密。格式固定為 `text/plain`
* `avatar`：用戶圖像，建議不加密。格式為 `binary`，`payload` 部分存放圖片的二進制流
* `bio`：用戶個人簡介，建議不加密。格式固定為 `text/plain`

### 數據格式

用戶個人信息的存儲採用如下格式：

```c
OP_FALSE
OP_IF
   metaid                
   create                
   /info/name            
   0                     
   OP_0                  
   text/plain            
   Alice                 // 用戶姓名（示例）
OP_ENDIF
```

#### Info 節點路徑

Info 節點路徑採用 **`/info`** 作為路徑，並通過後續路徑區分不同類型的個人信息。例如，`/info/name` 可以用於存儲用戶的姓名，而 `/info/avatar` 可以用於存儲用戶的頭像信息。通過在不同類型路徑下存儲個人信息，用戶可以清晰地組織和管理自己的個人資料。

如應用方需增加用戶信息，可自行添加在 `/info` 節點後。


# File 節點

### File 節點概述

File 節點是專門用於存放文件的 PIN 路徑。通過 File 節點，用戶可以將文件以 PIN 的形式安全地存儲在區塊鏈上，實現去中心化的文件存儲和管理。

### 數據**格式**

存儲文件的 PIN 內容遵循如下格式：

```go
OP_FALSE
OP_IF
	metaid            
	create            
	/file/file-name-1.jpg     
	0                 
	OP_0              
	image/jpg;binary  
	<file data>        // Payload - 文件的二进制内容
OP_ENDIF
```

在這裡，`<file data>` 包含了文件的二進制內容，而 `content-type` 指定了文件的數據類型（例如，`image/jpg;binary` 表示 JPEG 格式的圖片文件）。

### File 節點路徑

File 節點的路徑使用 `/file` 作為存儲路徑，並可通過文件名或子級路徑來進一步區分不同的文件。通過 File 節點的路徑，用戶可以在 MetaID 的樹狀結構中輕鬆地定位和檢索特定的文件 PIN，從而實現對文件的有效組織和管理。

### **File Referencing**

在 MetaID 中，文件引用是一種基礎的業務操作，具有極其重要的地位。這特性允許用戶在應用協議中引用已存在的鏈上`file`數據，進一步提高數據連接性並增強用戶體驗。為了實現此操作，我們定義了一種特殊的文件引用規則。

#### **文件引用格式**

當在一個子協議中需要引用一個 **`file`**，例如在 **`payload`** 中，我們使用以下格式：

```
metafile://{pinid}
```

其中，`PINID` 是待引用文件的唯一標識符。通過此格式，我們可以建立從當前協議到特定 **`file`** 的引用鏈接。

<figure><img src="https://content.gitbook.com/content/NHx0f4Bxw8OTbRs9kele/blobs/YDsMmDvLJyZwPmzFMWgW/image.png" alt=""><figcaption></figcaption></figure>

#### 例子

舉個例子，發一個帶有某個文件的貼：

```json
//Payload
{
	"content":"Hello bitcoin world!",
	"contentType":"text/plain",
	"createTime":1710741614716,
	"quoteTx":"",
	"attachment":[
		"metafile://{pinId}",
	]
}
```

最終上鏈內容即為：

```json
OP_FALSE
OP_IF
	metaid                           
	create                          
	/protocols/simplebuzz         
	0                                
	0                                
	application/json;utf-8              
	{"content":"Hello bitcoin world!","contentType":"text/plain","createTime":1710741614716,"quoteTx":"","attachment":["metafile://{pinId}",]}       //Payload
OP_ENDIF
```


# FT 節點

FT 節點用於保存不同資產協議的相關交易，包括部署、鑄造等 PIN 信息。

如基於 MRC20 協議的資產相關數據，均放置在路徑 `/FT/MRC20/` 下。

此頁面內容將在 MRC20 協議發布後進行詳細補充。


# NFT 節點

NFT 節點用於保存不同 NFT 協議的相關交易，包括專輯信息等。

例如基於 MRC721 協議的資產相關數據，均放置在路徑 `/NFT/MRC721/` 下。

此頁面內容將在 MRC721 協議發布後進行詳細補充。


# Protocols 節點

Protocols 節點用於記錄用戶使用各種第三方協議的交易情況。Protocols 節點下的子路徑為第三方協議路徑，其應為協議名稱。協議路徑下為用戶使用該協議所產生的具體交易。結構如下：

<figure><img src="https://content.gitbook.com/content/NHx0f4Bxw8OTbRs9kele/blobs/cUjSzQlnf8UP8lJFIgA8/image.png" alt=""><figcaption></figcaption></figure>

由於 Protocols 的協議是開放的，所有應用方都可以構建自己的協議。每個協議下的結構由協議制定方/應用方自己決定，但需保證協議節點的標識具有唯一性。

#### 關於協議名字的約定

構建一個新協議節點時，`/protocols` 之後的子路徑其為協議名稱，即 `/protocols/{sub-protocol}`。協議名稱沒有限制，應用方可根據自己的需要，構成一個方便閱讀和理解的協議名稱。協議名可以重名，應用方可以根據其格式來獲取所對應的內容。

#### 關於協議的結構和約定

每個協議的結構由協議制定方/應用方約定，每個協議下可以是扁平的一層結構，也可以是複雜的多層結構。如果業務允許的話，該協議的結構和詳細說明應公開，以便其他應用方/數據服務方可以調用和解析。

需注意的是，這些節點的結構雖由協議制定方/應用方決定，但相關的節點創建還是由用戶創建，為用戶所掌握，用戶只記錄和自己相關的協議數據。

#### 協議交易節點

每個子協議下的 PIN 均為用戶使用該協議下的產生的具體交易，每條具體的交易稱為協議交易節點。

* `payload` 為協議數據的存儲處。協議數據由應用方根據約定的協議自行解析。
* `content-type` 為數據類型和編碼方式。應用方需根據 `content-type` 來讀取 `payload` 數據。
* 協議交易節點的子路徑名稱需為域樹中同一層級內是唯一的，以方便以後用 URI 方式查找。例如可以採用 `publickey` 作為子級路徑名稱，也可以自行設定，只需確定與 `publickey` 映射關係即可。

假設某一 MetaID 交易是屬於 SampleBuzz 協議的，其數據格式採用 JSON，數據內容如下：

```
{"content":"This is a test","title":"Test-Title"}

```

那麼，該 MetaID 交易的構建參考如下：

```
OP_FALSE
OP_IF
	metaid                          
	create                           
	/protocols/simplebuzz          
	0                                
	0                                
	application/json;utf-8
	{"content":"This is a test","title":"Test-Title"}
OP_ENDIF
```

或者

```
OP_0
OP_RETURN
	metaid                          
	create                           
	/protocols/simplebuzz          
	0                                
	0                                
	application/json;utf-8
	{"content":"This is a test","title":"Test-Title"}
```

需注意的是，協議交易節點中的 `version` 值代表了其所遵循的協議版本，不同版本號代表其 `payload` 內容有可能不一樣。數據解析時，需根據不同的 `version` 做不同的解析。生成的 MetaID 樹結構參考如下：

<figure><img src="https://content.gitbook.com/content/NHx0f4Bxw8OTbRs9kele/blobs/8E9rojGMdsRNPtAiSCPh/image.png" alt=""><figcaption></figcaption></figure>


# Follow節點

## Introduction

`follow` 是 MetaID 規範的重要組成部分，它允許用戶在區塊鏈網絡中創建和維護他們的社交關係。通過 `follow`，我們能顯著提升 MetaID 的社交能力，為用戶提供更豐富、更深度的交互體驗。

<figure><img src="https://content.gitbook.com/content/NHx0f4Bxw8OTbRs9kele/blobs/2Uax84wtVvAZY278zj8y/image.png" alt=""><figcaption></figcaption></figure>

### Spec

`follow` 協議的腳本格式如下：

```jsx
OP_FALSE
OP_IF
	metaid                           
	create                          
	/follow                         
	0                                
	0                                
	application/json;utf-8                
	{metaid}                        
OP_ENDIF
```

#### 關於 `follow` 的約定

1. 在 `follow` 格式中，`create` 代表關注，`revoke` 代表取消關注。
2. 格式中的 `metaid` 必須是有效且已上鏈的 MetaID。如果 `payload` 中的 `metaid` 無效，那麼 `follow` 是無效的。
3. 在 `revoke` 操作中，`path` 需要定位到一個有效的 PIN，且這個 PIN 必須是有效的 `follow` PIN。

### 示例

以用戶 A 關注用戶 B 為例：

* 用戶 A 的 MetaID：`c08c4e96514ee5c4f91b6df3de7a42f797a36af7265918a6b74d5198f87682ad`
* 用戶 B 的 MetaID：`2464ad8d35e601f8b73c80976104ff00e878f58dc2f2936ec3a269fe34d962c2`

用戶 A 關注用戶 B 的腳本操作如下：

```jsx
OP_FALSE
OP_IF
	metaid                         
	create                           
	/follow                          
	0                               
	0                               
	application/json;utf-8                
	2464ad8d35e601f8b73c80976104ff00e878f58dc2f2936ec3a269fe34d962c2       //用户B的metaid
OP_ENDIF
```

將 `follow` PIN 上鏈後生成的 `pinId` 為：`dcvv5d4377f36c7c2466259593d0d4a0c1e5d7ec19500e082ce1eea3993f22b1aac1i0`

然後，用戶 A 取消關注用戶 B 的腳本操作如下：

```jsx
OP_FALSE
OP_IF
	metaid                           
	revoke                          
	@dcvv5d4377f36c7c2466259593d0d4a0c1e5d7ec19500e082ce1eea3993f22b1aac1  
	OP_0                                
	OP_0                                
	OP_0                
	OP_0
OP_ENDIF
```

關注和取消關注的操作會立即生效，並在鏈上產生相應的記錄。


# MetaID 信封格式

### 信封格式

MetaID 內容完全在鏈上的，MetaID 信封格式在當前 V2 版本中支持兩種方案：

**1. Taproot-Script**

通過利用 Taproot-Script 的“commit/reveal”方案，在輸入的 Taproot 腳本中，放置 MetaID 信封，其中包含可以在 MetaID 上合法執行的各種操作。約定是使用 `OP_FALSE OP_IF ... OP_ENDIF` 將任意不可執行的內容放置在 Taproot 支出腳本中。我們使用 “metaid” 字節（`6D6574616964` 十六進制）來標識該信封為 MetaID 協議。

**Taproot-Script 的 Envelope 方式：**

```jsx
OP_FALSE
OP_IF
	<metaid_flag>
	<operation>
	<path>
	<encryption>
	<version>
	<content-type>
	<payload>
OP_ENDIF
```

**2. Locking-Script**

通過利用 `OpReturn` 操作碼，將數據放在其後，在交易輸出的 Locking-Script 中，放置 MetaID 信封，其中包含可以在 MetaID 上合法執行的各種操作。約定是使用 `OP_RETURN` 將任意不可執行的內容放置在鎖定輸出腳本中。我們使用 “metaid” 字節（`6D6574616964` 十六進制）來指示該信封屬於 MetaID 協議。

**Locking-Script 的 Envelope 方式：**

```jsx
OP_0
OP_RETURN
	<metaid_flag> 
	<operation>
	<path>
	<encryption>
	<version>
	<content-type>
	<payload>
```

信封必須出現在輸出腳本中的 `OP_RETURN` 之後，且在 output 的 index 為 1 的位置，index 為 0 的 utxo 的第一個 satoshi 則是用來承載信封的內容。

<figure><img src="https://content.gitbook.com/content/NHx0f4Bxw8OTbRs9kele/blobs/teLUvbULtyIl1dWQ3rDJ/image.png" alt=""><figcaption></figcaption></figure>

**注意：如果同一交易同時存在 Taproot-Script 和 Data-script 兩種信封格式，以 Taproot-Script 的方式為主。**


# 隱私模型

MetaID 協議的隱私模型由應用方制定。如果應用開發者不希望其用戶數據公開，建議可考慮如下方式：

### 數據鏈上加密

* 將節點的 `encryption` 設置為 `1`，採用 ECIES 加密方式。這樣數據只有用戶自己可查看。具體 ECIES 加解密詳情請參考：[Integrated Encryption Scheme](https://link.juejin.cn/?target=https%3A%2F%2Fen.wikipedia.org%2Fwiki%2FIntegrated_Encryption_Scheme)
* 將節點的 `encryption` 設置為 `2`，採用 ECDH 協商密鑰的方式來處理。數據就只有用戶和應用方能查看，用戶也能授權或委託應用方來授權給第三方來訪問。具體 ECDH 加解密詳情請參考：[Elliptic-curve Diffie–Hellman](https://en.wikipedia.org/wiki/Elliptic-curve_Diffie%E2%80%93Hellman)

### Link模式

MetaID 樹的數據結構關係是透明的，有些用戶不希望其 MetaID 樹數據結構關係信息暴露，此場景下可以使用 `link` 模式。通過 `operation` 設置為 `link`，將節點設置為鏈接節點，指向另外一個數據集，這個數據集可以是另外一個 MetaID，也可以是另外匿名數據集。這樣用戶可以有選擇地使用匿名節點和 MetaID 協議節點。

### Hide模式

當 PIN 交易中的 `operation` 為 `hide` 時，也是隱私模型的一種方式。此時 PIN 將聲明不被索引和應用所引用，可用於本地應用和不希望被索引器以及第三方應用所引用的場景。


# 有關PIN

PIN 是 Personal Information Node 的縮寫，符合 MetaID 格式的每一條鏈上數據均稱為 PIN，由用戶通過私鑰簽名發出，代表了用戶的鏈上個體行為。比如創建 MetaID、發表評論和點贊、部署和鑄造資產等行為都是用一條 PIN 來表示。

PIN 採用序數理論，PIN 內容負載在交易的輸出中，默認在其輸出的第一個 Satoshi 上。當 PIN 被創建時，該交易輸出的第一個 Satoshi 即代表該 PIN。

#### PIN 的擁有者與創作者

每個 PIN 都有兩個主要屬性：擁有者和創作者。

* **創作者 (Creator)**：創作者是指生成 PIN 的原始地址。該屬性由創建 PIN 的交易決定，一旦被設定，無論後續發生何種交易，創作者屬性都是不可改變的。
* **擁有者 (Owner)**：擁有者是指當前擁有 PIN 所代表的 Satoshi 的用戶地址。該屬性可以通過轉移該 Satoshi 來改變。

例如，如果用戶地址 A 創建了一個 PIN，並且這個 PIN 所代表的 Satoshi 當前處於用戶地址 B，那麼，A 是其創作者，B 是其擁有者。

#### **PINID**

一個 PINID 由其交易 ID（TxId）和 PIN 所在交易中的 output 位置（output index）構成。形式如下

```
PINID = {TxId}i{index}
```

PINID 是一個全局唯一的標識符，標記了區塊鏈上的特定交易的特定位置。

#### **PIN Number**

PIN Number 是一個分配給 PIN 的序列號，它按照 PIN 在區塊鏈中的被打包順序來排列，採用先見原則。

#### Transfer

MetaID 的 PIN 是以聰形式存在，允許跟蹤和傳輸單個聰，並以先進先出的方式從交易輸入轉移到交易輸出，轉移過程取決於交易輸入和輸出的順序。

如圖，所有交易輸入裡面，PIN 在 #1001 位置，轉移之後，PIN 也在所有交易輸出裡面的 #1001 位置。

<figure><img src="https://content.gitbook.com/content/NHx0f4Bxw8OTbRs9kele/blobs/zU96RpccDsGK483As5SI/image.png" alt=""><figcaption></figcaption></figure>


# 有關PoP

## &#x20;概要

Proof of PIN（PoP）是 MetaID 中的一個有趣概念，我們參考了比特幣的挖礦原理制定了 PoP 機制。PoP 值反映的是用戶在 MetaID 世界的“工作量”證明。在 MetaID 世界中，用戶最小的“工作量”是發送一條 PIN，因此每條 PIN 都有一個哈希值，並且該將用戶的 PIN 與其所在的區塊難度結合。PoP 值反映了如下兩個維度：

1. 用戶創建 MetaID 數據的數量概況：創建 MetaID PIN 越多，獲得高難度的 PoP 值的概率越高。
2. 用戶創建 MetaID 數據的算力消耗：PoP 值和 MetaID 數據所在區塊鏈算力情況掛鉤，算力越高越容易獲得難度高的 PoP 值。

PIN 如同 SHA256 算力，PoP 如同難度哈希，算力越高則越大概率獲得高難度的哈希值。

通過驗證用戶相關的 PoP 值，我們可以快速評價一個用戶在 MetaID 世界的貢獻度，也讓 PIN 有了等級和稀有度的概念。

### 計算方法

PoP 是通過區塊的 `MerkleRoot` 和 `PINID` 用 SHA256 聯合哈希，然後再與 `BlockHash` 相乘，從而生成一個新的值。具體公式為：

```
PoP = hash(PIN_ID + Merkle_Root) * Block_Hash
```

得出的原始哈希值然後進行 8 進制轉換，轉換後的結果即為 PoP。

以下是計算 PoP 的代碼：

```go
package pop

import (
	"crypto/sha256"
	"encoding/hex"
	"fmt"
	"math/big"
	"strconv"
)

func CalculateHash(pinid string, merkleRoot string) string {
	h := sha256.New()
	h.Write([]byte(pinid + merkleRoot))
	return hex.EncodeToString(h.Sum(nil))
}

func CalculateProductToHexStr(blockhash string, pinHash string) string {
	blockhashByte, _ := hex.DecodeString(blockhash)
	blockhashInt, _ := new(big.Int).SetString(blockhash, 16)
	pinHashByte, _ := hex.DecodeString(pinHash)
	pinHashInt, _ := new(big.Int).SetString(pinHash, 16)
	popByte := new(big.Int).Mul(blockhashInt, pinHashInt).Bytes()
	// 計算總位數：32+32=64
	totalLen := len(blockhashByte) + len(pinHashByte)
	// 需要補 0 的位數
	remainingLen := totalLen - len(popByte)
	for i := 0; i < remainingLen; i++ {
		popByte = append([]byte{0}, popByte...)
	}
	return hex.EncodeToString(popByte)
}

func ConvertToOctalHex(productHex string) (string, int64) {
	productByte, _ := hex.DecodeString(productHex)

	// 轉二進制
	bList := make([]string, 0)
	for _, b := range productByte {
		binaryB := fmt.Sprintf("%b", b)
		bList = append(bList, fmt.Sprintf("%08s", binaryB))
	}
	productBinaryStr := ""
	for _, b := range bList {
		productBinaryStr += b
	}
	productBinaryStr = productBinaryStr[:510]

	bCount := int64(0)
	for _, b := range productBinaryStr {
		if b == '0' {
			bCount++
		} else {
			break
		}
	}

	// 二進制 str 轉 8 進制 str
	octal := ""
	for i := 0; i < len(productBinaryStr); i += 3 {
		binaryStr := productBinaryStr[i : i+3]
		num, err := strconv.ParseInt(binaryStr, 2, 64)
		if err != nil {
			fmt.Println("ParseInt error:", err)
			return "", 0
		}
		octal += strconv.FormatInt(num, 8)
	}
	return octal, bCount
}

func GenPop(pinid, merkleRoot, blockHash string) (string, int64) {
	// 計算 pinHash
	pinHash := CalculateHash(pinid, merkleRoot)
	// blockhash * pinHash
	productHexStr := CalculateProductToHexStr(blockHash, pinHash)
	// 轉 8 進制
	octal, bCount := ConvertToOctalHex(productHexStr)

	return octal, bCount
}
```

PoP 計算的測試用例：

```go
func Test_pop(t *testing.T) {
	pinid := "77aac2ae323748dee3b8b1ae6b7c33c1c4466f568c572ea488f584f041f0de4ei0"    // 64 char hash
	merkleRoot := "e56011a241cb196fc4efbeafef051ca901761ffb569a43146582f9133bfd41d2" // 64 char hash
	blockhash := "000000000000000004c2db0441a47fd3574992d508b8d9d866a789d371aa5060"  // real block hash
	pop, bCountZero := GenPop(mockPinId, merkleRoot, blockHash)

	fmt.Println("POP:", octal)
	fmt.Println("POP-0:", bCountZero)
}
```

### **PoP Level（難度等級）**

在MetaID系統中，PoP值的難度等級是依據類似區塊雜湊的前綴「0」位數來定義。具體而言，PoP值前綴中「0」的數量越多，其對應的難度等級（PoP Level）就越高。系統規定，任何有效的PoP值至少需包含21位前綴「0」，作為最低標準。

為了高效評估與表達PoP的稀有性與難度，MetaID提出了PoP Level的設定。PoP Level為整數，目前體系中共有1至13級，主要應用於PIN稀有度的快速判定、MRC20等場景的資產鑄造等。於不同的主鏈環境下，PoP Level的起始標準有所不同，例如MVC常以1級為初始門檻，BTC則通常從6級起步。

具體難度劃分為：PoP Level為1時，需滿足PoP值前綴有22個「0」；PoP Level為2時，需要有23個「0」；此後每提升一級，「0」的數量相應增加1位。前綴「0」的數量越多，代表PoP值的稀有性及運算挑戰難度越高。

此外，PoP Level等級之間屬指數級增長，即每提升一個等級，PoP值挖掘難度為前一級的8倍，極大提升了高等級PoP的安全性與稀缺性。

### **PoP Score（PoP分數）**

#### **PoP Score 的定義與應用場景**

PoP Score 是為了比 PoP Level 更加精細地評估 PIN 稀有度而設立的數值指標。尤其是在如 MetaSo 系統下的 PEV 值、MDV 值等需要細緻區分 PoP 難度的場景中，PoP Score 能為每一條 PIN 精確地打分及排序。每一條 PIN 都會對應一個 PoP Score，並記錄於 MetaID 系統中。

### **PoP Score 的計算方法**

**a. 確定 PoP Level 整數部分**

以某一 PIN 對應的 PoP 值為例：

```
0000000000000000000000215206653161113226643512614250403542335511435340330664252463510373257440244542222437344512355773452022004517474440724217350505346711227665150775715
```

首先統計前綴連續「0」的數量。假設如上例有 22 個「0」，則對應的 PoP Level 為 1，因此整數部分為 1。

**b. 計算 PoP Sub Octal**

將前綴「0」全部去除後，取其後非 0 部分的前4位數字，作為小數點後的部分。例如，例子中的這4位是「2152」，將其記錄為 PoP Sub Octal。所以此步得到 PoPSubOctal = 0.2152。

需注意，PoP Sub Octal 是特殊的 8 進制小數。

**c. 8進制均勻化轉換**

為使數值分佈更均勻，將 8 進制小數 PoPSubOctal 轉換為 \[0,1] 範圍內均勻分佈的 10 進制小數。此步驟使用 Octal Fraction To Uniform Decimal 方法進行轉換。

**d. 求取 PoP Sub Decimal**

將最終均勻化後的小數記作 PoP Sub Decimal，並採用以下公式修正：

```
PoPSubDecimal = 1 - octalFractionToUniformDecimal(PoPSubOctal)
```

如此可保證小數值越接近0，對應的 PoP Level Decimal 越大，契合難度設計的初衷。

**e. 計算 PoP Level Decimal**

將整數等級與小數等級相加：

```
PoP Level Decimal = PoP Level + PoP Sub Decimal
```

如本例算得 PoP Level Decimal 約為 1.72。

**f. 求取 PoP Score**

以 8 為底數，取 PoP Level Decimal 為指數，得到最終 PoP Score 值：

```
PoP Score = 8 ^ PoP Level Decimal
```

舉例來說，8 的 1.72 次方約等於 35.7531（取小數點後 4 位）。

#### **計算結果**

根據上述計算步驟，在本例中：

```
0000000000000000000000215206653161113226643512614250403542335511435340330664252463510373257440244542222437344512355773452022004517474440724217350505346711227665150775715
```

其 PoP Level 為：Lv.1\
其 PoP Score 為：35.7531


# 一些例子

假設Address：19Up4xZ4Y6CBhUcXSQZdo7tHaGNYFn7EUj，根據協議，其自帶的MetaID：8a15022dd74648c5158d237f41e544e6097b3f27dcc85788a4b7470c063ed33c

```jsx
OP_FALSE
OP_IF
	metaid  
	init  
	/     
	0      
	OP_0   
	OP_0   
	OP_0   
OP_ENDIF
```

<figure><img src="https://content.gitbook.com/content/NHx0f4Bxw8OTbRs9kele/blobs/ePyhCG2522phI7DhKtfO/image.png" alt=""><figcaption></figcaption></figure>

按協議約定，保留以下 `path`：

* `/info`：用於存儲用戶的基本資訊，如用戶名、頭像等。
* &#x20;`/protocols`：用戶可以在此進行應用協議操作。
* &#x20;`/file`：用於文件數據存儲。
* &#x20;`/ft`：用於存儲用戶的 ft 資產行為。
* &#x20;`/nft`：用於存儲用戶的 nft 資產行為。
* &#x20;`/follow`：用戶關注列表數據存於此。

#### 2. 創建用戶用戶名字和頭像

用戶可以通過構建 **PIN** 交易設置自己的姓名和頭像：

* 設置用戶名：用戶要為自己的 `name` 設定值為 Alice，其 `path` 為 `/info/name`。
* 設置頭像：用戶為自己的 `avatar` 設置某一個特定的頭像，其 `path` 為 `/info/avatar`。

以上 `path` 都位於 `/info` 目錄下，表明它們是用戶的個人資訊。

設置用戶名稱：

```jsx
OP_FALSE
OP_IF
	metaid  
	create     
	/info/name 
	0          
	OP_0       
	OP_0      
	Alice      
OP_ENDIF
```

設置用戶頭像：

```jsx
OP_FALSE
OP_IF
	metaid            
	create           
	/info/avatar      
	0                 
	OP_0             
	image/jpg;binary  
	<pfp data>        
OP_ENDIF
```

<figure><img src="https://content.gitbook.com/content/NHx0f4Bxw8OTbRs9kele/blobs/xneC5xCDHFgwYaJmikDZ/image.png" alt=""><figcaption></figcaption></figure>

### 提交 SimpleBuzz 協議

假設用戶想發一個 `buzz`，他需要在 `/protocols/simplebuzz` 部分創建並提交一個新的 `PIN`。

這樣，這個 `buzz` 數據就被添加到了 `/protocols/simplebuzz` 路徑下，表示它是該用戶在 SimpleBuzz 協議下的一條記錄。 OP\_FALSE

```jsx
OP_FALSE
OP_IF
	metaid                           
	create                           
	/protocols/simplebuzz            
	0                                
	0                               
	application/json;utf-8                
	{"content":"Hello bitcoin world!","contentType":"text/plain","createTime":1710741614716,"quoteTx":""}     
OP_ENDIF
```

<figure><img src="https://content.gitbook.com/content/NHx0f4Bxw8OTbRs9kele/blobs/188dw2d7fPA2alKEnWva/image.png" alt=""><figcaption></figcaption></figure>

### 修改

在進行 `modify` 操作時，需要使用 `@` 符號來指向要進行操作的 `PIN`。例如，如果我們要修改一個特定的 `PIN`，我們可以使用 `@{PINID}`。

```json
OP_FALSE
OP_IF
	metaid                           
	modify                          
	@{pinid}                       
	0                               
	0                             
	application/json;utf-8               
	{"content":"Hello bitcoin world!!!!!!!","contentType":"text/plain","createTime":1710741614716,"quoteTx":""}     
OP_ENDIF
```

### 廢棄

在進行 `revoke` 操作時，需要使用 `@` 符號來指向要進行操作的 `PIN`。例如，如果我們要廢棄一個特定的 `PIN`，我們可以使用 `@{PINID}`。

```c
OP_FALSE
OP_IF
	metaid                        
	modify                           
	@{pinid}                           
	OP_0                                
	OP_0                             
	OP_0             
	OP_0
OP_ENDIF
```


# 簡介

MetaID App Node（後續稱為 MAN）是第一個適配 MetaID V2 協議的開源後端索引器，同時也是 MetaID 數據的分佈式存儲數據庫。開發者無需依賴第三方服務商，也無需運行繁重的比特幣節點，只要在本地部署安裝 MAN 就可以開發和運行所有類型的 MetaID 應用，做到真正的 Web3 應用分佈式化。

#### MAN 主要特性

* 完全適配 MetaID V2 協議
* 按照區塊順序和交易順序索引 MetaID 協議數據，同時支持內存池中數據索引
* 開箱即用，支持多種數據庫適配，如 `mongodb`、`pebble` 等，開發者可根據應用區塊選擇即可。
* 開發者友好性，對於常用數據應用，提供通用數據查詢 API，另外對於複雜的數據，MAN 計劃實現 Graph Query Language。
* 可控制的索引數據量，MAN 支持全量數據同步、單應用數據同步、多應用組合同步等多種數據同步模式，開發者可以通過簡單的配置，獲取自己需要的數據。

#### 基於 MAN 開發應用流程

1. 下載 MAN 程序源碼編譯，或者直接下載最新 MAN-Release 程序
2. 修改相關配置文件
3. 運行 MAN
4. 使用 MAN API 和 MetaID SDK 進行開發
5. 在相關 UTXO 鏈的測試網絡進行開發調試
6. 主網發布


# 編譯與運行

{% hint style="info" %}
第一版的MAN已上綫並已開源，後續的部署和接口文檔請以Github上文件爲準:\
<https://github.com/metaid-developers/man-indexer>
{% endhint %}

{% embed url="<https://github.com/metaid-developers/man-indexer>" %}


# JSON API

{% hint style="info" %}
第一版的MAN已上綫並已開源，後續的部署和接口文檔請以Github上文件爲準:\
<https://github.com/metaid-developers/man-indexer>
{% endhint %}

## 基礎API

| 地址                                           | method | parameter                                    | 描述                                      |
| -------------------------------------------- | ------ | -------------------------------------------- | --------------------------------------- |
| /api/pin/{numberOrId}                        | GET    | PIN number 或 PIN id                          | 根據 PIN number 或 PIN id 獲取 PIN 詳情        |
| /api/address/pin/list/{addressType/{address} | GET    | address addressType ：creator（創建者），owner（擁有者） | 根據 address 獲取該地址創建或擁有的 PIN 列表           |
| /api/address/pin/root/{address}              | GET    | address                                      | 根據 address 獲取 PIN root                  |
| /api/node/child/{pinId}                      | GET    | pinId                                        | 根據 PIN id 獲取 child node                 |
| /api/node/parent/{pinId}                     | GET    | pinId                                        | 根據 PIN id 獲取 parent node                |
| /api/info/address/{address}                  | GET    | address                                      | 獲取 address 的 MetaID info                |
| /api/info/rootId/{rootId}                    | GET    | rootId                                       | 根據 rootId 獲取 MetaID info                |
| /api/pin/content/{numberOrId}                | GET    | PIN number 或 PIN id                          | 根據 PIN number 或 PIN id 獲取 PIN 的 content |
| /api/getAllPinByParentPath                   | GET    | page,limit,parentPath                        | 根據 parentPath 獲取所有 pin                  |

## generalQuery

protocols 數據通用查詢，支持 `get`, `count`, `sum` 方式獲取數據。

地址: /api/generalQuery

**method:** POST

```jsx
{
    "collection": "pins", // 查詢的集合名稱，必填
    "action": "sum", // 查詢操作，支持 get, count, sum
    "filterRelation": "or", // 查詢條件關係，支持 or, and，目前不支持混用
    "field": [
        "number" // 查詢的返回的字段，sum 時必填
    ],
    // 查詢條件
    "filter": [
        {
            "operator": "=", // 條件操作符號，支持 =, >, >=, <, <=
            "key": "number", // 條件字段
            "value": 1 // 查詢值
        },
        {
            "operator": "=",
            "key": "number",
            "value": 2
        }
    ],
    "cursor": 0, // 返回數據起始
    "limit": 1, // 返回數據條數
    "sort": [
        "number", // 排序字段
        "desc" // 順序，支持 asc, desc
    ]
}

```

**成功返回示例**

```jsx
{
    "code": 1, // 成功 1
    "message": "ok", // 返回消息
    "data": [ // 數據內容
        {
            "_id": "65e96a276bff93b007c02b16",
            "isLike": "1",
            "likeTo": "32c6d91b6fb3f6746258d83f1fe8fb32f19c2a3e0071847b6046f01c938ca20bi0",
            "pinAddress": "tb1pss8ce6tgupnhmfj8u9h4saue48upucu04c7549tzal6n67v8njyst7e0fx",
            "pinId": "3943f7fa4c8496ced9ff722ae5bbdd57ad7b84a383304890b41f21e12f11086bi0",
            "pinNumber": 69
        }
    ]
}
```

**失敗返回实例**

```jsx
{
    "code": -1, // 失敗
    "message": "Data not found", // 失敗原因
    "data": null
}
```


# 浏览器

{% hint style="info" %}
我們已部署了 MAN 瀏覽器，源代碼也已開源到 Github 上：\
<https://man.metaid.io/>
{% endhint %}

MAN 索引器內置一個 MetaID 瀏覽器，支持 MetaID 相關數據查詢。

### 運行

程序運行時指定 `server` 參數為 `1` 即可啟動一個 HTTP Web 服務：

```jsx
./manindexer  -server=1 
```

服務的默認端口是 `80/443`，如果需要特別指定端口，可以通過配置文件的 `web` 分類下的 `port` 指定。

服務啟動後，通過 `http://127.0.0.1:{port}` 訪問。

### 瀏覽器功能

**搜索**

接受 MetaID 、PIN Number、PIN ID 等內容關鍵字查詢，不支持模糊搜索。

**PIN**

所有 PIN 的列表，按照倒序分頁排列。點擊某一個 PIN 可以查看更多信息，如： `9bc429654d35a11e5dde0136e3466faa03507d7377769743fafa069e38580243i0`

**MetaID**

所有 MetaID 列表，按創建時間由大到小排列。點擊某一個 MetaID 可查看創建該 MetaID 的 PIN。

**Block**

按照區塊的高度倒序排列，列出所有有 MetaID 協議數據的區塊。點擊卡片可以查看具體該區塊中的交易詳情，如： <https://man.metaid.io/block/844453>

**Mempool**

內存池中 MetaID 數據列表，出塊後自動刪除。


# MetaID PIN規則約定

#### 關於`modify`/`revoke`

1. `modify`和`revoke`的發起者地址必須與舊版本PIN的創建者地址一致，並且是未發生過轉移的PIN。如果PIN發生過轉移，後續的`modify`/`revoke`將無效。`path`為`/info`下的PIN僅需發起者地址和舊版本的PIN的創建者地址一致即可修改。
2. 所修改的PIN必須是當前最新版本的PIN才有效，即如果所修改的PIN不是當前最新版本的PIN，所有的`modify`/`revoke`將無效。
3. 被修改的PIN和新修改的PIN需要被打包在不同的塊高才有效，如果被修改的PIN和新修改的PIN被打包在同一個區塊，新修改的PIN將無效。
4. 當`operation`為`modify`/`revoke`時，`path`需要指向對應的PIN，例如：`@{pinid}`。所指向的PIN必須是用戶已在鏈上存在並打包出塊的PIN的`path`，才是有效的`modify`/`revoke`，所針對的PIN必須在不同的塊高。

<figure><img src="https://content.gitbook.com/content/NHx0f4Bxw8OTbRs9kele/blobs/M6CAZzD6Xfu6jEb7fFdU/image.png" alt=""><figcaption></figcaption></figure>


# PIN数据结构

MAN索引器會從taproot交易的reveal腳本中獲取MetaID協議數據，具體協議請參照MetaID Specification章節。

## PIN數據結構

```jsx
type PinInscription struct {
	Id                 string `json:"id"`
	Number             int64  `json:"number"`
	RootTxId           string `json:"rootTxId"`
	Address            string `json:"address"`
	Output             string `json:"output"`
	OutputValue        int64  `json:"outputValue"`
	Timestamp          int64  `json:"timestamp"`
	GenesisFee         int64  `json:"genesisFee"`
	GenesisHeight      int64  `json:"genesisHeight"`
	GenesisTransaction string `json:"genesisTransaction"`
	TxInIndex          uint32 `json:"txInIndex"`
	TxInOffset         uint64 `json:"txInOffset"`
	Operation          string `json:"operation"`
	Path               string `json:"path"`
	ParentPath         string `json:"parentPath"`
	Encryption         string `json:"encryption"`
	Version            string `json:"version"`
	ContentType        string `json:"contentType"`
	ContentTypeDetect  string `json:"contentTypeDetect"`
	ContentBody        []byte `json:"contentBody"`
	ContentLength      uint64 `json:"contentLength"`
	ContentSummary     string `json:"contentSummary"`
}
```

## PIN索引規則

**通用**

* 識別Flag：`metaid`
* 大小寫規則：大小寫不敏感，索引器可以全部轉為小寫保存。

**Operation**

1. `init`類型PIN所在的交易的txid為一個`metaid`的`roottxid`。
2. `init`、`create`遵循先到先得原則。
3. 同一區塊內`init`、`create`不區分先後順序，索引器應先處理`init`類型PIN，再處理其他類型PIN，先處理`init`是為了得到`roottxid`/`metaid`。

**Path**

1. 對於相同的`path`，所有`init`和`create`的PIN是看最舊的，只有`modify`/`revoke`才是看最新的。
2. `modify`/`revoke`必須對已入塊的PIN操作，即`modify`/`revoke`只對已經入塊的PIN有效，即使同區塊也是無效的。
3. 非`init`-PIN的`path`一定是在以下`path`內，一個`metaid`默認存在這五個一級`path`：
   * `/info`
   * `/file`
   * `/protocols`
   * `/nft`
   * `/ft`
4. 以`/file`、`/protocols`、`/nft`、`/ft`開始的`path`應該是全路徑的，如`/protocols/simplebuzz/file/my-pfp.jpg`。

## PIN状态码

| 状态码  | 描述                                                                |
| ---- | ----------------------------------------------------------------- |
| 0    | 正常的PIN                                                            |
| -1   | revoke的PIN                                                        |
| 1    | modify的PIN                                                        |
| -101 | 目標PIN所在區塊高度 ≤ 當前PIN所在區塊高度                                         |
| -102 | 目標PIN已經被轉移                                                        |
| -201 | `modify`的PIN，格式正確，但`@+PINID`中的`PINId`不存在（已確認的PIN）                 |
| -202 | `modify`的PIN，格式正確，但發起`modify`的地址不存在                               |
| -203 | `modify`的PIN，格式正確，發起`modify`的地址存在，但目標PIN的地址不等於當前PIN的address       |
| -204 | 目標PIN已經有`modify`（狀態碼為1）                                           |
| -205 | 目標PIN的`Operation`是`init`                                          |
| -301 | `revoke`的PIN，格式正確，但`@+PINID`中的`PINId`不存在                          |
| -302 | `revoke`的PIN，格式正確，但發起`revoke`的地址不存在                               |
| -303 | `revoke`的PIN，格式正確，發起`revoke`的地址存在，但目標PIN的地址不等於當前PIN的地址            |
| -304 | 目標PIN已經被`revoke`過（狀態碼為-1）                                         |
| -305 | `revoke`的PIN，格式正確，但目標PIN的`Operation`是`init`或目標PIN的`Path`是`/info/` |

更多信息，請參考 MAN 源代碼。

{% embed url="<https://github.com/metaid-developers/man-indexer>" %}


# Get Started

{% hint style="info" %}
MetaID-TS-SDK 源代碼已發佈在 Github 上，相關 API 和示例代碼請以 Github 最新頁面為準 <https://github.com/metaid-developers/metaid>
{% endhint %}

## Introduction

MetaID SDK 提供了一套規範標準和方法工具，用來生成和處理遵循 MetaID 協議的底層區塊鏈數據（這裡具體指符合 UTXO 標準的鏈，目前支持 BTC 鏈）。&#x20;

MetaID SDK 的設計目標是提供一個相對統一且高效的方法，大大簡化了 web3 服務的整合，免去了開發者需與多種協議打交道以及數據上鏈時需自行構建複雜 UTXO 交易的需求，節省時間且減小了面臨兼容性問題的風險。&#x20;

基於 MetaID SDK 的簡潔性，兼容性，可擴展性，高效性，傳統應用開發者可以快速開發並部署一個運行在 UTXO 鏈上的 Dapp 應用。

## Core Concepts

MetaID SDK 有兩個核心概念：連接器（connector）和實體（entity）。&#x20;

連接器用於身份信息的認證和管理，作為用戶在區塊鏈上發布數據的基礎。&#x20;

"實體"是在應用層中使用的術語。它用於管理某種特定數據類型的資源。從編程的角度來看，當你創建一個新的實體實例時，你可以訪問其屬性，並利用它所提供的一系列可執行鏈上數據存儲和修改的方法。你可以將每一類 Entity 理解為分別對應於 MetaID Specification 中的 PATH 部分。

## Installation

#### Method 1: use yarn or npm

```jsx
// use yarn
yarn add @metaid/metaid 
// use npm
npm install --save @metaid/metaid
```

#### Mothod2: 以 src 方式引入到你的原生 js 項目中

該方法會把 npm 版本的包轉換成瀏覽器能運行的包，無需打包工具（如 webpack）。

1. 初始化一個本地項目

```jsx
mkdir generate-metaid-bundle && cd generate-metaid-bundle/ 
yarn init 
// or
npm init
```

2. 安裝 sdk：

```jsx
npm install --save @metaid/metaid
// or
yan add @metaid/metaid
```

3. 寫一個 main.js 文件，只需要兩行代碼

```jsx
var metaidSDK = require('@metaid/metaid')
window.metaidSDK = metaidSDK
```

5. 使用 npm 全局安裝 browserify:

```jsx
npm install -g browserify
// or 
yarn global add browserify

```

5. 安裝完成以後，執行命令：

`browserify main.js -o bundle.js`&#x20;

6. 命令運行完成以後，會生成一個 bundle.js 文件。現在我們就可以把這個文件和 HTML 代碼放在一起，通過 `<script>` 標籤導入了：

```jsx
<!DOCTYPE html>
<html>
    <head>
        <meta charset="utf-8">
        <script src="bundle.js"></script>
    </head>
    <body>
        <div class="app">
             // html tag of your page
        </div>
    <script>
        // js code
    </script>
    </body>

</html>
```


# Core API

{% hint style="info" %}
MetaID-TS-SDK 源代码已发布在 Github 上，相关 API 和示例代码请以 Github 最新页面为准

<https://github.com/metaid-developers/metaid>
{% endhint %}

#### Overview

The MetaID SDK currently targets the BTC chain, providing corresponding API methods from three dimensions: Wallet Layer, Connector Layer, and Entity Layer. Below is a detailed introduction to the relevant API methods.

Each layer's responsibilities and relationships are outlined.

#### Wallet Layer API

<pre class="language-jsx"><code class="lang-jsx">import { MetaletWalletForBtc } from '@metaid/metaid';
<strong>// Create a wallet object based on the currently logged-in wallet account
</strong>const _wallet = await MetaletWalletForBtc.create();

// Access the wallet object's public properties
const address = _wallet.address // Get address
const pubicKey = _wallet.pub // Get public key

// Access a series of methods provided by the wallet object (provided the wallet is connected, otherwise returns {status: 'not-connected' })
await _wallet.getAddress() // Get wallet address

await _wallet.getAddressType() // Get wallet address type

await _wallet.getPublicKey(path) // Get public key based on path

await _wallet.getBalance() // Get balance

await _wallet.signMessage(message) // Send signed message

await _wallet.signPsbt({
  psbtHex,
  options,
}: {
  psbtHex: string
  options?: { toSignInputs?: ToSignInput[]; autoFinalized: boolean }
}) // Sign the input psbtHex

// This is a low-level inscription API method; unless you have very customized inscription needs, it is not recommended to call it directly. 
// The connector layer has abstracted and encapsulated this method, along with related parameter descriptions.
await _wallet.inscribe({data, options} : \
  { data: InscriptionRequest, options: {noBroadcast : boolean }) 
</code></pre>

#### Notes on Wallet Method Parameters and Return Types:

1. Example return value for `getBalance`:

```jsx
{total: 97901828, confirmed: 97901828, unconfirmed: 0}
```

where `confirmed` and `unconfirmed` represent the confirmed and unconfirmed balances respectively (unit: satoshi).

2. Example return value for `getAddressType`:

```jsx
{name: 'Taproot', addressType: 'P2TR', path: "m/86'/0'/0'/0/0"}
```

BTC address types mainly include four types: Legacy (P2PKH), Nested SegWit (P2SH), Native SegWit (Bech32), and Taproot addresses.

3. Explanation of `inscribe` method parameters:

```jsx
export type Operation = 'init' | 'create' | 'modify' | 'revoke'
export type Encryption = '0' | '1' | '2'

export type MetaidData = {
  operation: Operation
  body?: string | Buffer
  path?: string
  contentType?: string
  encryption?: '0' | '1' | '2'
  version?: string
  encoding?: BufferEncoding
  revealAddr: string
}

export type InscriptionRequest = {
  feeRate: number;
  metaidDataList: MetaidData[];
  revealOutValue: number;
  changeAddress: string;
  minChangeValue?: number;
}
```

4. The `inscribe` method returns different transaction data formats depending on whether broadcasting is performed:

* If `noBroadcast` is set to `yes`, meaning no broadcasting, the return format is:

```jsx
{
  commitTxHex: string;
  revealTxsHex: string[];
  commitCost: string;
  revealCost: string;
}
```

* If `noBroadcast` is set to `no`, meaning broadcasting is performed, the return format is:

```jsx
{
  commitTxId: string;
  revealTxIds: string[];
  commitCost: string;
  revealCost: string;
}
```

Where, if not broadcasting, the transaction result is returned in `txHex` format; otherwise, the transaction result is returned as `txid`. The sum of `commitCost` and `revealCost` represents the estimated fee required for the current inscription transaction.

#### Connector Layer API

```jsx
import { btcConnect } from '@metaid/metaid';

// Create a new connector based on the wallet object
const _btcConnector: BtcConnector = await btcConnect({ wallet, network }: { wallet?: MetaIDWalletForBtc; network: BtcNetwork });

// If the wallet object is not empty, you can use the following method to check if the wallet has created a MetaID
_btcConnector.hasMetaid()

// The connector provides a series of methods for operating MetaID related data

type BtcNetwork = "testnet" | "regtest" | "livenet"

// Inscription method
type Operation = 'init' | 'create' | 'modify'
type InscribeOptions= {
  operation: Operation
  body?: string | Buffer
  path?: string
  contentType?: string
  encryption?: '0' | '1' | '2'
  version?: string
  encoding?: BufferEncoding
}
await _btcConnector.inscribe(inscribeOptions: InscribeOptions[], noBroadcast: 'yes' | 'no')
// The return type of this method is the same as the wallet inscribe method.

// Create MetaID, the parameter avatar is processed into Buffer in chunks from the native File type in JS, and then converted to a base64 string
const metaIdRes = await _btcConnector.createMetaid(body?: { network?: BtcNetwork, name?: string; avatar?: string })
// Return type: metaIdRes: { metaid:string }

// Get user information associated with MetaID
const user = await _btcConnector.getUser({ network, currentAddress }: { network: BtcNetwork; currentAddress?: string })

// Update user information associated with MetaID
const isUpdateSuccess = await _btcConnector.updateUserInfo(body: { name?: string; bio?: string; avatar?: string })

// Get MetaID
const currentMetaId = await _btcConnector.getMetaid()

// Check the current connector status (whether the wallet is connected)
const isConnected = await _btcConnector.isConnected()

// Disconnect the current wallet
await _btcConnector.disconnect()

// Create an Entity object, this method bridges the Connector layer and the Entity layer
await _btcConnector.use(entitySymbol: string)
```

#### Notes on Connector Layer API:

1. From the perspective of the MetaID Specification, issuing or modifying on-chain data involves sending a PIN, and the inscription interface handles this task. Whether it's creating a MetaID, updating user information, or calling the create method after generating an Entity object, it essentially sends a PIN to put the data on-chain.
2. For the `createMetaid` method of the connector object, if you pass in a complete `body` parameter including name, bio, and avatar, the SDK will sequentially perform the following actions: first initialize at the root path `/` (operation=init), then create corresponding information under the paths `/info/name`, `/info/bio`, and `/info/avatar` (operation=create).
3. Regarding data timeliness, when modifying on-chain data (operation=modify/revoke), there are relevant matters to note. Please refer to the second convention in the MetaID Specification regarding `modify`/`revoke` operations.

#### Entity Layer API

Once you create an entity through the connector, you can access a series of properties and methods provided by that entity.

> Currently, the MetaID SDK provides basic entity calls based on the on-chain microblog example application, including buzzEntity, fileEntity, and likeEntity. If developers have their own customization needs, they can create their data protocol on the MetaProtocols website, and the MetaID SDK will automatically create the corresponding entity for that protocol.

```jsx
// Example of creating a buzzEntity

type BtcNetwork = "testnet" | "regtest" | "livenet"

// Create a buzzEntity entity through the connector
const buzzEntity = await _btcConnector.use('buzz')

// Get all buzzes sent by the currently connected account in a paginated manner
const allBuzz = await buzzEntity.list({ page, limit, network }: { page: number; limit: number; network?: BtcNetwork })

// Get the details of a specific Pin by its pinId
const pid = 'XXXXXXXXX' 
const pinDetail = await buzzEntity.one({ pid, network }: { pid: string; network: BtcNetwork })

// Count the total number of Pins sent under the current entity (buzzEntity)
const pinTotal = await buzzEntity.total({ network }: { network?: BtcNetwork })

// Create a buzz
type CreateOptions = {
  body?: string | Buffer;
  contentType?: string;
  encryption?: "0" | "1" | "2";
  version?: string;
  encoding?: BufferEncoding;
}

// The return type of this method is the same as the wallet inscribe method.
const createRes = await buzzEntity.create({
  options,
  noBroadcast,
}: {
  options: CreateOptions[]
  noBroadcast: 'yes' | 'no'
})
```

#### Notes on the Entity's `create` Method:

1. According to the MetaID Specification, you can think of the create method as creating new files under a certain folder (file path), essentially calling the connector's inscribe method. The results vary depending on the broadcast parameter, and the specific data format can be found in the connector's inscribe method description.
2. Explanation of the `option` parameter corresponding to the MetaProtocols protocol:
   * The `body` parameter's specific fields should refer to the corresponding MetaProtocol protocol description for that entity (e.g., buzzEntity corresponds to the SimpleBuzz protocol).
   * The `contentType` field represents the data format, e.g., `text/plain`, `image/png`.
   * The `encryption` field indicates the encryption type of the content: `0` for no encryption, `1` for ECIES encryption, and `2` for ECDH negotiated key encryption.
   * The `version` field specifies the protocol version number of MetaProtocols.
   * The `encoding` field refers to the encoding format, which aligns with the global `BufferEncoding` parameter in TypeScript:

     ```typescript
     type BufferEncoding = 
         | "ascii"
         | "utf8"
         | "utf-8"
         | "utf16le"
         | "utf-16le"
         | "ucs2"
         | "ucs-2"
         | "base64"
         | "base64url"
         | "latin1"
         | "binary"
         | "hex";
     ```

     **Examples** for the `Option` Parameter

     (1) For the `buzz` entity, the `option` parameter should be:

     ```typescript
     {
         body: "buzz content"
     }
     ```

     (2) For the `file` entity, assuming you are passing an image file, the `option` parameter should be:

     ```typescript
     {
         body: Buffer.from('image raw hex string', "hex").toString("base64"),
         contentType: "image/jpeg",
         encoding: "base64"
     }
     ```

3\. Instructions for Batch Creation (Inscription): You may have noticed that the `CreateOptions` parameter is passed in as an array. This means you can create multiple pieces of data for a particular type of entity simultaneously. Here's a specific example: when you post a `buzz` with multiple image attachments, you only need to call the inscription interface twice. First, batch inscribe multiple images using the `fileEntity`. The generated transaction hash array is then passed into the `attachments` field of the `buzzEntity` create method for the second inscription.


# Quick Example

{% hint style="info" %}
MetaID-TS-SDK 源代码已发布在 Github 上，相关 API 和示例代码请以 Github 最新页面为准

<https://github.com/metaid-developers/metaid>
{% endhint %}

### Intro

Bitbuzz is a front-end social application based on the MetaID protocol and running on the testnet of BTC blockchain. It has the following basic functions: new user registration, setting user basic information, publishing buzz (with attached pictures), liking buzz. In this article, I will show you how to build this project with MetaID SDK step by step. I will presume you have a basic understanding of [MetaID Specification](/zh-hk/metaid-xie-yi-gui-fan/xie-yi-ge-shi).

### Creating a MetaID Account With SDK

Creating a MetaID Account is very easy, the following code will use a connector which is connected to a [Metalet wallet](https://metalet.space). Then it will check whether the Metalet account has built a MetaID account, if not , it will accept the `body parameter`(optional parameter, including name、bio、avatar) provided by the user to create a new MetaID account.

```jsx
import { MetaletWalletForBtc, btcConnect } from '@metaid/metaid';

 
const _btcConnector: BtcConnector = await btcConnect(_wallet);

const handleCreateMetaid = async (userInfo) => {
  const userInfo = {name:'Bob', bio:'Success needs time.', avatar:'imageUrl'}
	if (!_btcConnector.hasMetaid()) {
      const createRes = await btcConnector.createMetaid({ ...userInfo, network });
    } else {
      const resUser = await _btcConnector.getUser();
    }
};
```

#### Connecting to BTC Blockchain

Like most blockchains, we need a wallet account to connect to the blockchain. Here we use Metalet wallet as an example. Assume you have created a MetaID account based on last step and have a `handleLogin` method for your application triggered when user clicks the login button. We need to apply MetaID SDK to establish a connection between the application and the wallet. This is the foundation for users to send data to the blockchain.

```jsx
import {  MetaletWallet, connect } from "@metaid/metaid";

 
const handleLogin = async () => {
    const _wallet = await MetaletWallet.create();
    const baseConnector = await connect(_wallet);
 
}                                                                                                                                                                                                                                                                                                                                                                                                                                                                                                                                                                                                                           |. |
```

#### Define the required entities

On top of the foundation established in the previous step, it's time for `Entity` to come into play. We utilize the`use` keyword to create an entity. For the buzzhub application, we need a “Buzz” entity. With this entity, we can get the existing buzz data and send a new buzz to the BTC blockchain. The following code block implements the 'getBuzzList' function. The 'page' parameter is used to query paginated data. It's worth noting that 'connect' can be passed an empty object, and based on this, the created entity can only retrieve data from the blockchain but cannot send data to the blockchain (used for displaying data in an unauthenticated state. (Remember every buzz is just a Pin result)

```jsx
 
const getBuzzList = async ({ page, limit } ) => {
    const	buzzEntity = await baseConnector.use("buzz");
    const buzzList = await buzzEntity.list({ page, limit });;
 
};
```

#### Send **data to the blockchain with Entity**

When you get the buzzEntity variable, you can use its `create` method to publish a new buzz and store it on the blockchain. For each type of Entity, you need to set a Schema file which is used to define the format for on-chain data. For example, according to the definition of simplebuzz which comes from metaprotocols, we have our `buzz.entity.ts` schema file for the Buzz entity.

```jsx
type EntitySchema = {
  name: string
  path:string
  versions: {
    version: number
    body: any[]
  }[]
}

const buzzSchema: EntitySchema = {
  name: 'buzz',
  path: '/protocols/simplebuzz',
  versions: [
    {
      version: 1,
      body: [
        {
          name: 'content',
          type: 'string',
        },
        {
          name: 'attachments',
          type: 'array',
        },
      ],
    },
  ],
}
```

Sending a buzz with only text information is simple; it only requires a few lines of code. The first argument passed to the 'create' method comes from the 'body' field defined in the 'buzzSchema'.

```jsx
const	buzzEntity = await baseConnector.use("buzz");
const finalBodybody = { content: "Hello World", attachments: [] }
const createRes = await buzzEntity.create({
				options: [{ body: JSON.stringify(finalBody) }],
				noBroadcast: "no",
			});
```

#### Send multiple entities’ data to the blockchain

Assuming you need to post a buzz with some image attachments. That is, we need to populate the attachments field of the body parameter. A unique pinID(transaction id of this file create pin) is generated for each image file uploaded to the blockchain. Each string element in the attachments array relies on this txid, and the exact string prefix will vary depending on the type of file protocol (metacontract, sensible, etc.).We need to define a new File entity to implement the logic described above, according to the MetaFile protocol, we have the following code definition for the File entity schema.

```jsx
const fileSchema = {
  name: 'file',
  nodeName: 'MetaFile',
  encoding: 'binary',
  versions: [
    {
      version: '1.0.1',
      body: '',
    },
  ],
}
```

then we can generate txid based on this schema. It is worth noting that you need to transform binary image data to hex format with `Buffer.from` method.

```jsx
const finalBody: any = { content: buzz.content };
if (!isEmpty(buzz.images)) {
	const fileOptions = [];

	const fileEntity = await btcConnector!.use("file");

	for (const image of buzz.images) {
			fileOptions.push({
			body: Buffer.from(image.data, "hex").toString("base64"),
			contentType: "image/jpeg",
			encoding: "base64", // this encoding field is for wallet inscription API,
			toEncoding: fileSchema.encoding
		});
	}
	const imageRes = await fileEntity.create({
		options: fileOptions,
		noBroadcast: "no",
	});

		finalBody.attachments = imageRes.revealTxIds.map(
		(rid) => "metafile://" + rid + "i0"
	);
}
```

As you can see, The `create` method accepts `options` parameter.

```jsx
type CreateOptions = {
    body?: string | Buffer;
    contentType?: string;   
    encryption?: "0" | "1" | "2"; 
    version?: string;  
    encoding?: BufferEncoding;  
}
const createRes = await buzzEntity.create({
    options,
    noBroadcast,
  }: {
    options: CreateOptions[]
    noBroadcast: 'yes' | 'no'
  })
```

When you need to send multiple entities data to the blockchain. Until the last `create` method, you need to set the value of the `options.serialAction` parameter to `combo` in the previous `create` method.The purpose of this action is to bundle multiple transactions, thus avoiding multiple pop-ups when signing the transaction with the Metalet wallet and achieving a better user experience.

Finally, we can create a buzz with three image attachments:

```jsx
const createRes = await buzzEntity!.create({
				options: [{ body: JSON.stringify(finalBody) }],
				noBroadcast: "no",
			});
```

#### Build relationships between different user’s data

Imagine a scenario where as a BuzzHub user, you come across a buzz posted by someone else and you want to like it. Essentially, this scenario involves establishing an association between the data of two end-user accounts.

First we need a new `Like` entity, base on its metaprocols definition, we have the following like entity schema definition.

```jsx
const likeSchema = {
  name: 'like',
  path: '/protocols/payLike',
  versions: [
    {
      version: 1,
      body: [
        {
          name: 'likeTo',
          type: 'string',
        },
        {
          name: 'isLike',
          type: 'string',
        },
      ],
    },
  ],
}
const likeEntity = btcConnector.use('like')
```

And then, based on a logged-in MetaID account, you can like any buzz by calling this `likeEntity.create` method.The corresponding code is quite simple.

```jsx

const res = await likeEntity.create({ likeTo: pinId, isLike: '1' }, 
                                     { signMessage: 'like buzz' })
 //  pinId is from the buzz bin you want to like,
 //  it is caculated by the buzz's txid + 'io'                    
```

### Live Example

[Code Link](https://github.com/metaid-developers/metaid)

[Website Link](https://www.bitbuzz.io)


# 有關跨鏈

MetaID V2 從協議設計層面上已支持 MetaID 運行在比特幣及比特幣同構區塊鏈上。 只要索引器支持，理論上 PIN 可構建在任何比特幣架構的區塊鏈上，所有符合 MetaID 協議格式交易，即便是散落在不同的區塊鏈上，均可收斂於某一個 MetaID 節點下。 對於跨鏈的支持，理論上和比特幣同構的區塊鏈均能支持，具體為：

* 採用 UTXO 架構
* 鎖定腳本支持 op\_return 操作符
* 支持採用比特幣的經典地址格式（即前綴為「1」的比特幣地址格式）

現階段除了比特幣外，以下主流公鏈均符合 MetaID 支持的條件，在未來相關索引器和錢包支持後，將有望實現支持：

* MicrovisionChain
* Bitcoin Cash
* eCash
* Dogecoin
* Litecoin
* Bitcoin SV

但錢包和應用在實現跨鏈支持時，需注意以下概念：

### Unified Address With One Key

**\[TBD]**

### Unified UTXO Chain

**\[TBD]**


# Unified UTXO Chain

UnifiedUTXOChain

TBD


# MetaID歷史

弱MetaID 並不是一個在 2024 年創建的新協議，MetaID 第一版協議在 2020 年 4 月份發佈，第一版 MetaID 協議是基於 MetaNet 協議，經歷了接近 4 年的發展，由多方開發者共同打造了具規模的基礎設施和應用。在 V2.0 發佈之前，已累積有超過 17 萬用戶和 2100 多萬條交易（tx），並最多有十多個 MetaID 應用上線運行過。

以下是 MetaID 的簡短歷史：

* 2020 年 4 月，發佈 V1.0 MetaID 協議，在 BSV 鏈上實現
* 2021 年 4 月，MetaID 協議升級為 V1.1。
* 2022 年，已有多個應用採用 MetaID 方案，涵蓋 Web3 社交應用、網盤、NFT 市場、遊戲等。總用戶超過 10 萬人。
* 2023 年 1 月，MetaID 協議升級為 V1.2，增加對多鏈支持，包括支持比特幣側鏈 Microvision 等。
* 2024 年 5 月，MetaID 發佈 V2.0，全面支持比特幣，並進一步提高對 UTXO 架構區塊鏈的跨鏈支持。

## MetaID V2.0 同舊版對比

|                   | V1.2          | V2.0              |
| ----------------- | ------------- | ----------------- |
| 愿景                | 成爲最好的Web3基石協議 | **成爲最好的Web3基石協議** |
| 统一树状结构            | 是             | **是**             |
| 基于MetaNet         | 是             | **否**             |
| 采用类Ordinals序数理论方案 | 否             | **是**             |
| 带资产协议             | 否             | **是**             |
| 跨链支持              | 弱             | **更好**            |


# FAQ

## Can you explain what MetaID is?

Over the past year, many protocols have emerged in the Bitcoin ecosystem, but MetaID is the first designed specifically for building Web3 apps on Bitcoin. So, what exactly is MetaID? Here's a simple example to help explain it: Imagine a decentralized version of [X.com](http://x.com/) and Telegram built on Bitcoin using MetaID. With MetaID, these apps could interact seamlessly, allowing you to send a DM from your X account directly to a Telegram user. The best part? Your data is secured by Bitcoin's network, meaning no central authority can ban your account or delete your info. While many people see Bitcoin primarily as digital gold, we believe its potential goes way beyond that. Bitcoin's UTXO architecture and ability to store data on-chain make it the perfect foundation for Web3 apps. In short, we believe that with MetaID's help, a vast and thriving Web3 ecosystem can be built on top of Bitcoin.

So MetaID is a protocol about enabling web3 on Bitcoin

## Could you tell me other aspects that make MetaID stand out compared to the others?

MetaID is quite different from other protocols.

In Bitcoin, there are Ordinals and Atomiclas protocols,and more.Those protocols are great and have inspired MetaID in some ways. However, they often focus more on asset issuance and lack the structuring of on-chain data. So, building true Web3 apps based on these protocols isn't possible.

The biggest difference between MetaID and other protocols is that MetaID organizes scattered on-chain data into tree-like structures, using ‘people' as the classification method. Data from other protocols is like scattered stones and bricks, while MetaID data is like piles of structured building materials classified by ‘people’, making it easy for us to build skyscrapers.

This figure shows the concept:

&#x20;&#x20;

<figure><img src="https://57349855-files.gitbook.io/~/files/v0/b/gitbook-x-prod.appspot.com/o/spaces%2FNHx0f4Bxw8OTbRs9kele%2Fuploads%2FPCVI37u8dcAqorF7WaIE%2Fimage.png?alt=media&amp;token=a3f029c0-1b68-40d7-a223-3cf6b2f94eb2" alt=""><figcaption></figcaption></figure>

Plus, MetaID introduces models for declarative modification, deletion, hiding, and privacy handling of data. These data processing capabilities are precisely what other protocols are missing, and they're a must for building large-scale Web3 apps.

<br>

## I'm curious to know how you got to this point and how they came up with the idea.. Please explain history of MetaID

MetaID isn't a new protocol created in 2024. That idea came in mind in 2020.

The first version of MetaID was released in April 2020, based on the MetaNet protocol, and has undergone nearly 4 years of development. Before the release of v2, MetaID had already accumulated over 170,000 users and more than 21 million transactions with more than 10 MetaID apps running at its peak. Therefore, MetaID is a protocol that has been proven feasible.

<br>

## Could you give me some more detail on how the PIN data works?

PIN is the core concept of MetaID.

PIN is the smallest data unit and the most core concept in MetaID. Each PIN is like a brick of Lego, different PINs can be combined to create various Web3 applications. Eeach PIN inscribed is an NFT and introduced capabilities such as creator, holder, modification, deletion, hiding, encryption, and a POP value for value assessment. As a result, various complex Web3 applications and DataFi applications can be built using PINs.

I hope this fig can roughly explain how PIN organizes data:

&#x20;&#x20;

<figure><img src="https://57349855-files.gitbook.io/~/files/v0/b/gitbook-x-prod.appspot.com/o/spaces%2FNHx0f4Bxw8OTbRs9kele%2Fuploads%2FvHisx9VLdhEk3B5C7Kcy%2Fimage.png?alt=media&amp;token=7d5a4f2a-8060-4695-a450-58f36382ba3e" alt=""><figcaption></figcaption></figure>

We color and label each satoshi on the Bitcoin network as a piece of on-chain data. Since a satoshi is the smallest unit in the Bitcoin network, it is atomic, indivisible, and can be freely circulated. Therefore, in MetaID, all data is a satoshi and also an NFT.

Therefore, PIN=Sats, it also gains security properties from Bitcoin.

## Bitcoin doesn't seem to be designed for heavy usage. How does MetaID address the congestion issue on Bitcoin?

Indeed, Bitcoin cannot solve the problem of congestion and high fees in the foreseeable future. Therefore, MetaID supports cross-chain from the design level. As long as it is a Bitcoin sidechain, Layer-2, or even BCH that is homogeneous with Bitcoin, MetaID can theoretically support it seamlessly. This is the biggest difference between MetaID and other protocols. MetaID introduces the concepts of Unified UTXO Chain and Unified Bitcoin Address, which effectively solves Bitcoin's congestion problem and fully unleashes the potential of Layer 2 networks that are homogeneous with Bitcoin. In terms of cross-chain support, MetaID can be regarded as a Layer 0 protocol for the Bitcoin architecture, enabling interoperability between different blockchains that are homogeneous with Bitcoin and allowing assets to flow between Bitcoin and its Layer 2 networks.&#x20;

<br>

## Why should people use Web3 applications built on Bitcoin instead of those built on other public chains like ETH or Solana?

Sunny: Bitcoin is the earliest public chain and pioneered the blockchain industry. Counterintuitively, although Bitcoin was designed the earliest and lacks smart contracts, from an architectural perspective, it is the best carrier for Web3 applications. Let's look at the advantages of Bitcoin as a Web3 application carrier compared to other solutions:

1. 1.It has the highest consensus, decentralization, and security.
2. 2.The UTXO architecture is globally stateless, naturally suitable for high concurrency.
3. 3.On-chain data storage is an inherent capability of Bitcoin, which is simpler and more elegant than other blockchains.
4. 4.The smallest unit of Bitcoin, satoshi, is naturally atomic and indivisible, making it the best carrier for Web3 data.

In hindsight, it seems that the underlying design philosophy of Bitcoin was intended for the future of Web3. Of course, Bitcoin has issues like congestion and previously lacked a dedicated foundational protocol for building Web3, but fortunately, MetaID has now emerged.


# MetaID理念

#### MetaID 設計目標是在比特幣及其同構區塊鏈上構建 Web3 應用。

我們認為，未來良好的 Web3 應用應該具備以下特性，這些特性也是 MetaID 從最初版本開始一直堅持的設計目標：

* 數據完全歸數據生產者所有，數據所有者可自由交易其所有數據。
* 用戶只需一個私鑰便可使用所有 Web3 應用。
* 用戶數據應盡量上鏈，這樣可確保應用數據不被篡改和方便重建，更重要的是能減少全局的驗證成本（只需上鏈時驗證一次）。
* 數據即便在鏈上也能支持數據的聲明式刪除和修改，這樣才能支持所有類型的應用。
* 鏈上數據允許礦工刪除（比特幣白皮書上約定礦工可以刪除數據），但上鏈後的數據依然可以分佈式保存，比特幣的鏈上數據應該分佈在一個小世界網絡。
* 應用間數據應能互聯互通，徹底打破數據孤島，應用之間不再有數據藩籬。
* 資產和數據是緊密配合的，資產的價值應該是構建在用戶數據的價值上的。

#### 關於 MetaID 的擴容

MetaID 設計目標不只是構建少量的簡單的 Web3 應用，我們還希望有大量的 MetaID 應用出現，最終獲得廣泛的採用。但眾所周知，比特幣目前性能不高並且手續費昂貴，顯然不能支持大量的 Web3 應用運行在其上面。如果 MetaID 應用只運行在比特幣主鏈上，MetaID 是不能被大規模普及的。MetaID 要獲得成功，必須解決擴容問題。我們的理念是這樣的：

* MetaID 若要解決擴容問題則必須支持多鏈，我們認為只要是和比特幣同構的並且算力達到一定程度以上的區塊鏈，MetaID 應該都支持（詳見“關於跨鏈”一節）。
* 理想的比特幣側鏈/二層應該是和比特幣同構的，並且這些側鏈/二層應能和比特幣組成一個大的統一 UTXO 網絡（詳見“關於跨鏈” 一節）。
* 由於 UTXO 架構具有無狀態、高並發的特性，基於 UTXO 架構的比特幣側鏈/二層應該被看作是比特幣網絡的延伸。當比特幣主網擁堵時，MetaID 交易可創建在這些比特幣側鏈上；當這些側鏈也擁堵時，再繼續增加同構側鏈。這樣統一 UTXO 網絡的擴容上限沒有物理限制，只受總算力上限的制約——而算力的上限本質就是全人類的電力上限。因此，MetaID 支持統一 UTXO 網絡的背景下，某程度來說是徹底解決了擴容問題，具備了大規模普及的理論基礎。
* 用戶可以自由選擇 MetaID 數據保存在哪一條 UTXO 公鏈上，但數據保存在不同算力區塊鏈上的意義顯然是不同的。例如比特幣的算力比側鏈 A 高 1000 倍，這也意味著 MetaID 數據保存在比特幣上比保存在側鏈 A 安全 1000 倍，所需消耗的能源也高 1000 倍（算力 == 能源）。因此我們引入了 PoP 這一概念來反映出不同 MetaID 數據所蘊含的算力價值。

比特幣現在是共識最高和算力最大的公鏈，這也意味著資產保存在比特幣上將獲得最大的安全性。而比特幣相關側鏈雖然算力不高，但手續費便宜且幾乎不會堵塞。因此，我們認為基於 MetaID 的 Web3 應用未來最佳的實踐是應用的一般性數據運行在比特幣側鏈上，但重要的 MetaID 資產/數據則保存在比特幣主鏈上。


# MetaID資源

### 基礎設施

#### **MetaID 網站：**&#x20;

暫時就是在 MAN 瀏覽器上修改出官網首頁&#x20;

[https://metaid.io](https://metaid.io/)

#### **MetaID App Node：**&#x20;

你可以在這裡獲取 MAN 的源代碼

<https://github.com/metaid-developers/man-indexer>&#x20;

在線 MAN 瀏覽器和服務

[https://man.metaid.io](https://man.metaid.io/)

#### **MetaID SDK (TS)：**&#x20;

你可以在這裡獲取 MetaID-TS-SDK&#x20;

<https://github.com/metaid-developers/metaid>

#### **MetaID Protocols：**&#x20;

你可以在這裡發佈和查看各個應用方制定的協議，並且重用這些協議數據

[https://metaidprotocols.com](https://metaidprotocols.com/)

***

### 基於 MetaID 的應用

#### Bitbuzz:

<https://bitbuzz.io>

相信更多即將到來

***

### 其他

如果你在開發 MetaID 應用或需要 MetaID Logo，請拿去：

{% file src="/files/sTDct7efbvuUxxBUPrkw" %}


# MRC-20

{% hint style="warning" %}
請注意該協議仍在測試網測試中,我們會在充分測試後在比特幣主網合適的區塊高度啟動該協議
{% endhint %}

MRC-20 是基於 MetaID 的一個 Fungible Token 發行協議，使用者可以透過 MRC-20 協議發行資產並制定鑄造方式。與其他資產發行協議相比，MRC-20 協議最大的特點是其發行方式能夠與各人鏈數據以及 MetaID 協議緊密結合，從而能夠滿足各種鏈上活動的資產發行方式。簡單來說，MRC-20 是一種為滿足日後各種 Web3 活動而制定的 Fungible Token 發行協議。

## 協議格式

### 部署

#### PIN路徑：`/ft/mrc20/deploy`

後端索引器應只對符合路徑的 PIN做驗證和索引

該路徑下的 PIN 不接受 modify 和 revoke操作

#### 協議格式：

```jsx
{
  "tick": "satoshi", // 2-24 字符
  "amtPerMint": "1000", // 每次鑄造獲得的總代幣數量 [1, 1e12]
  "mintCount": "100", // 最大允許鑄造次數 [1, 1e12]
  "tokenName": "SatoshiTheLegend", // 選填，代幣全名，0-48 字符
  "decimals": "8", // 選填，小數位數 0 至 12，默認為 8  
  "premineCount": "60", // 選填，部署時預先鑄造的次數，默認為 0，[0, mintCount]
  "beginHeight": "851235", // 選填，鑄造事件開始的區塊高度
  "endHeight": "851781", // 選填，鑄造事件結束的區塊高度
  "metadata": "Arbitrary Data", // 選填，可以包含額外資料如代幣描述、圖示等，無格式要求
  "payCheck": { // 選填，檢查付款以驗證鑄造資格
    "payTo": "address", // 檢查輸出是否匹配指定地址
    "payAmount": "" // 以 satoshi 為單位，檢查是否支付了指定數量的 satoshi
  },
  "pinCheck": { // 選填，檢查 PIN 以驗證鑄造資格
    "creator": "", // 創建 PIN 的人，使用完整的 MetaID
    "path": "/", // PIN 的路徑
    "count": "1", // 0~n，所需的 PIN 數量
    "lvl": "6" // PIN 的最低等級
  }
}
```

#### 要點說明：

• 合法的創始交易後，該 `tick` 將被分配一個唯一的 id，該 id 用於標識該 MRC-20 代幣。該 id 用 pinid 表示

• `tick` 為全局唯一，不可重複，tick 的有效判定採用先見原則。

• 總供應量 = `amtPerMint` \* `mintCount`

• `metadata` 為自定義數據項目，可綁定代幣相關數據，可以包含簡介、圖片等

• `beginHeight` 和 `endHeight` 決定了該鑄造時間的有效時間範圍。`beginHeight` 如未指定有效區塊高度，則為 Deploy 该 PIN確認高度；`endHeight` 如未指定有效區塊高度，則代表無結束時間限制。

#### `premineCount` 說&#x660E;**：**

• 部署者可設置預挖參數，數值為在 deploy 交易中直接挖取指定次數的代幣

• 預挖的 Token 在 Deploy 交易確認時直接預挖到 Deploy 使用者地址上。

• 預挖總量 = `amtPerMint` \* `premineCount`

• `premineCount` 為選項，默認值為 0，取值範圍為 0\~mintCount，範圍之外的賦值視為無效

• 例子：一個 deploy 中設置為 `amtPerMint` = 10000, `mintCount` = 100, `premineCount` = 60，則視為 100 次的總挖取次數中預挖了 60 次，只有剩餘 40 次為公開的可鑄造次數

#### `payCheck` 說&#x660E;**：**

• 如果部署者設置了 `payCheck` 項目，則每次鑄造時均會檢查鑄造交易是否向指定地址支付了指定的 satoshi，如不符合要求則鑄造無效

• `payTo` 項目為鑄造時需向指定的地址轉入；`payAmount` 為鑄造時需向 `payTo` 地址轉移指定數量的 satoshi

#### `pinCheck` 說明

* 如果部署者設置了 `pinCheck` 項目，則每次鑄造時均會檢查鑄造交易中是否帶了指定條件的 PIN，如不符合要求則鑄造無效
* `creator` 為檢查 PIN 創建者是否為指定 MetaID&#x20;
* `path` 為檢查 PIN 所在路徑是否為指定的路徑
  * `path` 的格式請詳細查看 MetaID 協議關於 path 的說明
  * `path` 支持該 path payload 的內容匹配
  * `/path[‘payload’]` 匹配指定 path 位置下 payload 的全部內容
  * `/path[‘key’=’value’]` 匹配指定 path 位置下 payload 裡的 key 和 value 值
* `count` 為檢查符合條件的 PIN 的數量，默認值為 1
* `lvl` 為檢查 PIN 的等級是否符合要求。`lvl` 由 PIN 的 PoP 值決定，請詳細查看 PoP 值和 lvl 值說明
* `checkPin` 裡的 4 個參數可相互組合，形成可適應多場景的鑄造要求

#### **pinCheck示例**

```json
// 不限制路徑和難度及創建者，任意一個 PIN 均有鑄造資格
"pinCheck": {
  "count": "1"
}

// 需要一個 simplebuzz 協議的 PIN
"pinCheck": {
  "path": "/protocols/simplebuzz"
}

// 需要關注過特定 metaid 的 PIN
"pinCheck": {
  "path": "/follow['metaid_of_me']"
}

// 需要點贊過某個 PIN 的 PIN
"pinCheck": {
  "path": "/protocols/paylike['liketo'='abcdefgh...']"
}

// /protocols 下的任意協議的 PIN（2 個）均有鑄造資格
"pinCheck": {
  "path": "/protocols/*",
  "count": 2
}

// 需要擁有我的 PIN 才有鑄造資格
"pinCheck": {
  "creator": "abcdef0123457" // 需要 metaid 為“abcdef0123457”所創造的 pin
}
```

### 鑄造

#### PIN 路徑：`/ft/mrc20/mint`

後端索引器應只對符合路徑的 mint 資料做驗證和索引

該路徑下的 PIN 不接受 `modify` 和 `revoke`操作

#### 協議格式：

```tsx
{
  "id": "479f8579e5dcdbef868a61541f0d55efccfee1704c8a03f07fb1d97577104d53i0" // tokenID，這個 tokenID 是 deploy 交易的 PINID
}
```

#### 要點說明：

• 協議只有一個參數，就是 `id`，代表了要鑄造的 tokenid，tokenid 為 Deploy PIN對應的 PINID。

• 鑄造的 token 總量由 Deploy 的`amtPerMint` 參數決定。如成功鑄造，該次鑄造的 token 總量會轉移到 Mint 交易的第一個 output 的第一個 satoshi 上。

• 鑄造有效性由 indexer 服務決定，indexer 根據 Deploy 中的相關條件和約束規則驗證該鑄造交易是否合法。判斷的規則全都是鏈上數據，所以即便不同開發者開發的 indexer 的校驗結果也應該是一致的。

• 如 Deploy 檔有 `pinCheck` 要求時，Mint 交易 input 需要指向一個或多個有效 PIN 以完成 PIN 校驗。

• 一個 PIN 在同一個 token 的 mint event 中，只能使用一次。

• 如 Deploy PIN有 `payCheck` 要求時，Mint 交易需有一個 output 符合 `payCheck` 的地址和金額要求。

• Mint 不支持跨鏈鑄造，也就是說 Mint 交易必須和其對應的 Deploy 交易處於同一鏈中。

#### Mint 交易構建例子

<figure><img src="https://57349855-files.gitbook.io/~/files/v0/b/gitbook-x-prod.appspot.com/o/spaces%2FNHx0f4Bxw8OTbRs9kele%2Fuploads%2FnCPuWyxE2xNmiufyOEbE%2Fimage.png?alt=media&amp;token=2170a361-61a5-4797-a77c-52589aacc339" alt=""><figcaption><p>使用 Taproot 信封鑄造，該 mrc20 的鑄造條件中需要 3 個 pin（count: 3)，payCheck 條件為給 address xxx 地址支付 100000 聰 BTC。</p></figcaption></figure>

### Transfer 轉帳

{% hint style="info" %}
轉帳有兩種形式：原生轉帳和數據轉帳
{% endhint %}

#### 原生轉帳（直接轉帳）

原生轉帳是一種簡易的、Layer 1 的轉帳方式，不需要依靠寫入轉帳數據的方式，以純粹的 utxo 轉移方式完成。

原生轉帳適合於不需要 MRC20 代幣找零 的場景，如

1\. Alice 將自己的某種 MRC20 代幣 全部 轉移給 Bob。

2\. Alice 需要給 Bob 轉移的某種 MRC20 代幣的 數量剛好是其中一個或幾個 MRC20 UTXO 的數量之和。

#### 原生轉帳交易構造

當 input 中帶有 MRC20 UTXO，且交易中沒有指明轉帳數據（OPRETURN 或 taproot 數據），則所有 MRC 餘額轉入第一個非 OPRETURN 輸出中

<figure><img src="https://57349855-files.gitbook.io/~/files/v0/b/gitbook-x-prod.appspot.com/o/spaces%2FNHx0f4Bxw8OTbRs9kele%2Fuploads%2FoPTWJCX9a7nigc6y3qzw%2Fimage.png?alt=media&amp;token=60fc2609-4998-4a40-9c63-3f478180b32b" alt=""><figcaption><p>Native transfer</p></figcaption></figure>

### 數據轉帳 (MRC20 Allocation)

• 數據轉帳指通過 在 MetaID 規範的 Taproot 信封中顯式寫入轉帳說明數據 進行轉帳的方式。使用 JSON 格式。通過指定，規定該交易中傳入的 Input 中的 MRC20 餘額，分別分配到哪些 output 中。

• 數據轉帳適合於所有複雜的、需要有多個 output 分配的，或是需要進行餘額找零的交易類型。

• 數據轉帳使用的 PIN Path 為 `/ft/mrc20/transfer`

• 數據轉帳使用與 PIN 類似的數據結構，其中 operation 使用 `hide` 類型，不生成對應的 utxo，不帶有 pinId

• 如果分配方案超過了 input 中蘊含的 MRC20 數量的總額，則該分配視為無效 invalid，退回到缺省的直接轉帳機制，即當前交易中所有 MRC 餘額轉入第一個非 OPRETURN 輸出。

• input 中未被分配完的餘額，使用缺省的直接轉帳機制，自動賦予第一個非 OP\_RETURN 的輸出。可將該機制看作自動找零的行為，默認將未分配的餘額部份找零到第一個 output。

• 其他未被認可的數據轉帳寫法被視為非法，使用缺省的直接轉帳機制，此交易中的 MRC20 餘額將轉入第一個輸出。

#### 數據轉帳格式

數據轉帳寫在 MetaID 信封的 payload 中，以數組的形式存在。

```tsx
type MRC20AllocationItem = {
	id: string
	amount: string
	type?: 'transfer' | 'teleport' = 'transfer'
	vout?: number
	coord?: string
}

type MRC20Allocation = MRC20AllocationItem[]
```

#### 數據轉帳字段說明

* **`id`**: 分配的 MRC20 的 MRC20ID
* **`amount`**: 分配的 MRC20 數量
* **`type`**: 操作類型。有兩種類型：
  * **`transfer`**: （默認）轉帳，指該部份餘額轉到當前交易的某個輸出中。當類型為 transfer 時，需指定 vout
  * **`teleport`**：躍遷，指該部份餘額轉到非本鏈的某個 已存在 的 UTXO 中。當類型為 teleport 時，需指定 coord。躍遷的詳情請參考下一部份。
* **`vout`**: MRC20 分配到的 output index。
* **`coord`**：躍遷時 MRC20 分配到的非本鏈的 UTXO 的位置，以 ${txid}i${vout} 的形式表達。

#### 數據轉帳示例

* 以下 JSON 實例為 MetaID 協議規範中的 payload 項，外層需遵循 MetaID 信封規範。

```tsx
const allocation: MRC20Allocation = [
  {
    "amount": "100",
    "vout": 0,
    "id": "479f8579e5dcdbef868a61541f0d55efccfee1704c8a03f07fb1d97577104d53i0", // 'token1'
  },
  {
    "amount": "256",
    "vout": 3,
    "id": "bcccd98a7a1250f26b57d47cfdd36a95866d4bee59c32c9d4e71a6cc1f3429a5i0", // 'token2'
  },
  {
    "amount": "300",
    "vout": 3,
    "id": "479f8579e5dcdbef868a61541f0d55efccfee1704c8a03f07fb1d97577104d53i0", // 'token1'
  },
];

const pinData = {
	metaidFlag: 'metaid',
	operation: 'hide',
	path: '/ft/mrc20/transfer',
	contentType: 'application/json',
	payload: JSON.stringify(allocation) // 將分配數據進行 JSON 序列化放入 payload 字段
}
```

以上的轉帳交易中，100 個 token1 賦予給 index:0 輸出；256 個 token2 賦予給 index:3 輸出；300 個 token1 賦予給 index:3 輸出。

<figure><img src="https://57349855-files.gitbook.io/~/files/v0/b/gitbook-x-prod.appspot.com/o/spaces%2FNHx0f4Bxw8OTbRs9kele%2Fuploads%2F6UbCXYWmmc2aN3bZQpKS%2Fimage.png?alt=media&amp;token=1abf4959-a977-46ad-94fc-40df98bf9e5f" alt=""><figcaption><p>完全分配</p></figcaption></figure>

<figure><img src="https://57349855-files.gitbook.io/~/files/v0/b/gitbook-x-prod.appspot.com/o/spaces%2FNHx0f4Bxw8OTbRs9kele%2Fuploads%2FcF7Uhj0LZ8fKH9Oj0DGO%2Fimage.png?alt=media&amp;token=dc2d772f-3aca-4f77-85e4-9076a1d5835a" alt=""><figcaption><p>部分分配，未被指定分配的餘額將自動找零歸入第一個output</p></figcaption></figure>

<figure><img src="https://57349855-files.gitbook.io/~/files/v0/b/gitbook-x-prod.appspot.com/o/spaces%2FNHx0f4Bxw8OTbRs9kele%2Fuploads%2F9W7CoZBXPaHX9IwHCN81%2Fimage.png?alt=media&amp;token=8f78dda1-098e-4060-9800-4c77b199119e" alt=""><figcaption><p>無效分配，分配方案大於輸入中的餘額；此時無視分配方案，退回到缺省的直接轉帳機制</p></figcaption></figure>

## Teleport 躍遷（跨鏈）

### 躍遷示例

```tsx
const allocation: MRC20Allocation = [
  {
    amount: '100',
    id: '479f8579e5dcdbef868a61541f0d55efccfee1704c8a03f07fb1d97577104d53i0', // 'token1'
    coord: 'bcccd98a7a1250f26b57d47cfdd36a95866d4bee59c32c9d4e71a6cc1f3429a5i2', // 躍遷坐標，使用 pinId 結構定位 utxo
    type: 'teleport',
  },
]

const pinData = {
	metaidFlag: 'metaid',
	operation: 'hide',
	path: '/ft/mrc20/transfer',
	contentType: 'application/json',
	payload: JSON.stringify(allocation) // 將分配數據進行 JSON 序列化放入 payload 字段
}
```

* 躍遷實現了 MRC-20 的跨鏈功能；可以視為是 transfer 的擴維版本。transfer 將 MRC-20 餘額分配到本交易的 output 中，teleport 將餘額分配到其他鏈的 output 中。
* `coord`（坐標）使用另外鏈中的 `${txid}i${vout}` 格式來定位目標 utxo
* `coord` 指向的 utxo 由 indexer 來識別所在的鏈，無需在數據中表達
* 如果 `coord` 指向的 utxo 不存在（indexer 無法尋得），此交易依然視為有效，而 teleport 分配的餘額部份視為燃燒。
* teleport 可以同 transfer 並列於一個交易內，分配優先級高於 transfer

<figure><img src="https://57349855-files.gitbook.io/~/files/v0/b/gitbook-x-prod.appspot.com/o/spaces%2FNHx0f4Bxw8OTbRs9kele%2Fuploads%2FphxrySsRW8wT2lZxi9z5%2Fimage.png?alt=media&amp;token=26addc16-a699-42c5-874d-17add43cf15b" alt=""><figcaption><p>躍遷示例</p></figcaption></figure>

### Teleport 同 Transfer 可以同層

<figure><img src="https://57349855-files.gitbook.io/~/files/v0/b/gitbook-x-prod.appspot.com/o/spaces%2FNHx0f4Bxw8OTbRs9kele%2Fuploads%2FDBsVSWUtJddLVIIX79xT%2Fimage.png?alt=media&amp;token=3750fb53-b28b-4120-9a43-22a553533446" alt=""><figcaption><p>躍遷同轉移同時存在</p></figcaption></figure>


# MRC-721

{% hint style="warning" %}
請注意該協議仍在測試網測試中,我們會在充分測試後在比特幣主網合適的區塊高度啟動該協議
{% endhint %}

## 介紹

MRC-721 是一個基於 MetaID 的 NFT 專輯協議。儘管在 MetaID 協議中，每條數據均為 NFT，但我們仍需要一個專門的 NFT 專輯協議，以方便 NFT 以專輯方式展示和銷售。本協議可適用於各種 NFT 專輯，包括音樂 NFT 專輯、藝術創作 NFT 專輯、圖書 NFT 專輯等。

## 協議格式

### 專輯

#### 基礎路徑 `/nft/mrc721/{collection_name}`

MRC-721 採用路徑區分不同的專輯，用戶應該將 NFT PIN 創建在`/nft/mrc721/{collection_name}` 下，即約定了相關 NFT 歸屬於專輯{collection\_name}，PIN 格式不限。

如用戶要創建名字為“metabot”的 NFT專輯，則將所有相關 NFT PIN 文件創建在`/nft/mrc721/metabot` 路徑下

#### 要點說明

* 存放在`/nft/mrc721/` 路徑下的所有 NFT 文件以及其他文件，均不接受 modify，revoke 和 hide 操作符；也就是MRC721 協議下的所有文件都不能修改、撤銷和隱藏。
* collection\_name為任意字符，只要最後的路徑符合 metaid pin 的路徑規範即可

### 專輯說明協議

#### 路徑: `/nft/mrc721/collection_name}/collection_desc`

該協議為對其所在路徑的專輯的說明和介紹。只有存在collection\_desc 協議文件的 NFT 專輯才會被後端索引器索引。

#### 專輯說明協議格式：

```json
{
	"name":"the full name of the collection",
	"totalSupply":5, //該專輯的最大发行量，可接受值 ;range[-1~1e12]；default to -1，means unlimited；optional
	"royaltyRate":5, //該專輯的銷售版税設置，單位為百分比，5 即為 5%，可用範圍0-20, default to 0;optional
	"desc":"description of the collection", //optional
	"website":"https://the-website-of-the-collection", //optional
	"cover":"metafile://your-nft-cover-pinid",//optional
	"metadata":"any data if needed" //optional
}
```

#### 要點說明

* collectionid 為`collection_desc` 協議的 pinid; collectionid為專輯的索引值；
* `totalSupply`為專輯最大的發行量，索引器只索引專輯路徑下與`totalSupply`值對應的 PIN。超過`totalSupply`數量的 PIN 視為不是該專輯的有效PIN。如`totalSupply`為 999，則只認為首先創建的前 999 個 PIN 為該專輯下的有效 PIN。
* 每個專輯下只有一個 collection\_desc 協議。NFT 專輯有多個 collection\_desc 協議，則只採取第一個忽略後來增加的。

<br>

### NFT Item 說明協議

#### 路徑: `/nft/mrc721/{collection_name}/item_desc`

該協議用於對專輯內各個 Item 說明的協議。該協議為可選項，為對相關 NFT Item 的一個補充性，額外性說明。如缺失不影響 NFT 專輯的創建和索引。

#### NFT Item 說明協議格式

```json
{
"items":
[{
		"pinid":"the-pinid-of-nft", //optional
		"name":"the-name-of-the-NFT-Item",//optional
		"desc":"the description of the specific NFT",//optional
		"cover":"metafile://your-nft-cover-pinid",//optional
		"metadata":"any arbitrary data you can place here"//optional
	},
//repeat item object if needed
]
}
```

#### 要點說明：

* `item_desc`為對專輯內各個 NFT 的描述性文件；item\_desc為可選項，如缺失不影響後端索引器對該 NFT 專輯的索引。
* 一個 NFT 專輯下允許存在多個 `item_desc`協議文件
* 如有多個重複 pinid，則採用先見原則，對於已存在的 pinid 的相關信息將忽略處理；
* 如 pinid 指向非本專輯的 pinid，則忽略處理。


# 概要

MetaID是一个构建在比特币和其他UTXO 网络上的 Web3协议。基于 MetaID 协议，开发者可以在构建各种数据互联互通，数据归用户所拥有的 Web3 应用。

## 简单来说，MetaID 可以用于

* 在比特币上构建所有类型的 Web3 应用，包括社交类应用、游戏、电商应用等。
* 在比特币上发行和数据价值紧密结合各种 FT 和 NFT 资产。
* 利用 比特币侧链和 UTXO模型特性进行无限扩容，从而可承载海量用户使用

## MetaID 特点

* 将离散的区块链数据抽象成有序的树状结构数据，为在比特币上构建Web3 应用而准备；
* 用户信息和应用数据全部上链，保存在由用户控制的私钥所对应的地址上，做到用户数据和其他方无关，数据归属权彻底由数据产生者所有；
* 每一条MetaID链上数据天然是一条非同质化 Token（NFT）数据，用户可自由转移和交易，用户彻底掌握自己数据；
* 不同应用间的数据可以相互连通，消除应用间数据孤岛；不同协议数据可以在用户的MetaID关联下相互组合，Web3应用开发工作大为减少。

## MetaID愿景

* 比特币由于具有高共识、高并发以及支持数据在本链保存等特性，是成为Web3应用的最好载体，MetaID 目标是成为比特币生态上最大的用户身份和数据统一协议；
* MetaID将打造一个数据互联互通、数据归属用户、用户数据和资产天然结合的新的Web3开发范式，我们相信 **Bitcoin = Money+Data**

## MetaID基本原理

通过MetaID协议，将散落在区块链上的基于MetaID的交易，以“人”为分类方式，将数据以树状结构进行完全分类。在MetaID协议的视角下，所有链上数据均抽象成“MetaID树”的格式在链上进行保存，链上数据从此只有一棵棵“MetaID树”，因此可以做到数据和链无关，甚至和保存数据的信封格式无关，只要最终实现的“MetaID树”符合MetaID格式，便可以实现数据归属用户、数据有序存放和数据互联互通等特点。故此在这基础上可以构建一切形式的Web3 应用。

#### **以“人”为分类方式，将离散的区块链数据变成有序的结构数据**

<figure><img src="https://377496739-files.gitbook.io/~/files/v0/b/gitbook-x-prod.appspot.com/o/spaces%2FNaMZCEAQtOV5yhwyCugt%2Fuploads%2F4lRC529q2WYVWx1N7bKX%2FWechatIMG24.jpg?alt=media&amp;token=38ddfb27-2c62-4ebd-8ca3-9f2f7c4ff96b" alt=""><figcaption></figcaption></figure>

**通过协议重用链上数据**

<figure><img src="https://377496739-files.gitbook.io/~/files/v0/b/gitbook-x-prod.appspot.com/o/spaces%2FNaMZCEAQtOV5yhwyCugt%2Fuploads%2FPoBd38G6gY75HBqdHOSh%2FWechatIMG25.jpg?alt=media&amp;token=2b509f7c-805a-4c6b-9680-56d2ab41c7b8" alt=""><figcaption></figcaption></figure>

**在一个应用中通过 MetaID 组合不同的协议**

<figure><img src="https://377496739-files.gitbook.io/~/files/v0/b/gitbook-x-prod.appspot.com/o/spaces%2FNaMZCEAQtOV5yhwyCugt%2Fuploads%2F6P7T9FY121HjhyWUO3yu%2FWechatIMG31.jpg?alt=media&amp;token=40930785-eae0-4a88-ba9c-7fd052b8bcb8" alt=""><figcaption></figcaption></figure>

## MetaID现状

**2024 年 5 月：**&#x20;

MetaID 协议已发布最新的V2.0版本，并且在开发者社区的努力下，已上了MAN、MetaID浏览器、MetaID SDK等基础设施，并且第一个在BTC上的MetaID 应用链上X(Bitbuzz)也已上线。


# 术语

在本MetaID 文档里，我们引入了一些新术语：

### MetaID

MetaID 定义为用户数据树的根部索引值。该值为全局唯一。MetaID 协议本质就是生成这个用户数据树的一套约定。本文档中，MetaID有时既指这个索引值，有时也会将 MetaID 协议和相关方法简称为 MetaID。

#### 生成规则

MetaID的生成规则基于将用户的 Address 通过SHA256哈希处理得到，因此 Address 就自带有唯一的 MetaID。

```jsx
MetaID=SHA256(Address)
```

#### MetaID树

符合 MetaID 规则而生成的树状数据结构，我们称为“MetaID 树”。MetaID 树是通过用户自己 PIN 中的`path`，构建出一个相互关联、有向无环的树状数据结构，详见“MetaID树介绍”词条。

### PIN

PIN是指Personal Information Node，在 MetaID 树上每一个节点和叶子都是一个 PIN。简单来说每一条在链上铭刻的 MetaID 数据都称为 PIN，详见“关于 PIN”词条。

### PoP

PoP是指 Proof of PIN，它和随机性以及该 PIN 所在区块的算力难度相关，用于反应用户 MetaID 数据的价值的和用户在MetaID 世界中的“工作量”，详见“关于PoP”词条。

### MAN

MAN 是指 MetaID App Node，是第一个遵循 MetaID V2 协议的后端索引器，目标是打造基于 MetaID 的分部署存储节点，以及方便开发者可以在不依赖第三方服务商开发去中心化的 MetaID 应用。详见“MAN”部分相关文档。


# 协议格式

### 协议格式

MetaID协议的标准规范如下

```jsx
<metaid_flag> 
<operation> 
<path> 
<encryption> 
<version>  
<content-type> 
<payload> 
```

MetaID 协议标准规范由7部分组成，分别是：

#### **\<metaid\_flag>**

固定为“`metaid`”，用作协议标识。

必要选项。

#### **\<operation>**

操作指令，支持5种操作指令

* **`init`**，此指令为在链上初始化MetaID，确定MetaID树的根节点。约定init所在PIN的ID即&#x4E3A;**`MetaID`**。init采用先见原则，后者init均无效。该指令将忽略后续的part，后续的5个part均可填默认值。
* **`create`** 创建内容，在path指定的路径上创建PIN
* **`modify`** 修改内容，对path指定路径的PIN进行修改
* **`revoke`** 作废内容，对path指定路径的PIN声明作废
* **`hide`** 创建并隐藏PIN， 使用该指令后，将不分配 PINNumber

必要选项。

#### \<path>

PIN所在的路径。表示path有三种模式，如下

* “/” 开头，通过路径定位需创建的PIN，如/protocols/simplebuzz
* “#”开头，通过PINNumber定位PIN
* “@”开头，通过PINID定位的PIN

必要选项。

#### \<encryption>

针对PIN内容的加密方式。0 为不加密；1 为ECIES加密；2为ECDH加密。

非必选项，若不传必须默认使用`OP_0`占位，默认为`0`。

#### **\<v**ersion>

PIN的版本号。不同版本号意味着payload内容的格式可能不相同。

非必选项，若不传必须默认使用`OP_0`占位，默认为`0`。

#### \<content-type>

约定`payload`的文件格式，包含了`payload`的编码方式。

所有的媒体类型可参考：<https://www.iana.org/assignments/media-types/media-types.xhtml>

非必选项，若不传必须默认使用`OP_0`占位，默认值为`application/json`。

#### \<payload>

`payload`为任意数据内容，其数据格式由\<content-type>规定。MetaID 协议对`payload` 长度没限制。只应受该 PIN 所在区块链的单条交易数据大小约束。

非必选项，若不传必须默认使用`OP_0`占位。


# MetaID 树介绍


# MetaID树

### 概括

用户的数据和操作以 PIN 的形式存储在区块链中，其中，用户的 MetaID 树都可以通过 PIN 中的`path`来构建出树状结构，形成一个相互关联、有向无环的数据结构，用于组织和管理用户在区块链上的数据和操作。

<figure><img src="https://377496739-files.gitbook.io/~/files/v0/b/gitbook-x-prod.appspot.com/o/spaces%2FNaMZCEAQtOV5yhwyCugt%2Fuploads%2FXMHuJ8BXLWg0nvMZ5pvk%2Fimage.png?alt=media&amp;token=75f656e8-9a22-4b60-8233-09ee02772ce6" alt=""><figcaption></figcaption></figure>

#### MetaID树默认保留节点

MetaID树默认保留了info，protocols，file，nft，ft，follow路径，当A地址生成一个`operation`为`init`的PIN，则A地址完成MetaID的生成，默认给其MetaID树结构分配保留的路径：

<figure><img src="https://377496739-files.gitbook.io/~/files/v0/b/gitbook-x-prod.appspot.com/o/spaces%2FNaMZCEAQtOV5yhwyCugt%2Fuploads%2FcRKr3O9SojSLVAoMhT2w%2Fimage.png?alt=media&amp;token=8811132b-70fa-421f-b5f5-d47661b0e12b" alt=""><figcaption></figcaption></figure>

默认给MetaID树保留路径`/info`、`/protocols`、`/file` 、`/ft`、`/nft`、`/follow`。并且分配了MetaID，其MetaID为用户A生成`init`的PINID

`/info` ：用户个人信息的存放路径

`/protocols` ：用户应用协议信息的存放路径

`/file` ：用户文件的存放路径

`/ft` ：用户ft资产行为的存放路径

`/nft` ：用户nft资产行为的存放路径

`/follow` ：用户关注行为的存放路径


# Info 节点

### **Info节点概述**

Info节点专门用于存储用户的个人信息。通过Info节点，用户可以在区块链上安全地存储和管理个人信息。

### **关于Info基本信息**

协议规定Info节点固定包含以下3个子节点：

* name 用户名，建议不加密。格式固定为text/plain
* avatar 用户图像，建议不加密。格式为binary，payload部分存放图片的二进制流
* bio 用户个人简介，建议不加密。格式固定为text/plain

### **数据格式**

用户个人信息的存储采用如下格式：

```c
OP_FALSE
OP_IF
   metaid                
   create                
   /info/name            
   0                     
   OP_0                  
   text/plain            
   Alice                 // 用户姓名（示例）
OP_ENDIF
```

### **Info节点路径**

Info节点路径采用 **`/info`** 作为路径，并通过后续路径区分不同类型的个人信息。比如，**`/info/name`** 可以用于存储用户的姓名，而 **`/info/avatar`** 可以用于存储用户的头像信息。通过在不同类型路径下存储个人信息，用户可以清晰地组织和管理自己的个人资料。

如应用方需增加用户信息，可自行添加在/info 节点后


# File 节点

### **File节点概述**

File节点是专门用于存放文件的PIN路径。通过File节点，用户可以将文件以PIN的形式安全地存储在区块链上，实现去中心化的文件存储和管理。

### **数据格式**

存储文件的PIN内容遵循如下格式：

```go
OP_FALSE
OP_IF
	metaid            
	create            
	/file/file-name-1.jpg     
	0                 
	OP_0              
	image/jpg;binary  
	<file data>        // Payload - 文件的二进制内容
OP_ENDIF
```

在这里，**`<file data>`** 包含了文件的二进制内容，而 **`content-type`** 指定了文件的数据类型（例如，image/jpg;binary 表示JPEG格式的图片文件）。

### **File节点路径**

File节点的路径使用 **`/file`** 作为存储路径，并可通过文件名或子级路径来进一步区分不同的文件。通过File节点的路径，用户可以在MetaID的树状结构中轻松地定位和检索特定的文件PIN，从而实现对文件的有效组织和管理。

### **File Referencing**

在 MetaID 中，文件引用是一种基础的业务操作，具有极其重要的地位。这特性允许用户在应用协议中引用已存在的链上 **`file`** 数据，进一步提高数据连接性并增强用户体验。为了实现此操作，我们定义了一种特殊的文件引用规则

#### **文件引用格式**

当在一个子协议中需要引用一个 **`file`**，例如在 **`payload`** 中，我们使用以下格式：

```
metafile://{pinid}
```

其中，`PIN**ID**` 是待引用文件的唯一标识符。通过此格式，我们可以建立从当前协议到特定 **`file`** 的引用链接。

<figure><img src="https://377496739-files.gitbook.io/~/files/v0/b/gitbook-x-prod.appspot.com/o/spaces%2FNaMZCEAQtOV5yhwyCugt%2Fuploads%2FYVkVM6jaqEo23NPSYKMQ%2Fimage.png?alt=media&amp;token=54f48e32-f25f-426a-926c-c7e2ca9ce273" alt=""><figcaption></figcaption></figure>

#### 例子

举个例子，发一个带有某个文件的贴：

```json
//Payload
{
	"content":"Hello bitcoin world!",
	"contentType":"text/plain",
	"createTime":1710741614716,
	"quoteTx":"",
	"attachment":[
		"metafile://{pinId}",
	]
}
```

最终上链内容即为：

```json
OP_FALSE
OP_IF
	metaid                           
	create                          
	/protocols/simplebuzz         
	0                                
	0                                
	application/json;utf-8              
	{"content":"Hello bitcoin world!","contentType":"text/plain","createTime":1710741614716,"quoteTx":"","attachment":["metafile://{pinId}",]}       //Payload
OP_ENDIF
```


# FT 节点

FT 节点用于保存不同资产协议的相关交易，包括部署、铸造等 PIN 信息。

如基于 MRC20 协议的资产相关数据，均放置在路径 /FT/MRC20/ 下

此页面内容将在 MRC20 协议发布后进行详细补充。


# NFT 节点

NFT 节点用于保存不同NFT协议的相关交易，包括专辑信息等

例如基于 MRC721 协议的资产相关数据，均放置在路径 /NFT/MRC721/ 下

此页面内容将在 MRC721 协议发布后进行详细补充。


# Protocols 节点

Protocols节点为记录用户使用各种第三方协议的交易情况。Protocols节点下的子路径为第三方协议路径，其应为协议名称。协议路径下为用户使用该协议所产生的具体交易。结构如下

<figure><img src="https://377496739-files.gitbook.io/~/files/v0/b/gitbook-x-prod.appspot.com/o/spaces%2FNaMZCEAQtOV5yhwyCugt%2Fuploads%2F4ScHLCgAkdmAZo4ZRrH7%2Fimage.png?alt=media&amp;token=638915aa-ae4c-4d8b-9d07-d80771334dc1" alt=""><figcaption></figcaption></figure>

由于Protocols的协议是开放的，所有应用方都可以构建自己的协议。每个协议下的结构由协议制定方/应用方自己决定，但需保证协议节点的标识具有唯一性。

#### **关于协议名字的约定**

构建一个新协议节点时，`/protocols`之后的子路径其为协议名称， `/protocols/{sub-protocol}`。协议名称没有限制，应用方可根据自己的需要，构成一个方便阅读和理解的协议名称。协议名可以重名，应用方可以根据其格式来获取所对应的内容

#### **关于协议的结构和约定**

每个协议的结构由协议制定方/应用方约定，每个协议下可以是扁平的一层结构，也可以是复杂的多层结构。如果业务允许的话，该协议的的结构和详细说明，协议制定方应公开出来，以便其他应用方/数据服务方可以调用和解析。

需注意的是，这些节点的结构虽然为协议制定方/应用方决定，但相关的节点创建还是由用户创建，为用户所掌握，用户只记录和自己相关的协议数据。

#### **协议交易节点**

每个子协议下的PIN均为用户使用该协议下的产生的具体交易，每条具体的交易称为协议交易节点。

`payload` 为协议数据的存储处。协议数据由应用方根据约定的协议自行解析。

`content-type` 为数据类型和编码方式。应用方需根据`content-type`来读取`payload`数据。

协议交易节点的子路径名称需为域树中同一层级内是唯一的，以方便以后用URI方式查找。例如可以采用publickey作为子级路径名称，也可以自行设定，只需确定与publickey映射关系即可。

假设某一MetaID交易是属于SampleBuzz协议的，其数据格式采用Json，数据内容如下：

```
{"content":"This is a test","title":"Test-Title"}

```

那么，该MetaID交易的构建参考如下：

```
OP_FALSE
OP_IF
	metaid                          
	create                           
	/protocols/simplebuzz          
	0                                
	0                                
	application/json;utf-8
	{"content":"This is a test","title":"Test-Title"}
OP_ENDIF
```

或者

```
OP_0
OP_RETURN
	metaid                          
	create                           
	/protocols/simplebuzz          
	0                                
	0                                
	application/json;utf-8
	{"content":"This is a test","title":"Test-Title"}
```

需注意的是，协议交易节点中的`version`值代表了其所遵循的协议版本，不同版本号代表其`payload`内容有可能不一样。数据解析时，需根据不同的`version`做不同的解析。上面例子中，生成的MetaID树结构参考如下：

<figure><img src="https://377496739-files.gitbook.io/~/files/v0/b/gitbook-x-prod.appspot.com/o/spaces%2FNaMZCEAQtOV5yhwyCugt%2Fuploads%2FP19sf2B7vF72jNEdSmQt%2Fimage.png?alt=media&amp;token=12f34ee1-e7aa-4317-84e8-0a893cab97c7" alt=""><figcaption></figcaption></figure>


# Follow节点

## Introduction

**`follow`** 是 MetaID 规范的重要组成部分，它允许用户在区块链网络中创建和维护他们的社交关系。通过 **`follow`**，我们能显著提升 MetaID 的社交能力，为用户提供更丰富、更深度的交互体验。

<figure><img src="https://377496739-files.gitbook.io/~/files/v0/b/gitbook-x-prod.appspot.com/o/spaces%2FNaMZCEAQtOV5yhwyCugt%2Fuploads%2Flkyn91hosx3YEp8av0Kd%2Fimage.png?alt=media&amp;token=350e3626-afd2-48b8-8a3e-36b3b6f29514" alt=""><figcaption></figcaption></figure>

### Spec

**`follow`** 协议的脚本格式如下：

```jsx
OP_FALSE
OP_IF
	metaid                           
	create                          
	/follow                         
	0                                
	0                                
	application/json;utf-8                
	{metaid}                        
OP_ENDIF
```

#### 关于 **`follow`** 的约定

1. 在 **`follow`格式中，`create`** 代表关注，**`revoke`** 代表取消关注。
2. 格式中的 **`metaid`** 必须是有效且已上链的 MetaID。如果 **`payload`** 中的 **`metaid`** 无效，那么 **`follow`** 是无效的。
3. 在 **`revoke`** 操作中，**`path`** 需要定位到一个有效的 `PIN`，且这个 `PIN` 必须有效的 **`follow`** `PIN`。

### 示例

以用户 A 关注用户 B 为例：

用户 A 的 MetaID：**`c08c4e96514ee5c4f91b6df3de7a42f797a36af7265918a6b74d5198f87682adi0`**

用户 B 的 MetaID：**`2464ad8d35e601f8b73c80976104ff00e878f58dc2f2936ec3a269fe34d962c2i0`**

用户 A 关注用户 B 的脚本操作如下：

```jsx
OP_FALSE
OP_IF
	metaid                         
	create                           
	/follow                          
	0                               
	0                               
	application/json;utf-8                
	2464ad8d35e601f8b73c80976104ff00e878f58dc2f2936ec3a269fe34d962c2i0       //用户B的metaid
OP_ENDIF
```

将 **`follow`** `PIN` 上链后生成的 **`pinId`** 为：**`dcvv5d4377f36c7c2466259593d0d4a0c1e5d7ec19500e082ce1eea3993f22b1aac1i0`**

然后，用户 A 取消关注用户 B 的脚本操作如下：

```jsx
OP_FALSE
OP_IF
	metaid                           
	revoke                          
	@dcvv5d4377f36c7c2466259593d0d4a0c1e5d7ec19500e082ce1eea3993f22b1aac1i0  
	OP_0                                
	OP_0                                
	OP_0                
	OP_0
OP_ENDIF
```

关注和取消关注的操作都会立即生效，并在链上产生相应的记录。


# MetaID 信封格式

### 信封格式

MetaID内容完全在链上的，MetaID信封格式在当前 V2 版本中支持两种方案：

#### 1.Taproot-Script:

通过利用 Taproot-Script的“commit/reveal”方案，在输入的Taproot脚本中，放置 MetaID 信封，其中包含可以在 MetaID 上合法执行的各种操作，约定是使用`OP_FALSE OP_IF ... OP_ENDIF`将任意不可执行的内容放置在Taproot支出脚本中。我们使用“ `metaid` ”字节（`6D6574616964`十六进制）来标识该信封为MetaID协议。

Taproot-Script的**Envelope**方式：

```jsx
OP_FALSE
OP_IF
	<metaid_flag>
	<operation>
	<path>
	<encryption>
	<version>
	<content-type>
	<payload>
OP_ENDIF
```

#### 2.Locking-Script:

通过利用OpReturn操作码，将数据放在其后，在交易输出的Locking-Script中，放置MetaID信封，其中包含可以在 MetaID 上合法执行的各种操作，约定是使用 `OP_RETURN` 将任意不可执行的内容放置在锁定输出脚本中。我们使用“ `metaid` ”字节（`6D6574616964`十六进制）来指示该信封属于MetaID协议。

Locking-Script的**Envelope**方式：

```jsx
OP_0
OP_RETURN
	<metaid_flag> 
	<operation>
	<path>
	<encryption>
	<version>
	<content-type>
	<payload>
```

信封必须出现在输出脚本中的OP\_RETURN之后，且在output的index为1的位置，index为0的utxo的第一个satoshi则是用来承载信封的内容。

<figure><img src="https://377496739-files.gitbook.io/~/files/v0/b/gitbook-x-prod.appspot.com/o/spaces%2FNaMZCEAQtOV5yhwyCugt%2Fuploads%2F8IFGKeKxtgOXZsJ1bjeU%2Fimage.png?alt=media&amp;token=e25d63be-2a76-4170-8aae-97451b407af2" alt=""><figcaption></figcaption></figure>

**注意：如果同一交易同时存在Taproot-Script和Data-script两种信封格式，以Taproot-Script的方式为主**


# 隐私模型

MetaID协议的隐私模型是由应用方制定，如果应用开发者不希望其用户数据公开，建议可考虑如下方式：

### 数据链上加密

* 将节点的`encryption`设置为`1`，采用ECIES加密方式。这样数据只有用户自己可查看。具体ECIES加解密详情请参考：[Integrated Encryption Scheme](https://link.juejin.cn/?target=https%3A%2F%2Fen.wikipedia.org%2Fwiki%2FIntegrated_Encryption_Scheme)
* 将节点的`encryption`设置为`2`，采用ECDH协商密钥的方式来处理。数据就只有用户和应用方能查看，用户也能授权或委托应用方来授权给第三方来访问。具体ECDH加解密详情请参考：[Elliptic-curve Diffie–Hellman](https://en.wikipedia.org/wiki/Elliptic-curve_Diffie%E2%80%93Hellman)

### Link模式

MetaID树的数据结构关系是透明的，有些用户不希望其 MetaID 树数据结构关系信息暴露，此场景下可以使用 link 模式。通过operation 设置为 link，将节点设置为链接节点，指向另外一个数据集，这个数据集可以是另外一个MetaID，也可以是另外匿名数据集。这样用户可以有选择的使用匿名节点和MetaID协议节点。

### Hide模式

另外值得一提的是，当PIN交易中的`operation`为`hide`时，也是隐私模型的一种方式。此时 PIN 将声明不被索引和应用所引用，可用于本地应用和不希望被索引器以及第三方应用所引用时的场景。


# 关于PIN

PIN 为Personal Information Node缩写，符合 MetaID 格式的每一条链上数据均称为 PIN，由用户通过私钥签名发出，代表了用户的 链上个体行为。比如创建MetaID、发表评论和点赞、部署和铸造资产等行为都是用一条 PIN 来表示。

PIN采用序数理论， PIN内容负载在交易的输出中，默认在其输出的第一个sat上。当PIN被创建时，该交易输出的第一个Satoshi即代表该PIN。

#### **PIN 的拥有者与创作者**

每个 **`PIN`** 都有两个主要属性：拥有者和创作者。

* **创作者 (Creator)**：创作者是指生成 **`PIN`** 的原始地址。该属性由创建 **`PIN`** 的交易决定，一旦被设定，无论后续发生何种交易，创作者属性都是不可改变的。
* **拥有者 (Owner)**：拥有者是指当前拥有 **`PIN`** 所代表的Satoshi的用户地址。该属性可以通过转移该Satoshi 来改变。

例如，如果用户地址 A 创建了一个 **`PIN`**，并且这个 **`PIN`** 所代表的Satoshi当前处于用户地址 B，那么，A 是其创作者，B 是其拥有者。

#### **PINID**

一个 **`PINID`** 由其交易ID（**`TxId`**）和`PIN`所在交易中的output位置（**`output index`**）构成。形式如下：

```
PINID = {TxId}i{index}
```

**`PINID`** 上是一个全局唯一的标识符，标记了区块链上的特定交易的特定位置。

#### **PIN Number**

**`PIN Number`** 是一个分配给 **`PIN`** 的序列号，它按照 **`PIN`** 在区块链中的被打包顺序来排列，采用先见原则。

#### Transfer

MetaID的PIN是以聪形式存在，允许跟踪和传输单个聪，并以先进先出的方式从交易输入转移到交易输出，转移过程取决于交易输入和输出的顺序。

如图，所有交易输入里面，PIN在#1001位置，转移之后，PIN也在所有交易输出里面的#1001位置

<figure><img src="https://377496739-files.gitbook.io/~/files/v0/b/gitbook-x-prod.appspot.com/o/spaces%2FNaMZCEAQtOV5yhwyCugt%2Fuploads%2FWV6eCMoiozLFAgn58t7T%2Fimage.png?alt=media&amp;token=8eec8fc8-9936-4f8d-9b07-b839c31f7cdc" alt=""><figcaption></figcaption></figure>


# 关于PoP

## &#x20;概要

Proof of PIN（PoP）是 MetaID 中的一个有趣概念，我们参考了比特币的挖矿原理制定了 PoP 机制。PoP值反映的是用户在MetaID 世界的“工作量”证明。在 MetaID 世界中，用户最小的“工作量”是发送一条 PIN，因此每条 PIN 都有一个哈希值，并且该将用户的PIN与其所在的区块难度结合。PoP 值反映了如下两个维度：

* 用户创建MetaID 数据的数量概况：创建 MetaID PIN越多，获得高难度的 PoP 值的概率越高
* 用户创建 MetaID 数据的算力消耗：PoP 值和MetaID 数据所在区块链算力情况挂钩，算力越高越容易获得难度高的 PoP 值

PIN 如同 SHA256 算力，PoP 如同难度哈希，算力越高则越大概率获得高难度的哈希值。

通过验证用户相关的PoP值，我们可以快速评价一个用户在 MetaID 世界的贡献度，也让 PIN有了等级和稀有度的概念。

### **计算方法**

PoP 是通过区块的 **`MerkleRoot`** 和 **`PINID`** 用SHA256联合哈希，然后再与 `BlockHash`相乘，从而生成一个新的值。具体公式为：

```
PoP = hash(PIN_ID + Merkle_Root) * Block_Hash
```

得出的原始的哈希值然后进行8进制转换，转换后的结果即为 PoP。

以下为计算代码：

```go
package pop

import (
	"crypto/sha256"
	"encoding/hex"
	"fmt"
	"math/big"
	"strconv"
)

func CalculateHash(pinid string, merkleRoot string) string {
	h := sha256.New()
	h.Write([]byte(pinid + merkleRoot))
	return hex.EncodeToString(h.Sum(nil))
}

func CalculateProductToHexStr(blockhash string, pinHash string) string {
	blockhashByte, _ := hex.DecodeString(blockhash)
	blockhashInt, _ := new(big.Int).SetString(blockhash, 16)
	pinHashByte, _ := hex.DecodeString(pinHash)
	pinHashInt, _ := new(big.Int).SetString(pinHash, 16)
	popByte := new(big.Int).Mul(blockhashInt, pinHashInt).Bytes()
	//计算总位数：32+32=64
	totalLen := len(blockhashByte) + len(pinHashByte)
	//需要补0的位数
	remainingLen := totalLen - len(popByte)
	for i := 0; i < remainingLen; i++ {
		popByte = append([]byte{0}, popByte...)
	}
	return hex.EncodeToString(popByte)
}

func ConvertToOctalHex(productHex string) (string, int64) {
	productByte, _ := hex.DecodeString(productHex)
	
	//转二进制
	bList := make([]string, 0)
	for _, b := range productByte {
		binaryB := fmt.Sprintf("%b", b)
		bList = append(bList, fmt.Sprintf("%08s", binaryB))
	}
	productBinaryStr := ""
	for _, b := range bList {
		productBinaryStr += b
	}
	productBinaryStr = productBinaryStr[:510]

	bCount := int64(0)
	for _, b := range productBinaryStr {
		if b == '0' {
			bCount++
		} else {
			break
		}
	}

	//二进制str转8进制str
	octal := ""
	for i := 0; i < len(productBinaryStr); i += 3 {
		binaryStr := productBinaryStr[i : i+3]
		num, err := strconv.ParseInt(binaryStr, 2, 64)
		if err != nil {
			fmt.Println("ParseInt error:", err)
			return "", 0
		}
		octal += strconv.FormatInt(num, 8)
	}
	return octal, bCount
}

func GenPop(pinid, merkleRoot, blockHash string) (string, int64) {
	//计算pinHash
	pinHash := CalculateHash(pinid, merkleRoot)
	//blockhash * pinHash
	productHexStr := CalculateProductToHexStr(blockHash, pinHash)
	//转8进制
	octal, bCount := ConvertToOctalHex(productHexStr)
	
	return octal, bCount
}
```

以下为计算实例：

```go
func Test_pop(t *testing.T) {
	pinid := "77aac2ae323748dee3b8b1ae6b7c33c1c4466f568c572ea488f584f041f0de4ei0"    // 64 char hash
	merkleRoot := "e56011a241cb196fc4efbeafef051ca901761ffb569a43146582f9133bfd41d2" // 64 char hash
	blockhash := "000000000000000004c2db0441a47fd3574992d508b8d9d866a789d371aa5060"  // real block hash
	pop, bCountZero := GenPop(mockPinId, merkleRoot, blockHash)

	fmt.Println("POP:", octal)
	fmt.Println("POP-0:", bCountZero)
}
```

### **PoP  Level（难度等级）**

在MetaID系统中，PoP值的难度级别采用类似区块哈希的前缀 "0" 位数进行定义。具体而言，PoP值前缀中 "0" 的数量越多，其对应的难度等级（PoP Level）越高。系统规定，任何有效的PoP值至少应包含21位前缀 "0" ，作为最低标准。

为了高效评估和表达PoP的稀有性与难度，MetaID提出了PoP Level的设定。PoP Level为整数，目前体系中共有1至13级，主要应用于PIN稀有度的快速判定、MRC20等场景的资产铸造等。在不同主链环境下，PoP Level的起始标准有所区别，例如MVC常以1级为初始门槛，BTC则通常从6级起步。

具体难度划分为：PoP Level为1时，需满足PoP值前缀有22个 "0" ；PoP Level为2时，需要23个 "0" ；此后每提升一级，"0" 的数量相应增加1位。前缀 "0" 的数量越多，反映出PoP值的稀有性和算法挑战难度越高。

此外，**PoP Level难度等级间为指数递增关系，即每提升一个等级，PoP值挖掘的难度为前一等级的8倍，极大增强了高等级PoP的安全性和稀缺性。**

### PoP Score（PoP分数）

#### PoPScore的定义与应用场景

PoP Score是为比PoP Level更加精细评估PIN稀有度而设立的数值。尤其在诸如MetaSo系统下的PEV值、MDV值等需细致区分PoP难度的场景下，PoP Score能够为每条PIN精准地评分和排序。每一条PIN都对应一个PoP Score，并会记录在MetaID系统中。

#### PoPScore的计算方法

**a. 确定PoP Level整数部分**

以某PIN对应的PoP值为例：

<pre><code><strong>0000000000000000000000215206653161113226643512614250403542335511435340330664252463510373257440244542222437344512355773452022004517474440724217350505346711227665150775715
</strong></code></pre>

* 先统计前缀连续“0”的数量。假设上例有22个“0”，则对应的PoP Level为1，则整数部分为1。

**b. 计算PoP Sub Octal**

* 将前缀“0”全部去除后，取其后非0部分的前4位数字，作为小数点后的部分。例如，例中的4位为“2152”，并将其记录为PoP Sub Octal。则此步骤得到PoPSubOctal = 0.2152。
* 需要注意，**PoP Sub Octal是特殊的8进制小数**。

**c. 8进制均匀化转换**

* 为便于数值分布的均匀性，将8进制小数PoPSubOctal转换为\[0,1]范围内均匀分布的十进制小数。此计算采用Octal Fraction To Uniform Decimal方法进行转换。

**d. 求取PoP Sub Decimal**

* 记最终的均匀化十进制小数为PoP Sub Decimal，并采用如下公式修正：

  ```
  PoPSubDecimal = 1 - octalFractionToUniformDecimal(PoPSubOctal)
  ```

  **这样能保证小数值越接近0，对应的PoP Level Decimal越大，契合难度设计初衷。**

**e. 计算PoP Level Decimal**

* 将整数等级和小数等级相加：

  ```
  PoP Level Decimal = PoP Level + PoP Sub Decimal
  ```

  例如，本例得到PoP Level Decimal约等于1.72。

**f. 求取PoPScore**

* 以8为底数，取PoP Level Decimal为指数，得到最终PoP Score值：

  ```
  PoP Score = 8 ^ PoP Level Decimal
  ```

  举例，8的1.72次方约等于**35.7531**（结果取小数点后4位）

#### 计算结果

根据以上计算步骤，在本例中：

<pre><code><strong>0000000000000000000000215206653161113226643512614250403542335511435340330664252463510373257440244542222437344512355773452022004517474440724217350505346711227665150775715
</strong></code></pre>

其PoP Level为：Lv.1

其PoP Score为：35.7531


# Host

#### \<path>

PIN所在的路径。表示path有三种模式，如下

* “/” 开头，通过路径定位需创建的PIN，如/protocols/simplebuzz
* “#”开头，通过PINNumber定位PIN
* “@”开头，通过PINID定位的PIN

必要选项。

#### host

```json
<path> {host}:{path}
```

\<path>中的host为address或MetaName，如：

Address: `1PKZnf7DxP69TFTHyzPc5KBidph6yuPKyG`，

```json
1PKZnf7DxP69TFTHyzPc5KBidph6yuPKyG:/protocols/simplebuzz
```

\<path>中带host，可声明该数据的发送来源，理解为主机头。非必要。

若host为MetaName，则长度不超过32字符，如： MetaName:`alice.metaid`


# MetaAccess

### **Introduction**

MetaAccess 用于为提供一个去中心化的授权功能，让链上的加密数据，按照特定规则授权查看。

### Spec

约定需要两个协议，AccessControl和AccessPass。

* AccessControl负责设置权限进行控制，在发布密文内容的同时也发布AccessControl上链。
* AccessPass负责构建付费和授权交易，用于授权展示明文内容

#### AccessControl

path: `/metaaccess/accesscontrol`

```json
{
	"publicContent": "public part of content",//公开部分内容
	"publicPins":["PINID-1", "PINID-2"],//公开部分文件
	"publicPath": "/protocols/simplepublicbuzz",
	"controlPins":["PINID1","PINID2"], //Array of PINs that will be in control of accessing
	"controlPath": "/protocols/simpleasseccbuzz",//The pins which is in this path will be in control of accessing
	"manDomain":"",//待定
	"manPubkey":"THE-PUBKEY-OF-MAN", //Pubkey of the MAN node providing custody decryption services.
	"creatorPubkey":"THE-PUBKEY-OF-CREATOR",//Pubkey of the creator
	"encryptedKey":"Use the ECDH Key to Decrypt it and use that decryptedkey to decrypt the content",
	"holdCheck":{//hold检查
		"type":"mrc20" //"chainCoin" or "mrc20", 
		"ticker":"mc" //the ticker of mrc20;if type = chainCoin then it will be ignored
		"amount":"1000"
	},
	"payCheck":{//pay检查
		"type":"chainCoin", //"chainCoin" or "mrc20"
		"ticker":"",
		"amount":"0.00001",
		"payTo":"address",
		"validPeriod": "4320", //blocks，4320 means 1 month
	},
}
```

#### AccessPass

path: `/metaaccess/accesspass`

```json
{
	"accessControlID":"the-pinid-of-accesscontrol-file"
}
```

### 流程

创作者：

1. 应用端请求MAN获取publicKey，此时MAN会针对该请求生成一对公私钥并保存，然后返回man-publicKey
2. 应用端对钱包请求ecdh操作，根据传的钱包路径和man-publicKey，生成协商密钥SP
3. 应用端生成随机AES密钥-P1
4. 应用端编辑文本或图片，选择公开部分和付费部分，设置付费模式
5. 使用密钥-P1对付费部分内容进行AES加密，即对整个payload进行加密，得到内容txRaw
6. 使用协商密钥SP对密钥-P1进行AES加密，得到encrypted-key，构建`accesscontrol` 的pin
7. 把内容pin和`accesscontrol` 的pin统一广播上链

购买者：

1. 应用端构建`accesspass` ，output中带有针对`accesscontrol`所指定的payment
2. MAN提供获取密文的接口，需要带钱包的头部签名信息，MAN验证签名信息，获取带签名地址的`accesspass`
3. MAN根据accessControlID查询对应的`accesscontrol` ，用man-privateKey与creator-publicKey生成协商密钥SP
4. MAN先判断`accesspass`是否符合`accesscontrol` ，符合进行下一步，不符合则返回空
5. 用协商密钥SP对encrypted-key解密，获取密钥-P1
6. MAN用密钥-P1解密对应的controlPins，返回明文内容

### ECDH 配置说明

为了确保客户端与服务器端在密钥交换过程中能够正常协作，双方在 **ECDH (Elliptic Curve Diffie-Hellman)** 密钥交换协议中需要统一以下配置参数：

* **椭圆曲线类型**
  * 使用的曲线：`NIST P-256`（即 `secp256r1`或`prime256v1`）。
  * `P-256` 是一种被广泛使用的椭圆曲线，兼具较好的安全性和效率。
* **公钥和私钥格式**
  * 私钥和公钥均以 **Hex 编码** 的字符串形式进行传输。
  * 公钥在传输前通过 `PublicKey().Bytes()` 转换为字节数组，再进行 Hex 编码；私钥同样通过 `Bytes()` 转换为字节数组再 Hex 编码。
* **密钥派生**
  * 双方各自生成公私钥对后，使用私钥和对方的公钥计算共享密钥。
  * 共享密钥在计算完成后可以直接用于对称加密的密钥材料。

#### 对称加密配置 (AES)

* **对称加密算法**
  * 使用 `AES-256-CFB` 模式作为对称加密算法。
  * `CFB (Cipher Feedback)` 模式支持流式加密和解密，适合在共享密钥环境下进行数据加密。
* **AES 密钥生成**
  * 采用 256 位（32 字节）的随机字节作为 AES 密钥，生成时通过 `rand.Read` 随机生成。
  * AES 密钥使用 Hex 编码存储和传输。
* **初始化向量 (IV)**
  * 每次加密操作生成新的 16 字节（AES 块大小）的随机初始化向量（IV）。
  * IV 放在密文的前面一起传输，解密时需要从密文中提取 IV。

Go代码示例：

```go
// 生成 ECDH 密钥对
func GenKeyPair() (privateKey string, publicKey string, e error) {
    curve := ecdh.P256()
    privKeyA, err := curve.GenerateKey(rand.Reader)
    if err != nil {
        return
    }
    privateKey = hex.EncodeToString(privKeyA.Bytes())
    publicKey = hex.EncodeToString(privKeyA.PublicKey().Bytes())
    return
}

// 密钥交换过程
func PerformECDH(privKeyA *ecdh.PrivateKey, pubKeyB *ecdh.PublicKey) ([]byte, error) {
    return privKeyA.ECDH(pubKeyB) // 生成共享密钥
}

// 生成 AES 密钥
func GenerateAESKey() (string, error) {
    key := make([]byte, 32) // AES-256 key
    _, err := rand.Read(key)
    if err != nil {
        return "", err
    }
    return hexEncode(key), nil
}

// AES 加密
func EncryptPayloadAES(key, payload []byte) ([]byte, error) {
    block, err := aes.NewCipher(key)
    if err != nil {
        return nil, err
    }
    ciphertext := make([]byte, aes.BlockSize+len(payload))
    iv := ciphertext[:aes.BlockSize]
    if _, err := io.ReadFull(rand.Reader, iv); err != nil {
        return nil, err
    }
    stream := cipher.NewCFBEncrypter(block, iv)
    stream.XORKeyStream(ciphertext[aes.BlockSize:], payload)
    return ciphertext, nil
}

```


# MetaName

## About

### **Introduction**

为了打造更完整的生态，在MetaID-v2协议上使用MetaName作为域名系统。任何人都可以注册自己的域名和命名空间，并使用其功能。

## Spec

MetaName为MetaID-v2中的域名规范，约定的`path`路径为`/metaname/{namespace}`。

#### Register Name

注册新域名遵循先见原则，即**First is first**，且暂时索引在BTC上。任何人都可以在MetaID-v2协议上简单方便地注册MetaName。按照MetaID-v2协议，使用`operation`为`create`，`path`为`/metaname/{namespace}`，在路径中即可声明任何namespace，比如`metaid/ord/sats/btc` 等等。如下注册一个`alice.metaid`

```json
OP_FALSE
OP_IF
   metaid                
   create                
   /metaname/metaid  //namespace: metaid/ord/sats/btc          
   0                     
   OP_0                  
   Application/json            
   { 
	  "name": "alice",
	  "rev": "",
	  "relay": "",
	  "metadata": ""
	}                // MetaName payload（示例）
OP_ENDIF
```

MetaName允许用户注册时设置`rev/relay/metadata`参数，

```json
{
  "name": "alice",
  "rev": "",
  "relay": "",
  "metadata": ""
}
```

| **Key**  | **Required?** | **Type** | **Expected**   | **Description**                                                                                                |
| -------- | ------------- | -------- | -------------- | -------------------------------------------------------------------------------------------------------------- |
| name     | Y             | String   | MNS name       | 注册时设置的域名name，不需要添加namespace，具体参考一下[限制](https://www.notion.so/MetaName-12ee16594dde806caecfef37a31c2df7?pvs=21) |
| rev      | N             | String   | address format | 域名解析对应的地址                                                                                                      |
| relay    | N             | String   |                | 域名解析对应的指针                                                                                                      |
| metadata | N             | String   |                | metadata，自定义内容，建议不超过200字符                                                                                      |

#### **⚠️ 域名限制**

* 注册域名不可重复，遵循先见原则，即**First is first**
* 注册域名时operation必须要为create
* 任何 UTF-8 字符均有效
* 所有域名均自动转化为小写
* 域名中不允许有空格，句点和换行符

#### Update Name

通过MetaID-v2的规则，使用operation为modify来修改更新，path需要指向对应的MetaName的`pinid`，且仅对`rev/relay/metadata`参数有效。

* 注意modify对`name`无效
* modify时payload中的`name`可空

```json
OP_FALSE
OP_IF
   metaid                
   modify                
   @{pinid}         
   0                     
   OP_0                  
   Application/json            
   { 
		  "rev": "xxx",
		  "relay": "xxxxx",
		  "metadata": "xxxxxxxx"
		}
OP_ENDIF
```

### Example

#### 注册

MetaName：alice.metaid

```json
OP_FALSE
OP_IF
   metaid                
   create                
   /metaname/metaid  //metaid/ord/sats/btc          
   0                     
   OP_0                  
   Application/json            
   { 
		  "name": "alice",
		  "rev" : "bc1puyjhe7h2crd86qnerjqwmhc55t9zzhacnj4h9ypmclwkgsd4h8eq6xk2ys",
		  "relay": "xxx",
			"metadata": ""
		}
OP_ENDIF
```

#### 更新

MetaName：alice.metaid

```json
OP_FALSE
OP_IF
   metaid                
   modify                
   @2e9b714d338c47cb4144d9f6986f510f83504ad4158297158b490406e825ff0c         
   0                     
   OP_0                  
   Application/json            
   { 
		   "rev" : "bc1ppkvfwnw67q4w8pt86l7wr3jkngsyymqucrn6vxak7zpntawm6n6qe2n9ls",
		   "relay": "xxx",
		   "metadata": ""
		}
OP_ENDIF
```


# 一些例子

假设Address：19Up4xZ4Y6CBhUcXSQZdo7tHaGNYFn7EUj，根据协议，其自带的MetaID：8a15022dd74648c5158d237f41e544e6097b3f27dcc85788a4b7470c063ed33c

```jsx
OP_FALSE
OP_IF
	metaid  
	init  
	/     
	0      
	OP_0   
	OP_0   
	OP_0   
OP_ENDIF
```

<figure><img src="https://377496739-files.gitbook.io/~/files/v0/b/gitbook-x-prod.appspot.com/o/spaces%2FNaMZCEAQtOV5yhwyCugt%2Fuploads%2F5ivp2fApFrlltsaHP6xB%2Fimage.png?alt=media&amp;token=04293625-69dc-4203-b402-45d2ceb4c665" alt=""><figcaption></figcaption></figure>

按协议约定，保留以下路径

* **`/info`**: 用于存储用户的基本信息，如用户名、头像等。
* **`/protocols`**: 用户可以在此进行应用协议操作。
* **`/file`**: 用于文件数据存储。
* **`/ft`**: 用于存储用户的ft资产行为
* **`/nft`**: 用于存储用户的nft资产行为
* **`/follow`**: 用户关注列表数据存于此。

#### 2.创建用户用户名字和头像

用户可以通过构&#x5EFA;**`PIN`** 交易设定自己的姓名和头像：

1. 设置用户名：用户要为自己的 **`name`** 设定值为 **`Alice`**，其 **`path`** 为 **`/info/name`**。
2. 设置头像：用户为自己的 **`avatar`** 设置某一个特定的头像，其 **`path`** 为 **`/info/avatar`**。

以上 **`path`** 都位于 **`/info`** 目录下，表明它们是用户的个人信息。

设置用户名称：

```jsx
OP_FALSE
OP_IF
	metaid  
	create     
	/info/name 
	0          
	OP_0       
	OP_0      
	Alice      
OP_ENDIF
```

设置用户头像

```jsx
OP_FALSE
OP_IF
	metaid            
	create           
	/info/avatar      
	0                 
	OP_0             
	image/jpg;binary  
	<pfp data>        
OP_ENDIF
```

<figure><img src="https://377496739-files.gitbook.io/~/files/v0/b/gitbook-x-prod.appspot.com/o/spaces%2FNaMZCEAQtOV5yhwyCugt%2Fuploads%2FfX2e6aQn82ld9JcmdTrH%2Fimage.png?alt=media&amp;token=111972b0-2e6b-4f51-8fa3-479288b55797" alt=""><figcaption></figcaption></figure>

### 提交SimpleBuzz协议

假设用户想发一个 **`buzz`**，他需要在 **`/protocols/simplebuzz`** 部分创建并提交一个新的 **`PIN`**。

这样，这个 **`buzz`** 数据就被添加到了 **`/protocols/simplebuzz`** 路径下，表示它是该用户在 SimpleBuzz 协议下的一条记录。

```jsx
OP_FALSE
OP_IF
	metaid                           
	create                           
	/protocols/simplebuzz            
	0                                
	0                               
	application/json;utf-8                
	{"content":"Hello bitcoin world!","contentType":"text/plain","createTime":1710741614716,"quoteTx":""}     
OP_ENDIF
```

<figure><img src="https://377496739-files.gitbook.io/~/files/v0/b/gitbook-x-prod.appspot.com/o/spaces%2FNaMZCEAQtOV5yhwyCugt%2Fuploads%2FtNvWWOhN4HrQKe2MB8D8%2Fimage.png?alt=media&amp;token=c6cfa6b4-8db5-4229-9441-84eccb2f8079" alt=""><figcaption></figcaption></figure>

### 修改

在进行 **`modify`操作时，需要使用 `@` 符号来指向要进行操作的 `PIN`。例如，如果我们要修改一个特定的 `PIN`，我们可以使用`@{PINID}`**。

```json
OP_FALSE
OP_IF
	metaid                           
	modify                          
	@{pinid}                       
	0                               
	0                             
	application/json;utf-8               
	{"content":"Hello bitcoin world!!!!!!!","contentType":"text/plain","createTime":1710741614716,"quoteTx":""}     
OP_ENDIF
```

### 废弃

在进行 revoke操作时，需要使用 **`@`** 符号来指向要进行操作的 **`PIN`**。例如，如果我们要废弃一个特定的 **`PIN`**，我们可以使用\*\*`@{PINID}`\*\*。

```c
OP_FALSE
OP_IF
	metaid                        
	modify                           
	@{pinid}                           
	OP_0                                
	OP_0                             
	OP_0             
	OP_0
OP_ENDIF
```


# 简介

MetaID App Node（后续称为 MAN）是第一个适配 MetaID V2 协议的开源的后端索引器，同时也是 MetaID 数据的分布式存储数据库。开发者无需依赖第三方服务商，也无需运行繁重的比特币节点，只要在本地部署安装 MAN 就可以开发和运行所有类型的 MetaID应用，做到真正的Web3 应用分布式化。

**MAN主要特性**

1. 完全适配MetaID V2 协议
2. 按照区块顺序和交易顺序索引MetaID协议数据，同时支持内存池中数据索引
3. 开箱即用，支持多种数据库适配，如mongodb, pebble等，开发者根据应用区块选择即可。
4. 开发者友好性，对于常用数据应用，提供通用数据查询API，另外对于复杂的数据，MAN计划实现Graph Query Language。
5. 可控制的索引数据量，MAN支持全量数据同步、单应用数据同步、多应用组合同步等多种数据同步模式，开发者可以通过简单的配置，获取自己需要的数据。

**基于MAN开发应用流程**

1. 下载MAN程序源码编译、或者直接下载最新MAN-Release程序
2. 修改相关配置文件
3. 运行MAN
4. 使用MAN Api和MetaID SDK进行开发
5. 在相关UTXO链的测试网络进行开发调试
6. 主网发布


# 编译与运行

{% hint style="info" %}
第一版的 MAN 已上线并已开源，后续的部署和接口文档请以 Github 上文档为准：\
<https://github.com/metaid-developers/man-indexer>
{% endhint %}

{% embed url="<https://github.com/metaid-developers/man-indexer>" %}


# JSON API

{% hint style="info" %}
第一个版本的 MAN 已上线并已开源，后续的部署和接口文档请以 Github 上文档为准：\
<https://github.com/metaid-developers/man-indexer>
{% endhint %}

## 基础API

| 地址                                           | method | parameter                                    | 描述                               |
| -------------------------------------------- | ------ | -------------------------------------------- | -------------------------------- |
| /api/pin/{numberOrId}                        | GET    | PIN number 或 PIN id                          | 根据PIN number或PIN id获取PIN详情       |
| /api/address/pin/list/{addressType/{address} | GET    | address addressType ：creator（创建者），owner(拥有者) | 根据address获取该地址创建或拥有的PIN列表        |
| /api/address/pin/root/{address}              | GET    | address                                      | 根据address获取PIN root              |
| /api/node/child/{pinId}                      | GET    | pinId                                        | 根据PIN id 获取child node            |
| /api/node/parent/{pinId}                     | GET    | pinId                                        | 根据PIN id 获取parent node           |
| /api/info/address/{address}                  | GET    | address                                      | 获取adress的MetaID info             |
| /api/info/rootId/{rootId}                    | GET    | rootId                                       | 根据rootId获取MetaID info            |
| /api/pin/content/{numberOrId}                | GET    | PIN number 或 PIN id                          | 根据PIN number或PIN id获取PIN的content |
| /api/getAllPinByParentPath                   | GET    | page,limit,parentPath                        | 根据parentPath获取所有pin              |

## generalQuery

protocols 数据通用查询，支持get,count,sum方式获取数据。

地址: /api/generalQuery

**method:** POST

```json
{
    "collection": "pins", // 查询的集合名称，必填
    "action": "sum", // 查询操作，支持 get, count, sum
    "filterRelation": "or", // 查询条件关系，支持 or, and，目前不支持混用
    "field": [
        "number" // 查询的返回的字段，sum 时必填
    ],
    // 查询条件
    "filter": [
        {
            "operator": "=", // 条件操作符号，支持 =, >, >=, <, <=
            "key": "number", // 条件字段
            "value": 1 // 查询值
        },
        {
            "operator": "=",
            "key": "number",
            "value": 2
        }
    ],
    "cursor": 0, // 返回数据起始
    "limit": 1, // 返回数据条数
    "sort": [
        "number", // 排序字段
        "desc" // 顺序，支持 asc, desc
    ]
}
```

**成功返回示例**

```json
{
    "code": 1, //成功1
    "message": "ok", //返回消息
    "data": [ //数据内容
        {
            "_id": "65e96a276bff93b007c02b16",
            "isLike": "1",
            "likeTo": "32c6d91b6fb3f6746258d83f1fe8fb32f19c2a3e0071847b6046f01c938ca20bi0",
            "pinAddress": "tb1pss8ce6tgupnhmfj8u9h4saue48upucu04c7549tzal6n67v8njyst7e0fx",
            "pinId": "3943f7fa4c8496ced9ff722ae5bbdd57ad7b84a383304890b41f21e12f11086bi0",
            "pinNumber": 69
        }
    ]
}
```

**失败返回实例**

```json
{
    "code": -1, //失败
    "message": "Data not found", //失败原因
    "data": null
}
```


# 浏览器

{% hint style="info" %}
我们已部署了 MAN 浏览器，源代码也已开源到 Github 上\
<https://man.metaid.io/>
{% endhint %}

MAN索引器内置一个MetaID浏览器，支持MetaID相关数据查询。

### 运行

程序运行时指定server参数为1即可启动一个http web服务

```jsx
./manindexer  -server=1 
```

服务的默认端口是80/443，如果需要特别指定端口，可以通过配置文件的web分类下的port指定。

服务启动后，通过[http://127.0.0.0:{port}访问。](https://docs.metaid.io/zh/metaid-app-node/http:/127.0.0.0:{port}访问。)

### 浏览器功能

#### 搜索

接受MetaID , PIN Numner, PIN ID 等内容关键字查询，不支持模糊搜索。

#### PIN

所有PIN的列表，按照倒序分页排列。点击某一个pin可以查看更多信息，如：

[9bc429654d35a11e5dde0136e3466faa03507d7377769743fafa069e38580243i0](https://man.metaid.io/pin/9bc429654d35a11e5dde0136e3466faa03507d7377769743fafa069e38580243i0)

#### MetaID

所有MetaID列表，按创建时间由大到小排列。点击某一个MetaID可查看创建该MetaID的PIN.

#### Block

按照区块的高度倒序排列，列出所有有MetaID协议数据的区块。点击卡片可以查看具体该区块中的交易详情,如

<https://man.metaid.io/block/844453>

#### Mempool

内存池中MetaID 数据列表，出块后自动删除。


# MetaID PIN规则约定

#### 关于`modify`/`revoke`

1. `modify`和`revoke`发起者address必须和旧版本的pin的创作者address一致，并且是未发生过转移的pin，若PIN发生过转移，后续的`modify`/`revoke`为无效。`path`为`/info`下的PIN仅需发起者address和旧版本的pin的创作者address一致即可修改。
2. 所修改的PIN为当前最新版本的PIN才为有效，即如果所修改的PIN是非当前最新版本的PIN时，所有的`modify`/`revoke`为无效。
3. 被修改的PIN和新修改的PIN，需要被打包在不同的块高才有效，若被修改的PIN和新修改的PIN被打包在同一个区块，新修改的PIN为无效修改。
4. 当`operation` 为`modify`/`revoke` 时，`path` 需要指向对应PIN，例如：`@{pinid}` ， 所指向的PIN必须是用户已在链上存在并打包出块的PIN的`path` ，才是有效的`modify`/`revoke` ，所针对的PIN必须是在不同的块高。

<figure><img src="https://377496739-files.gitbook.io/~/files/v0/b/gitbook-x-prod.appspot.com/o/spaces%2FNaMZCEAQtOV5yhwyCugt%2Fuploads%2FLMeeYa5vMInKgn4qkFcl%2Fimage.png?alt=media&amp;token=e8c1566c-e221-4934-b83a-102d2a6b56bc" alt=""><figcaption></figcaption></figure>


# PIN数据结构

MAN索引器会从taproot交易的reveal脚本中获取MetaID协议数据，具体协议请参照MetaID Specification章节。

## PIN数据结构

```jsx
type PinInscription struct {
	Id                 string `json:"id"`
	Number             int64  `json:"number"`
	RootTxId           string `json:"rootTxId"`
	Address            string `json:"address"`
	Output             string `json:"output"`
	OutputValue        int64  `json:"outputValue"`
	Timestamp          int64  `json:"timestamp"`
	GenesisFee         int64  `json:"genesisFee"`
	GenesisHeight      int64  `json:"genesisHeight"`
	GenesisTransaction string `json:"genesisTransaction"`
	TxInIndex          uint32 `json:"txInIndex"`
	TxInOffset         uint64 `json:"txInOffset"`
	Operation          string `json:"operation"`
	Path               string `json:"path"`
	ParentPath         string `json:"parentPath"`
	Encryption         string `json:"encryption"`
	Version            string `json:"version"`
	ContentType        string `json:"contentType"`
	ContentTypeDetect  string `json:"contentTypeDetect"`
	ContentBody        []byte `json:"contentBody"`
	ContentLength      uint64 `json:"contentLength"`
	ContentSummary     string `json:"contentSummary"`
}
```

## PIN索引规则

### 通用

#### 识别Flag

* **metaid**

#### 大小写规则

* 大小写不敏感，索引器可以全部转为小写保存。

### Operation

* **init** 类型 PIN 所在的交易的 `txid` 为一个 `metaid` 的 `roottxid`。
* **init**、**create** 遵循先到先得原则。
* 同一区块内 **init**、**create** 不区分先后顺序，索引器应先处理 **init** 类型 PIN，再处理其他类型 PIN。
  * 先处理 **init** 是为了得到 `roottxid/metaid`。

### Path

* 对于相同的 `path`，所有 **init** 和 **create** 的 PIN 是看最旧的，只有 **modify/revoke** 才是看最新的。
* **modify/revoke** 必须对已入块的 PIN 操作，即 **modify/revoke** 只对已经入块的 PIN 有效，即使同区块也是无效的。
* 非 **init-PIN** 的 `path` 一定是在以下 `path` 内，一个 `metaid` 默认存在这五个一级 `path`：
  * `/info`
  * `/file`
  * `/protocols`
  * `/nft`
  * `/ft`

#### Path 规则

* 以 `/file`、`/protocols`、`/nft`、`/ft` 开始的 `path` 应该是全路径的，如： `/protocols/simplebuzz/file/my-pfp.jpg`。

## PIN状态码

| 状态码  | 描述                                                                  |
| ---- | ------------------------------------------------------------------- |
| 0    | 正常的PIN                                                              |
| -1   | revoke的PIN                                                          |
| 1    | modify的PIN                                                          |
| -101 | 目标PIN所在区块高度 ≤ 当前PIN所在区块高度                                           |
| -102 | 目标PIN已经被转移                                                          |
| -201 | modify的PIN，格式正确，但@+PINID 中的PINId不存在（已确认的PIN）                        |
| -202 | modify的PIN，格式正确，但发起modify的address不存在                                |
| -203 | modify的PIN，格式正确，发起modify的address存在，但目标PIN的address不等于当前PIN的address   |
| -204 | 目标PIN已经有modify（状态码为1）                                               |
| -205 | 目标PIN的Operation是init                                                |
| -301 | revoke的PIN，格式正确，但@+PINID 中的PINId不存在                                 |
| -302 | revoke的PIN，格式正确，但发起modify的address不存在                                |
| -303 | revoke的PIN，格式正确，发起revoke的address存在，但目标PIN的address不等于当前PIN的address   |
| -304 | 目标PIN已经被revoke过，（状态码为-1）                                            |
| -305 | revoke的PIN，格式正确，但目标PIN的Operation是init 或目标PIN的Path&#x662F;**/info/** |

更多信息，请参考 MAN 源代码：

{% embed url="<https://github.com/metaid-developers/man-indexer>" %}


# Get Started

{% hint style="info" %}
MetaID-TS-SDK 源代码已发布在 Github 上，相关 API 和示例代码请以 Github 最新页面为准

<https://github.com/metaid-developers/metaid>
{% endhint %}

## Introduction

MetaID SDK提供了一套规范标准和方法工具，用来生成和处理遵循MetaID协议的底层区块链数据(这里具体指符合UTXO标准的链， 目前支持BTC链) 。

MetaID SDK的设计目标是提供一个相对统一且高效的方法，大大简化了web3服务的整合，免去了开发者需与多种协议打交道以及数据上链时需自行构建复杂UTXO交易的需求，节省时间且减小了面临兼容性问题的风险。

基于MetaID SDK的简洁性，兼容性，可扩展性，高效性， 传统应用开发者可以快速开发并部署一个运行在UTXO链上的Dapp应用。

## Core Concepts

MetaID SDK有两个核心概念：连接器（connector）和实体（entity）。

连接器用于身份信息的认证和管理，作为用户在区块链上发布数据的基础。

"实体"是在应用层中使用的术语。它用于管理某种特定数据类型的资源。从编程的角度来看，当你创建一个新的实体实例时，你可以访问其属性，并利用它所提供的一系列可执行链上数据存储和修改的方法。你可以将每一类Entity理解为分别对应于MetaID Specification中的PATH部分。

## PIN索引规则

### 通用

#### 识别Flag

* **metaid**

#### 大小写规则

* 大小写不敏感，索引器可以全部转为小写保存。

### Operation

* **init** 类型 PIN 所在的交易的 `txid` 为一个 `metaid` 的 `roottxid`。
* **init**、**create** 遵循先到先得原则。
* 同一区块内 **init**、**create** 不区分先后顺序，索引器应先处理 **init** 类型 PIN，再处理其他类型 PIN。
  * 先处理 **init** 是为了得到 `roottxid/metaid`。

### Path

* 对于相同的 `path`，所有 **init** 和 **create** 的 PIN 是看最旧的，只有 **modify/revoke** 才是看最新的。
* **modify/revoke** 必须对已入块的 PIN 操作，即 **modify/revoke** 只对已经入块的 PIN 有效，即使同区块也是无效的。
* 非 **init-PIN** 的 `path` 一定是在以下 `path` 内，一个 `metaid` 默认存在这五个一级 `path`：
  * `/info`
  * `/file`
  * `/protocols`
  * `/nft`
  * `/ft`

#### Path 规则

* 以 `/file`、`/protocols`、`/nft`、`/ft` 开始的 `path` 应该是全路径的，如： `/protocols/simplebuzz/file/my-pfp.jpg`。

## Installation

#### Method 1: 使用 yarn 或 npm

```bash
// 使用 yarn
yarn add @metaid/metaid 

// 使用 npm
npm install --save @metaid/metaid
```

#### Method 2: 以 src 方式引入到你的原生 JS 项目中

该方法会把 npm 版本的包转换成浏览器能运行的包，无需打包工具（如 webpack）。

1. 初始化一个本地项目

```bash
mkdir generate-metaid-bundle && cd generate-metaid-bundle/ 
yarn init 
// 或者
npm init
```

2. 安装 SDK：

```bash
npm install --save @metaid/metaid
// 或者
yarn add @metaid/metaid
```

3. 写一个 `main.js` 文件，只需要两行代码：

```javascript
var metaidSDK = require('@metaid/metaid')
window.metaidSDK = metaidSDK
```

4. 使用 npm 全局安装 browserify：

```bash
npm install -g browserify
// 或者 
yarn global add browserify
```

5. 安装完成以后，执行命令：

```bash
browserify main.js -o bundle.js
```

命令运行完成以后，会生成一个 `bundle.js` 文件。现在我们就可以把这个文件和 HTML 代码放在一起，通过 `<script>` 标签导入了：

```html
<!DOCTYPE html>
<html>
    <head>
        <meta charset="utf-8">
        <script src="bundle.js"></script>
    </head>
    <body>
        <div class="app">
             <!-- HTML tag of your page -->
        </div>
        <script>
            // JS code
        </script>
    </body>
</html>
```


# Core API

{% hint style="info" %}
MetaID-TS-SDK 源代码已发布在 Github 上，相关 API 和示例代码请以 Github 最新页面为准

<https://github.com/metaid-developers/metaid>
{% endhint %}

#### Overview

The MetaID SDK currently targets the BTC chain, providing corresponding API methods from three dimensions: Wallet Layer, Connector Layer, and Entity Layer. Below is a detailed introduction to the relevant API methods.

Each layer's responsibilities and relationships are outlined.

#### Wallet Layer API

<pre class="language-jsx"><code class="lang-jsx">import { MetaletWalletForBtc } from '@metaid/metaid';
<strong>// Create a wallet object based on the currently logged-in wallet account
</strong>const _wallet = await MetaletWalletForBtc.create();

// Access the wallet object's public properties
const address = _wallet.address // Get address
const pubicKey = _wallet.pub // Get public key

// Access a series of methods provided by the wallet object (provided the wallet is connected, otherwise returns {status: 'not-connected' })
await _wallet.getAddress() // Get wallet address

await _wallet.getAddressType() // Get wallet address type

await _wallet.getPublicKey(path) // Get public key based on path

await _wallet.getBalance() // Get balance

await _wallet.signMessage(message) // Send signed message

await _wallet.signPsbt({
  psbtHex,
  options,
}: {
  psbtHex: string
  options?: { toSignInputs?: ToSignInput[]; autoFinalized: boolean }
}) // Sign the input psbtHex

// This is a low-level inscription API method; unless you have very customized inscription needs, it is not recommended to call it directly. 
// The connector layer has abstracted and encapsulated this method, along with related parameter descriptions.
await _wallet.inscribe({data, options} : \
  { data: InscriptionRequest, options: {noBroadcast : boolean }) 
</code></pre>

#### Notes on Wallet Method Parameters and Return Types:

1. Example return value for `getBalance`:

```jsx
{total: 97901828, confirmed: 97901828, unconfirmed: 0}
```

where `confirmed` and `unconfirmed` represent the confirmed and unconfirmed balances respectively (unit: satoshi).

2. Example return value for `getAddressType`:

```jsx
{name: 'Taproot', addressType: 'P2TR', path: "m/86'/0'/0'/0/0"}
```

BTC address types mainly include four types: Legacy (P2PKH), Nested SegWit (P2SH), Native SegWit (Bech32), and Taproot addresses.

3. Explanation of `inscribe` method parameters:

```jsx
export type Operation = 'init' | 'create' | 'modify' | 'revoke'
export type Encryption = '0' | '1' | '2'

export type MetaidData = {
  operation: Operation
  body?: string | Buffer
  path?: string
  contentType?: string
  encryption?: '0' | '1' | '2'
  version?: string
  encoding?: BufferEncoding
  revealAddr: string
}

export type InscriptionRequest = {
  feeRate: number;
  metaidDataList: MetaidData[];
  revealOutValue: number;
  changeAddress: string;
  minChangeValue?: number;
}
```

4. The `inscribe` method returns different transaction data formats depending on whether broadcasting is performed:

* If `noBroadcast` is set to `yes`, meaning no broadcasting, the return format is:

```jsx
{
  commitTxHex: string;
  revealTxsHex: string[];
  commitCost: string;
  revealCost: string;
}
```

* If `noBroadcast` is set to `no`, meaning broadcasting is performed, the return format is:

```jsx
{
  commitTxId: string;
  revealTxIds: string[];
  commitCost: string;
  revealCost: string;
}
```

Where, if not broadcasting, the transaction result is returned in `txHex` format; otherwise, the transaction result is returned as `txid`. The sum of `commitCost` and `revealCost` represents the estimated fee required for the current inscription transaction.

#### Connector Layer API

```jsx
import { btcConnect } from '@metaid/metaid';

// Create a new connector based on the wallet object
const _btcConnector: BtcConnector = await btcConnect({ wallet, network }: { wallet?: MetaIDWalletForBtc; network: BtcNetwork });

// If the wallet object is not empty, you can use the following method to check if the wallet has created a MetaID
_btcConnector.hasMetaid()

// The connector provides a series of methods for operating MetaID related data

type BtcNetwork = "testnet" | "regtest" | "livenet"

// Inscription method
type Operation = 'init' | 'create' | 'modify'
type InscribeOptions= {
  operation: Operation
  body?: string | Buffer
  path?: string
  contentType?: string
  encryption?: '0' | '1' | '2'
  version?: string
  encoding?: BufferEncoding
}
await _btcConnector.inscribe(inscribeOptions: InscribeOptions[], noBroadcast: 'yes' | 'no')
// The return type of this method is the same as the wallet inscribe method.

// Create MetaID, the parameter avatar is processed into Buffer in chunks from the native File type in JS, and then converted to a base64 string
const metaIdRes = await _btcConnector.createMetaid(body?: { network?: BtcNetwork, name?: string; avatar?: string })
// Return type: metaIdRes: { metaid:string }

// Get user information associated with MetaID
const user = await _btcConnector.getUser({ network, currentAddress }: { network: BtcNetwork; currentAddress?: string })

// Update user information associated with MetaID
const isUpdateSuccess = await _btcConnector.updateUserInfo(body: { name?: string; bio?: string; avatar?: string })

// Get MetaID
const currentMetaId = await _btcConnector.getMetaid()

// Check the current connector status (whether the wallet is connected)
const isConnected = await _btcConnector.isConnected()

// Disconnect the current wallet
await _btcConnector.disconnect()

// Create an Entity object, this method bridges the Connector layer and the Entity layer
await _btcConnector.use(entitySymbol: string)
```

#### Notes on Connector Layer API:

1. From the perspective of the MetaID Specification, issuing or modifying on-chain data involves sending a PIN, and the inscription interface handles this task. Whether it's creating a MetaID, updating user information, or calling the create method after generating an Entity object, it essentially sends a PIN to put the data on-chain.
2. For the `createMetaid` method of the connector object, if you pass in a complete `body` parameter including name, bio, and avatar, the SDK will sequentially perform the following actions: first initialize at the root path `/` (operation=init), then create corresponding information under the paths `/info/name`, `/info/bio`, and `/info/avatar` (operation=create).
3. Regarding data timeliness, when modifying on-chain data (operation=modify/revoke), there are relevant matters to note. Please refer to the second convention in the MetaID Specification regarding `modify`/`revoke` operations.

#### Entity Layer API

Once you create an entity through the connector, you can access a series of properties and methods provided by that entity.

> Currently, the MetaID SDK provides basic entity calls based on the on-chain microblog example application, including buzzEntity, fileEntity, and likeEntity. If developers have their own customization needs, they can create their data protocol on the MetaProtocols website, and the MetaID SDK will automatically create the corresponding entity for that protocol.

```jsx
// Example of creating a buzzEntity

type BtcNetwork = "testnet" | "regtest" | "livenet"

// Create a buzzEntity entity through the connector
const buzzEntity = await _btcConnector.use('buzz')

// Get all buzzes sent by the currently connected account in a paginated manner
const allBuzz = await buzzEntity.list({ page, limit, network }: { page: number; limit: number; network?: BtcNetwork })

// Get the details of a specific Pin by its pinId
const pid = 'XXXXXXXXX' 
const pinDetail = await buzzEntity.one({ pid, network }: { pid: string; network: BtcNetwork })

// Count the total number of Pins sent under the current entity (buzzEntity)
const pinTotal = await buzzEntity.total({ network }: { network?: BtcNetwork })

// Create a buzz
type CreateOptions = {
  body?: string | Buffer;
  contentType?: string;
  encryption?: "0" | "1" | "2";
  version?: string;
  encoding?: BufferEncoding;
}

// The return type of this method is the same as the wallet inscribe method.
const createRes = await buzzEntity.create({
  options,
  noBroadcast,
}: {
  options: CreateOptions[]
  noBroadcast: 'yes' | 'no'
})
```

#### Notes on the Entity's `create` Method:

1. According to the MetaID Specification, you can think of the create method as creating new files under a certain folder (file path), essentially calling the connector's inscribe method. The results vary depending on the broadcast parameter, and the specific data format can be found in the connector's inscribe method description.
2. Explanation of the `option` parameter corresponding to the MetaProtocols protocol:
   * The `body` parameter's specific fields should refer to the corresponding MetaProtocol protocol description for that entity (e.g., buzzEntity corresponds to the SimpleBuzz protocol).
   * The `contentType` field represents the data format, e.g., `text/plain`, `image/png`.
   * The `encryption` field indicates the encryption type of the content: `0` for no encryption, `1` for ECIES encryption, and `2` for ECDH negotiated key encryption.
   * The `version` field specifies the protocol version number of MetaProtocols.
   * The `encoding` field refers to the encoding format, which aligns with the global `BufferEncoding` parameter in TypeScript:

     ```typescript
     type BufferEncoding = 
         | "ascii"
         | "utf8"
         | "utf-8"
         | "utf16le"
         | "utf-16le"
         | "ucs2"
         | "ucs-2"
         | "base64"
         | "base64url"
         | "latin1"
         | "binary"
         | "hex";
     ```

     **Examples** for the `Option` Parameter

     (1) For the `buzz` entity, the `option` parameter should be:

     ```typescript
     {
         body: "buzz content"
     }
     ```

     (2) For the `file` entity, assuming you are passing an image file, the `option` parameter should be:

     ```typescript
     {
         body: Buffer.from('image raw hex string', "hex").toString("base64"),
         contentType: "image/jpeg",
         encoding: "base64"
     }
     ```

3\. Instructions for Batch Creation (Inscription): You may have noticed that the `CreateOptions` parameter is passed in as an array. This means you can create multiple pieces of data for a particular type of entity simultaneously. Here's a specific example: when you post a `buzz` with multiple image attachments, you only need to call the inscription interface twice. First, batch inscribe multiple images using the `fileEntity`. The generated transaction hash array is then passed into the `attachments` field of the `buzzEntity` create method for the second inscription.


# Quick Example

{% hint style="info" %}
MetaID-TS-SDK 源代码已发布在 Github 上，相关 API 和示例代码请以 Github 最新页面为准

<https://github.com/metaid-developers/metaid>
{% endhint %}

### Intro

Bitbuzz is a front-end social application based on the MetaID protocol and running on the testnet of BTC blockchain. It has the following basic functions: new user registration, setting user basic information, publishing buzz (with attached pictures), liking buzz. In this article, I will show you how to build this project with MetaID SDK step by step. I will presume you have a basic understanding of [MetaID Specification](/zh/metaid-xie-yi-gui-fan/xie-yi-ge-shi).

### Creating a MetaID Account With SDK

Creating a MetaID Account is very easy, the following code will use a connector which is connected to a [Metalet wallet](https://metalet.space). Then it will check whether the Metalet account has built a MetaID account, if not , it will accept the `body parameter`(optional parameter, including name、bio、avatar) provided by the user to create a new MetaID account.

```jsx
import { MetaletWalletForBtc, btcConnect } from '@metaid/metaid';

 
const _btcConnector: BtcConnector = await btcConnect(_wallet);

const handleCreateMetaid = async (userInfo) => {
  const userInfo = {name:'Bob', bio:'Success needs time.', avatar:'imageUrl'}
	if (!_btcConnector.hasMetaid()) {
      const createRes = await btcConnector.createMetaid({ ...userInfo, network });
    } else {
      const resUser = await _btcConnector.getUser();
    }
};
```

#### Connecting to BTC Blockchain

Like most blockchains, we need a wallet account to connect to the blockchain. Here we use Metalet wallet as an example. Assume you have created a MetaID account based on last step and have a `handleLogin` method for your application triggered when user clicks the login button. We need to apply MetaID SDK to establish a connection between the application and the wallet. This is the foundation for users to send data to the blockchain.

```jsx
import {  MetaletWallet, connect } from "@metaid/metaid";

 
const handleLogin = async () => {
    const _wallet = await MetaletWallet.create();
    const baseConnector = await connect(_wallet);
 
}                                                                                                                                                                                                                                                                                                                                                                                                                                                                                                                                                                                                                           |. |
```

#### Define the required entities

On top of the foundation established in the previous step, it's time for `Entity` to come into play. We utilize the`use` keyword to create an entity. For the buzzhub application, we need a “Buzz” entity. With this entity, we can get the existing buzz data and send a new buzz to the BTC blockchain. The following code block implements the 'getBuzzList' function. The 'page' parameter is used to query paginated data. It's worth noting that 'connect' can be passed an empty object, and based on this, the created entity can only retrieve data from the blockchain but cannot send data to the blockchain (used for displaying data in an unauthenticated state. (Remember every buzz is just a Pin result)

```jsx
 
const getBuzzList = async ({ page, limit } ) => {
    const	buzzEntity = await baseConnector.use("buzz");
    const buzzList = await buzzEntity.list({ page, limit });;
 
};
```

#### Send **data to the blockchain with Entity**

When you get the buzzEntity variable, you can use its `create` method to publish a new buzz and store it on the blockchain. For each type of Entity, you need to set a Schema file which is used to define the format for on-chain data. For example, according to the definition of simplebuzz which comes from metaprotocols, we have our `buzz.entity.ts` schema file for the Buzz entity.

```jsx
type EntitySchema = {
  name: string
  path:string
  versions: {
    version: number
    body: any[]
  }[]
}

const buzzSchema: EntitySchema = {
  name: 'buzz',
  path: '/protocols/simplebuzz',
  versions: [
    {
      version: 1,
      body: [
        {
          name: 'content',
          type: 'string',
        },
        {
          name: 'attachments',
          type: 'array',
        },
      ],
    },
  ],
}
```

Sending a buzz with only text information is simple; it only requires a few lines of code. The first argument passed to the 'create' method comes from the 'body' field defined in the 'buzzSchema'.

```jsx
const	buzzEntity = await baseConnector.use("buzz");
const finalBodybody = { content: "Hello World", attachments: [] }
const createRes = await buzzEntity.create({
				options: [{ body: JSON.stringify(finalBody) }],
				noBroadcast: "no",
			});
```

#### Send multiple entities’ data to the blockchain

Assuming you need to post a buzz with some image attachments. That is, we need to populate the attachments field of the body parameter. A unique pinID(transaction id of this file create pin) is generated for each image file uploaded to the blockchain. Each string element in the attachments array relies on this txid, and the exact string prefix will vary depending on the type of file protocol (metacontract, sensible, etc.).We need to define a new File entity to implement the logic described above, according to the MetaFile protocol, we have the following code definition for the File entity schema.

```jsx
const fileSchema = {
  name: 'file',
  nodeName: 'MetaFile',
  encoding: 'binary',
  versions: [
    {
      version: '1.0.1',
      body: '',
    },
  ],
}
```

then we can generate txid based on this schema. It is worth noting that you need to transform binary image data to hex format with `Buffer.from` method.

```jsx
const finalBody: any = { content: buzz.content };
if (!isEmpty(buzz.images)) {
	const fileOptions = [];

	const fileEntity = await btcConnector!.use("file");

	for (const image of buzz.images) {
			fileOptions.push({
			body: Buffer.from(image.data, "hex").toString("base64"),
			contentType: "image/jpeg",
			encoding: "base64", // this encoding field is for wallet inscription API,
			toEncoding: fileSchema.encoding
		});
	}
	const imageRes = await fileEntity.create({
		options: fileOptions,
		noBroadcast: "no",
	});

		finalBody.attachments = imageRes.revealTxIds.map(
		(rid) => "metafile://" + rid + "i0"
	);
}
```

As you can see, The `create` method accepts `options` parameter.

```jsx
type CreateOptions = {
    body?: string | Buffer;
    contentType?: string;   
    encryption?: "0" | "1" | "2"; 
    version?: string;  
    encoding?: BufferEncoding;  
}
const createRes = await buzzEntity.create({
    options,
    noBroadcast,
  }: {
    options: CreateOptions[]
    noBroadcast: 'yes' | 'no'
  })
```

When you need to send multiple entities data to the blockchain. Until the last `create` method, you need to set the value of the `options.serialAction` parameter to `combo` in the previous `create` method.The purpose of this action is to bundle multiple transactions, thus avoiding multiple pop-ups when signing the transaction with the Metalet wallet and achieving a better user experience.

Finally, we can create a buzz with three image attachments:

```jsx
const createRes = await buzzEntity!.create({
				options: [{ body: JSON.stringify(finalBody) }],
				noBroadcast: "no",
			});
```

#### Build relationships between different user’s data

Imagine a scenario where as a BuzzHub user, you come across a buzz posted by someone else and you want to like it. Essentially, this scenario involves establishing an association between the data of two end-user accounts.

First we need a new `Like` entity, base on its metaprocols definition, we have the following like entity schema definition.

```jsx
const likeSchema = {
  name: 'like',
  path: '/protocols/payLike',
  versions: [
    {
      version: 1,
      body: [
        {
          name: 'likeTo',
          type: 'string',
        },
        {
          name: 'isLike',
          type: 'string',
        },
      ],
    },
  ],
}
const likeEntity = btcConnector.use('like')
```

And then, based on a logged-in MetaID account, you can like any buzz by calling this `likeEntity.create` method.The corresponding code is quite simple.

```jsx

const res = await likeEntity.create({ likeTo: pinId, isLike: '1' }, 
                                     { signMessage: 'like buzz' })
 //  pinId is from the buzz bin you want to like,
 //  it is caculated by the buzz's txid + 'io'                    
```

### Live Example

[Code Link](https://github.com/metaid-developers/metaid)

[Website Link](https://www.bitbuzz.io)


# 关于跨链

MetaID V2 从协议设计层面上已支持MetaID运行在比特币及比特币同构区块链上。

只要索引器支持，理论上 PIN 可构建在任何比特币架构的区块链上，所有符合 MetaID 协议格式交易，即便是散落在不同的区块链上，均可收敛于某一个 MetaID 节点下。

对于跨链的支持，理论上和比特币同构的区块链均能支持，具体为：

* 采用 UTXO 架构
* 锁定脚本支持 op\_return 操作符
* 支持采用比特币的经典地址格式（即前缀为”1”的比特币地址格式）

现阶段除了比特币外，以下主流公链均符合 MetaID 支持的条件，在未来相关索引器和钱包支持后，将有望实现支持：

* MicrovisonChain
* Bitcon Cash
* eCash
* Dogecoin
* Litecoin
* Bitcoin SV

但钱包和应用在实现跨链支持时，需具体实现时，需注意以下概念

### Unified Address With One Key

**\[TBD]**

### Unified UTXO Chain

**\[TBD]**


# Unified UTXO Chain

UnifiedUTXOChain

TBD


# MetaID历史

MetaID并不是一个在2024年创建的新协议，MetaID第一版协议在2020年4月份发布，第一版MetaID协议是基于MetaNet协议，经历了接近4年的发展，由多方开发者共同打造了出具规模的基础设施和应用，在V2.0发布之前，已累积有超过17万用户和2100多万条tx，并最多有十多个MetaID应用上线运行过。

以下是MetaID的简短历史：

* 2020年4月，发布V1.0 MetaID 协议，在 BSV 链上实现
* 2021年4月，MetaID协议升级为V1.1。
* 2022 年，已有多个应用采用 MetaID 方案，涵盖Web3 社交应用、网盘、NFT 市场、游戏等。总用户超过 10 万人。
* 2023年1月，MetaID协议升级为V1.2 增加对多链支持，包括支持比特币侧链 Microvision 等。
* 2024年5月份，MetaID发布V2.0，全面支持 比特币 ，并进一步提高对UTXO架构区块链的跨链支持。

## MetaID V2.0 和旧版对比

|                   | V1.2          | V2.0              |
| ----------------- | ------------- | ----------------- |
| 愿景                | 成为最好的Web3基石协议 | **成为最好的Web3基石协议** |
| 统一树状结构            | 是             | **是**             |
| 基于MetaNet         | 是             | **否**             |
| 采用类Ordinals序数理论方案 | 否             | **是**             |
| 带资产协议             | 否             | **是**             |
| 跨链支持              | 弱             | **更好**            |


---

[Next Page](/llms-full.txt/1)

